![]()
![]()
![]()
In this chapter, you'll learn about issues you'll encounter when you design, build, and install Visual Basic applications in a multiple-user environment. The topic of creating multi-user applications is very broad, so I'll concentrate on a handful of
issues in this chapter. The focus will be the following:
Before I get into the details of coding multi-user features into your Visual Basic applications, I first want to touch on some points concerning multi-user programming in general.
Designing and creating multi-user applications is more than just making sure that you add error handlers to trap for database update conflicts. Good multi-user applications are designed with the user in mind. Applications that are well-designed,
multi-user programs enable users to modify the program environment to fit their needs and preferences. Good multi-user applications also are aware of the division between shared and localized resources. Some configuration data might be shared with all
users (location of needed files, system-level control parameters, and so on). Some other configuration data might be local to the logged-in users (their security profile, the last project data they were working on, and so on). Still other configuration
data might be local to the physical workstation (type of hardware available, location of non-shared resources on the workstation, and so on). Good multi-user applications take all these factors into account.
After you design your multi-user application, you need to distribute and install it. You must decide whether your application will operate only in a multi-user setting or be allowed to function as a stand-alone program. You also need to make sure your
program can locate and use all the needed resources, such as printers, modems, and disk drives. Finally, you need to make sure your program can locate and use any shared or local configuration information that might be stored on the workstation or at the
network level.
Before you begin coding your multi-user application, you should take time to think about the various multi-user aspects of your program. Will your application use a set of centrally located files? If so, you need to provide pointers in your program that
will identify the location of these files. If you hard code these values into your program, you'll have trouble when you install it somewhere else.
Typically, "pointer gathering" is done at the start of the program using INI or registry settings and internal variables. If your application opens a central database file, for example, you can load the location for an INI or registry setting
into your internal variable.
Listing 14.1 shows a typical technique for loading data from an INI setting into an internal variable. This routine usually is executed at the start of the program to establish the basic environment for the application.
Public Sub LoadINIVars()

    '

    ' read ini values into internal variables

    '

    ' attempt to access settings

    If OpenINI() = False Then

        Unload Me   ' oops!

    End If

    '

    cDatabase = GetIniStr("System", "Database", "c:\source\chap14\vbu1401.mdb")

    cLocalPrinter = GetIniStr("System", "LocalPrinter", "No")

    cLocalModem = GetIniStr("System", "LocalModem", "No")

    '

    ' get form size and location info

    '

    nFormWidth = GetIniStr("Forms", Me.Name + ".Width", "6800")

    nFormHeight = GetIniStr("Forms", Me.Name + ".Height", "4550")

    nFormLeft = GetIniStr("Forms", Me.Name + ".Left", "1200")

    nFormTop = GetIniStr("Forms", Me.Name + ".Top", "1300")

    '

    ' get confirmation flag

    gblConfirm = UCase(GetIniStr("system", "Confirm", "YES"))

    '

    ' get color set

    gblColorSet = UCase(GetIniStr("system", "ColorSet", "Default"))

    '

End Sub
If your software will be using other system resources, such as modems or printers, you need to make sure that your program can locate the resources and that it provides error handlers to take care of instances when these resources are not responding. It
is usually a good idea to test for the presence of these shared resources at the start of your program. If you need a modem to perform communications tasks with your program, for example, you should attempt to open and initialize the modem at startup. If
it is not responding, you can tell users about the problem before they enter a great deal of data and click the Send key.
Lastly, your application should allow individual users to customize their program environment to fit their own preferences. Whenever possible, you should let users choose the colors and fonts they prefer. The resulting selections should be stored by the
users so that each user can have his or her own set of preferences. The values typically are stored in a local INI file in the same directory that contains the Windows executable.
However, there might be cases where this is not an acceptable solution. There are times when some configuration data must be stored in a central location in order to give application administrators access to the data. In this case, the configuration
data can be stored in an INI-type file in a central location. This INI-type file can contain header sections that identify the configuration data by user. The sample INI file shown in Listing 14.2 is an example of storing multiple user data in a single INI
file.
[UserA.Settings]

LocalPrinter=Yes

ModemFound=No

ColorMonitor=Yes

[UserB.Settings]

LocalPrinter=No

ModemFound=Yes

ColorMonitor=No
When you finish coding your multi-user application, there are some additional items you should plan for when you distribute and install the program. If your application assumes the existence of INI files or other resources, you need to ship the
application with a default INI file or add routines to your application that will create these INI files. The configuration file creation can be a special configuration applet or a part of the user program.
If you must create files that will be used by all users, it usually is best to take care of this with a special configuration program that runs independently of the user application. A good example of this is a routine to create a set of new data tables
at installation time. You can write a small applet that creates the database and then creates empty tables.
The advantage of creating files of this type on-site, instead of shipping them with the application, is that users now have a method for re-creating these files without having to perform a complete installation. Also, if users want to perform an
installation to refresh some damaged programs, they don't need to worry about destroying their existing data at the same time.
Listing 14.3 shows how you might write a routine to create all your data tables. This routine can be part of an initial configuration program that is run immediately after installation.
Public Sub NewData()

    '

    ' create a new database

    '

    Dim dbFile As Database

    Dim cDBFile As String

    Dim cTable1 As String

    Dim cTable2 As String

    Dim nTemp As Integer

    '

    ' set vars

    cDBFile = "c:\source\chap14\ch1401.mdb"

    cTable1 = "CREATE TABLE Table1 (CustID TEXT(10),CustName TEXT(30),CustType

    _TEXT(10));"

    cTable2 = "CREATE TABLE Table2 (CustType TEXT(10),TypeName TEXT(20));"

    '

    ' kill any current database

    nTemp = MsgBox("Ready to Delete Any Existing Database?", vbInformation +

    _vbYesNo, "Create Database")

    If nTemp = vbNo Then

        MsgBox "Create Database Canceled"

    Else

        On Error Resume Next

        Kill cDBFile

        On Error GoTo 0

        '

        ' create empty DB

        Set dbFile = DBEngine.CreateDatabase(cDBFile, dbLangGeneral)

        '

        ' create tables

        dbFile.Execute cTable1

        dbFile.Execute cTable2

        '

        ' add additional tables, indexes, relations, etc.

        '

        MsgBox "Database has been Created"

    End If

End Sub
For configuration data that will be specific to each user, it usually is a good idea to add configuration routines to the user program. When the program is run for the first time at a workstation, these routines should create a configuration INI file
that contains default values. The user then can modify these values at any time to customize the application. Because this configuration file is local, any changes made by one user will not affect other users at other workstations.
A simple method for incorporating auto-generation of local configuration files is to automatically create and populate the local INI file at initial startup. You can store default values for all INI settings in your program or in an ASCII file that you
ship with the installation. These default values can be used at startup to create any missing settings. After the settings have been created, users should be able to use their version of the program to modify the settings they want.
Listing 14.4 shows how to write an INI-file read function that automatically creates missing entries by checking the return value from the GetSettings statement. If the return value is the same as the default value, the routine assumes that Windows
could not find the INI setting and immediately calls the INI-file write function.
Function GetIniStr(cSection As String, ByVal cItem As String, ByVal cDefault As

_String)

    '

    ' this routine looks for cItem

    ' in section cSection. If it

    ' is not found, the item is

    ' written using the cDefault

    ' value.

    '

    Dim cTemp As String

    '

    ' try to get it

    cTemp = GetSetting(gblIniFile, cSection, cItem, cDefault)

    '

    ' returned default? may be missing, write it to be sure

    If Trim(UCase(cTemp)) = Trim(UCase(cDefault)) Then

        SaveSetting gblIniFile, cSection, cItem, cDefault

    End If

    '

    GetIniStr = cTemp   ' set return value

    '

End Function
Some portions of a multi-user application must be shared among all users, such as central database files. Other portions, such as the local user preference INI file, must exist on the local workstation. Still other parts of an application, such as
common DLL files or other program modules, can exist in either location. You should consider the advantages and disadvantages when determining the final placement of shared application resources.
Placing shared resources in a central location makes it easy to maintain an application and can reduce the total amount of storage resources occupied by your application. Suppose that your application has a total of 1.5 MB of executable modules (EXEs
and DLLs). You need to roll out this application to 50 users on the same network server. If you place a single copy of the application on a shared network disk, your total program storage is only 1.5 MB. If you store the program at each workstation,
however, you'll be using 75 MB of disk space for the same program.
Although saving space is nice, there is the matter of program performance to consider, too. Sharing an application over a networked disk can dramatically decrease overall performance—not just for your application, but for the entire network. If
your program makes numerous calls to executables stored on the server, server traffic can skyrocket, causing even unrelated programs to become bogged down.
In situations where the installation requires that your program work in a diskless workstation environment, you have no choice but to locate your programs on the remote disk. However, because of the potential performance drain, it is recommended that
you install all executables at the workstation level.
Whether you are working in a diskless environment or at a powerful desktop workstation, you always should store any DLL, OCX, and VBX files in the \WINDOWS\SYSTEM directory.
In fact, if you do not store this information in the \WINDOWS\SYSTEM directory, you might run into serious problems. Windows assumes that the needed DLLs and other components will be stored in the SYSTEM directory; it looks there first. If the needed
item is not found in the SYSTEM directory, the directory that contains the EXE file that is currently running is checked next. If you store your components (DLLs and so on) in the same directory as the EXE file, youll be okay as long as no one installs a
component with the same name (possibly a different version) in the SYSTEM directory. If this does happen, you'll spend hours trying to figure out why your program is acting weird or hanging up entirely.
Always store DLLs, OCXs, VBXs, and other similar components in the user's \WINDOW\SYSTEM directory. This greatly reduces the possibility of encountering unexplained and difficult-to-diagnose fatal errors in your multi-user applications.
Writing programs that can be configured for user preferences is an important part of creating any multi-user application. Users should be able to configure their own colors and fonts, arrange and size forms when appropriate, and control some aspects of
program behavior (skip confirmations on deletes, display or hide a toolbar on the main form, and so on).
Most of this type of information can be stored in local INI-type configuration files. In the next several sections, we'll cover the use of INI files and explore several examples of user-configurable options you should consider for your multi-user
programs.
Multi-user applications need to allow for individual customization of selected aspects of the program. In the 16-bit Windows environment (Windows for WorkGroups and Windows 3.1), details about these customizations can be stored in a related INI file in
the user's \WINDOWS directory. In the 32-bit Windows environment (Windows 95 and Windows NT), this information is stored in the registry file. It is easy to read and write INI data using Visual Basic 4.0 GetSettings and SaveSettings statements. In some
cases, you will also need the GetWindowsDirectory API call. These can form the basis of a valuable set of library routines you can use in all your Visual Basic programs.
Listing 14.5 shows a short set of routines that make up a library file you can use in any Visual Basic program to read and write INI entries.
Open a new project in Visual Basic, add a BAS module to the project, and enter the code in Listing 14.5 in the declaration section of the module.
Option Explicit

'

' *** ini api declarations

'

#If Win16 Then

Declare Function OSGetWindowsDirectory% Lib "Kernel" Alias "GetWindowsDirectory"

_(ByVal a$, ByVal b%)

#End If

'

#If Win32 Then

Declare Function OSGetWindowsDirectory Lib "kernel32" Alias "GetWindowsDirectoryA"

_(ByVal lpBuffer As String, ByVal nSize As Long) As Long

#End If

'

Global gblIniFile As String ' name of INI file

Global gblWinDir As String  ' name of Windows launch directory
Now add the function that will return the Windows launch directory. Create a new function called GetWinDir and enter the code shown in Listing 14.6.
Function GetWinDir() As String

    '

    ' get the Windows launch dir

    '

    Dim cTemp As String

    Dim nTemp As Integer

    '

    cTemp = String$(255, 32)    ' reserve space

    nTemp = OSGetWindowsDirectory(cTemp, 255) ' call API

    GetWinDir = Left$(cTemp, nTemp) ' set return value

End Function
Now create a new function called WriteINIStr and enter the code shown in Listing 14.7.
Function WriteINIStr(ByVal cSection, ByVal cItem, ByVal cDefault) As Integer

    '

    ' write cKeyName into cSection

    SaveSetting gblIniFile, cSection, cItem, cDefault

    WriteINIStr = True  ' in case they ask!

    '

End Function
Now, create a new function called GetINIStr and enter the code shown in Listing 14.8.
Function GetIniStr(cSection As String, ByVal cItem As String, ByVal cDefault As

_String)

    '

    ' this routine looks for cItem

    ' in section cSection. If it

    ' is not found, the item is

    ' written using the cDefault

    ' value.

    '

    Dim cTemp As String

    '

    ' try to get it

    cTemp = GetSetting(gblIniFile, cSection, cItem, cDefault)

    '

    ' returned default? may be missing, write it to be sure

    If Trim(UCase(cTemp)) = Trim(UCase(cDefault)) Then

        SaveSetting gblIniFile, cSection, cItem, cDefault

    End If

    '

    GetIniStr = cTemp   ' set return value

    '

End Function
Notice that this routine does more than just read an INI entry. If the entry is determined to be missing, this routine automatically adds that entry, using the default value supplied. This makes it very easy to automatically create
fully populated INI files when a user first starts up the newly installed application.
We need to add one more routine to our library. This routine will handle differences between the 16-bit and 32-bit versions of Windows. In 16-bit environments, all settings are stored in an ASCII text file. We will need to make sure that file is present
and available to our 16-bit application. In the 32-bit environment, this routine just confirms the name of the registry key we will use.
Create a new function called OpenINI and add the following code, as in Listing 14.9.
Public Function OpenINI(Optional cININame As Variant)

    '

    ' For 32-bit

    '   set gblIniFile name for registry calls

    '

    ' For 16-bit

    '   set gblIniFile name for File calls

    '   if not there, create a new one

    '

    OpenINI = True  ' assume all goes OK

    '

    If IsMissing(cININame) Then ' no parm passed?

        cININame = App.EXEName  ' set to this app

    End If

    gblIniFile = Trim(cININame) ' clean up spaces

    '

    Dim nFile As Integer        ' for file channel

    Dim cFile As String         ' for file name

    '

    ' If we're running in 16-bit environment

    ' we have to get to a file in the Windows

    ' launch directory. We'll make sure it's

    ' there and create a new one if needed.

    '

    #If Win16 Then

        On Error Resume Next    ' keep quiet about errors

        nFile = FreeFile        ' get free file channel

        cFile = gblIniFile + ".INI" ' fill out file name

        Open cFile For Input As nFile   ' try to open it

        If Err <> 0 Then        ' some error

            If Err = 53 Then    ' was it 'FileNotFound?'

                Open cFile For Output As nFile  ' create it

            Else    ' uh-oh....

                MsgBox Error$, vbCritical, "Error opening INI File - " + Str(Err)

                OpenINI = False ' we failed!

            End If

        End If

        Close nFile 'close channel

    #End If

    '

End Function
Save this module with the name libINI.bas. Now let's add a bit of code to the main form of the project to show how the INI library works.
First add the form-level variables shown in Listing 14.10 to the form.
Option Explicit

'

' internal vars for INI values

'

Dim cDatabase As String

Dim cLocalPrinter As String

Dim cLocalModem As String
Next, create a subprocedure called LoadINIVars and add the code shown in Listing 14.11.
Public Sub LoadINIVars()

    '

    ' read ini values into internal variables

    '

    ' attempt to access settings

    If OpenINI() = False Then

        Unload Me   ' oops!

    End If

    '

    cDatabase = GetIniStr("System", "Database", "c:\source\chap14\vbu1401.mdb")

    cLocalPrinter = GetIniStr("System", "LocalPrinter", "No")

    cLocalModem = GetIniStr("System", "LocalModem", "No")

    '

    ' get form size and location info

    '

    nFormWidth = GetIniStr("Forms", Me.Name + ".Width", "6800")

    nFormHeight = GetIniStr("Forms", Me.Name + ".Height", "4550")

    nFormLeft = GetIniStr("Forms", Me.Name + ".Left", "1200")

    nFormTop = GetIniStr("Forms", Me.Name + ".Top", "1300")

    '

    ' get confirmation flag

    gblConfirm = UCase(GetIniStr("system", "Confirm", "YES"))

    '

    ' get color set

    gblColorSet = UCase(GetIniStr("system", "ColorSet", "Default"))

    '

End Sub
This routine attempts to open the INI file (16-bit only). If it is not found (and a new file couldn't be created), an error is returned and the program is halted. If OpenINI returns TRUE, the routine attempts to read three INI settings in the file.
Because of the behavior of your GetINIStr function, if these settings are missing from the INI file, they will be created with the default values.
Now add one more routine to the form. This will display the INI readings captured in the LoadINIVars routine. Place the code shown in Listing 14.12 in the Form_Activate event.
Private Sub Form_Activate()

    LoadINIVars ' read INI stuff

    Me.Cls

    Me.Print "gblIniFile="; gblIniFile

    Me.Print "cDatabase="; cDatabase

    Me.Print "cLocalPrinter="; cLocalPrinter

    Me.Print "cLocalModem="; cLocalModem

    '

End Sub
This routine first calls the INI read routine, and then displays the results on the form. Save this form as vbu1401.frm and save the project as vbu1401.vbp. Now run the project and view the results. Your screen should look like the screen shown in
Figure 14.1.
FIGURE 14.1. Displaying INI file results.
If you are running the 16-bit version of Visual Basic, you now have a new INI file in your \WINDOWS directory called vbu1401.ini. Use Notepad or some other ASCII editor to load and view this file. It should look like Listing 14.12.
If you are running the 32-bit version of Visual Basic, you now have a new set of entries in the Windows registry. Use RegEdit.EXE to open the registry and look under the key "HKEY_CURRENT_USERS\Software\VB and VBA Program Settings\vbu1401."
You'll see the same values shown in Listing 14.13.
[System]

Database=c:\source\chap14\vbu14.mdb

LocalPrinter=No

LocalModem=No
A common user preference is the capability to remember the size and placement of program windows within the application. It always is annoying to have to continually rearrange windows on a screen each time you start the program. Listing 14.13 shows how
this information can be stored and recalled the next time the program is started. Because this data is stored in the local INI file, multiple users can arrange their forms to their liking without affecting the forms arrangement for other users of the same
application.
Add the form-level variables shown in Listing 14.14 to the declaration section of the form.
'

' form size/location

Dim nFormWidth As Integer

Dim nFormHeight As Integer

Dim nFormLeft As Integer

Dim nFormTop As Integer
Now add the code shown in Listing 14.15, which will read the new INI settings at the end of the LoadINIVars routine.
    '

    ' get form size and location info

    '

    nFormWidth = GetIniStr("Forms", Me.Name + ".Width", "6800")

    nFormHeight = GetIniStr("Forms", Me.Name + ".Height", "4550")

    nFormLeft = GetIniStr("Forms", Me.Name + ".Left", "1200")

    nFormTop = GetIniStr("Forms", Me.Name + ".Top", "1300")

    '
Notice that you are using the form name as part of the INI setting. This means that you can use this code to store different forms without changing your code.
Now add the code that will use the variables to update the form properties. Add the lines shown in Listing 14.16 to the Form_Activate routine. Insert these lines right after the LoadINIVars line and before the Me.Cls line.
    '

    ' resize based on INI settings

    '

    Me.Left = nFormLeft

    Me.Width = nFormWidth

    Me.Height = nFormHeight

    Me.Top = nFormTop
Finally, add the code that will update the INI file with the current form properties (see Listing 14.17). You'll do this in the Form_Unload event.
Private Sub Form_Unload(Cancel As Integer)

    '

    ' store form size & location

    '

    Dim lTemp As Long

    Dim cForm As String

    '

    cForm = Me.Name

    '

    lTemp = WriteINIStr("Forms", cForm + ".Top", Str(Me.Top))

    lTemp = WriteINIStr("Forms", cForm + ".Left", Str(Me.Left))

    lTemp = WriteINIStr("Forms", cForm + ".Width", Str(Me.Width))

    lTemp = WriteINIStr("Forms", cForm + ".Height", Str(Me.Height))

    '

End Sub
Now save this form and run it. The first time it runs, you'll see no change in the form's size or location. Now use your mouse to resize and move the form, and then close the form (use the standard form buttons, not the Visual Basic End button). Now
restart the form. This time, the form is sized and located in the same way you left it (see Figure 14.2).
FIGURE 14.2. Recalling the resized form.
This example performs the resizing and relocating within the Form_Activate event. To keep the code simple, you usually should perform this task in the Form_Load event so that the user will not see the form move or resize.
Now use Notepad to load and view the modified vbu1401.ini file or registry entries. Your values for these settings may differ from the ones shown in Listing 14.18.
[System]

Database=c:\source\chap14\vbu14.mdb

LocalPrinter=No

LocalModem=No

[Forms]

Form1.Width= 3210

Form1.Height= 3255

Form1.Left= 2715

Form1.Top= 1485
One of the most common user customizations is the capability to alter the colors displayed on the user's monitor. Providing this level of customization is essential for any good multi-user application. It also is a fairly straightforward task if you
follow a short list of guidelines.
The simplest way to provide users with the capability to customize the colors used within your program is to make sure your program uses the current Windows color scheme for all forms and controls. That way, whenever users change their Windows colors,
your program follows suit. You can use a set of defined constants to get the current Windows color settings. Table 14.1 lists these defined constants, their values, and descriptions of what the constants represent in the Windows color scheme.
Constant |
Value |
Description |
|
vbScrollBars |
0x80000000 |
Scroll bar color |
|
vbDesktop |
0x80000001 |
Desktop color |
|
vbActiveTitleBar |
0x80000002 |
Color of title bar for active window |
|
vbInactiveTitleBar |
0x80000003 |
Color of title bar for inactive window |
|
vbMenuBar |
0x80000004 |
Menu background color |
|
vbWindowBackground |
0x80000005 |
Window background color |
|
vbWindowFrame |
0x80000006 |
Window frame color |
|
vbMenuText |
0x80000007 |
Color of text on menus |
|
vbWindowText |
0x80000008 |
Color of text in windows |
|
vbTitleBarText |
0x80000009 |
Color of text in caption, size box, and scroll arrow |
|
vbActiveBorder |
0x8000000A |
Border color of active window |
|
vbInactiveBorder |
0x8000000B |
Border color of inactive window |
|
vbApplicationWorkspace |
0x8000000C |
Background color of multiple-document interface (MDI) applications |
|
vbHighlight |
0x8000000D |
Background color of items selected in a control |
|
vbHighlightText |
0x8000000E |
Text color of items selected in a control |
|
vbButtonFace |
0x8000000F |
Color of shading on the face of command buttons |
|
vbButtonShadow |
0x80000010 |
Color of shading on the edge of command buttons |
|
vbGrayText |
0x80000011 |
Grayed (disabled) text |
|
vbButtonText |
0x80000012 |
Text color on pushbuttons |
|
vbInactiveCaptionText |
0x80000013 |
Color of text in an inactive caption |
|
vb3Dhighlight |
0x80000014 |
Highlight color for 3D display elements |
|
vb3DDKShadow |
0x80000015 |
Darkest shadow color for 3D display elements |
|
vb3Dlight |
0x80000016 |
Second lightest of the 3D colors after vb3DHighlight |
|
vbInfoText |
0x80000017 |
Color of text in ToolTips |
|
vbInfoBackground |
0x80000018 |
Background color of ToolTips |
The values in Table 14.1 that you will most commonly use as the core of your color scheme are vbWindowBackground and vbWindowText for standard form background and form foreground values, respectively. These also can be used for standard control
background and control foreground. You can use the vbApplicationWorkspace for the background color of your MDI forms. Use the vbHighlight and vbHightlighText values for any controls or text that should be highlighted (active input controls, selected values
in a listbox, and so on). You can use any of the color values you want in your Visual Basic applications, but be sure you are not confusing the user by misapplying the color used by Windows (don't use the disabled text color (vbGrayText) for all your
active input controls, for example).
Listing 14.19 shows how you can use the system color constants to set the colors for your forms. Create a new subprocedure in the vbu1401.vbp project and add this code.
Public Sub LoadSysColors()

    '

    ' load the colors from the current

    ' Windows color scheme

    '

    Dim ctlTemp As Control

    '

    ' set colors for all controls on form

    On Error Resume Next

    For Each ctlTemp In Me.Controls

        ctlTemp.BackColor = vbWindowBackground

        ctlTemp.ForeColor = vbWindowText

    Next

    On Error GoTo 0

    '

    ' set colors for form itself

    Me.BackColor = vbApplicationWorkspace

    Me.ForeColor = vbWindowText

    '

End Sub
The code in Listing 14.18 loops through all the controls on the form and attempts to set their foreground and background colors to match the standard colors for the current color scheme. Notice the On Error Resume Next and On Error Goto 0
statements. This is done to prevent error messages from occurring if you try to set colors for controls that have no ForeColor or BackColor properties. Because the idea is to have your application change whenever the Windows color scheme changes, you do
not save the colors setting in the user's INI file.
Add a line to the Form_Load event that calls the LoadsysColors routine. Place this line right after the LoadINIVars line. Now save and run the project to see the slightly different color scheme you now have for the sample program.
If you want to give users the capability to set and retain their own color values, you need to provide an input form for them to select their desired colors. In our example, we will stick to the standard foreground and background colors for the input
and form controls. Use Figure 14.3 as a guide in laying out new controls on the existing form.
FIGURE 14.3. Laying out the custom color form.
Add a single command button to the form. Set its Name property to cmdColor and then use Copy and Paste to create a command button array with four members (0..3). After adding two text controls and two label controls, add a single common dialog control.
You'll use that to call up the Windows colors dialog box.
First add the form-level variables shown in Listing 14.20 to the declaration section of the default form.
'

' colors

'

Dim lUserColor(4) As Long

Const vbuFormBG = 1

Const vbuFormFG = 2

Const vbuControlBG = 3

Const vbuControlFG = 4
Now add the code shown in Listing 14.21 to the cmdColor_Click event.
Private Sub cmdColor_Click(Index As Integer)

    '

    ' handle user color settings

    '

Select Case Index

        Case 0

            ' form back color

            CommonDialog1.DialogTitle = "Select Form Background Color"

            CommonDialog1.ShowColor

            lUserColor(Index + 1) = CommonDialog1.Color

        Case 1

            ' form fore color

            CommonDialog1.DialogTitle = "Select Form Foreground Color"

            CommonDialog1.ShowColor

            lUserColor(Index + 1) = CommonDialog1.Color

        Case 2

            ' control back color

            CommonDialog1.DialogTitle = "Select Control Background Color"

            CommonDialog1.ShowColor

            lUserColor(Index + 1) = CommonDialog1.Color

        Case 3

            ' control fore color

            CommonDialog1.DialogTitle = "Select Control Foreground Color"

            CommonDialog1.ShowColor

            lUserColor(Index + 1) = CommonDialog1.Color

    End Select

    '

    ' set object colors

    SetUserColors

    '

End Sub
Listing 14.21 calls the Color dialog box for each designated color value. The returned color is stored in the lUserColor array, and then the objects are updated with the current color settings.
Now add the routine that actually uses the values set by the user to set the Color properties. Create a new subprocedure called SetUserColors and add the code shown in Listing 14.22.
Public Sub SetUserColors()

    '

    ' set the form and controls

    ' to the selected colors

    '

    Dim ctlTemp As Control

    '

    ' first the form

    Me.BackColor = lUserColor(vbuFormBG)

    Me.ForeColor = lUserColor(vbuFormFG)

    '

    ' now all controls

    On Error Resume Next

    For Each ctlTemp In Form.Controls

        ctlTemp.BackColor = lUserColor(vbuControlBG)

        ctlTemp.ForeColor = lUserColor(vbuControlFG)

    Next

    On Error GoTo 0

    '

End Sub
Now add the code to the Form_Unload event that will write these values out to the INI file (see Listing 14.23).
    lTemp = WriteINIStr("forms", cForm + ".formBG", Str(lUserColor(lFormBG)))

    lTemp = WriteINIStr("forms", cForm + ".formFG", Str(lUserColor(lFormFG)))

    lTemp = WriteINIStr("forms", cForm + ".controlBG", Str(lUserColor(lControlBG)))

    lTemp = WriteINIStr("forms", cForm + ".controlFG", Str(lUserColor(lControlFG)))

    '
And finally, add the code that reads the INI settings at startup and sets the initial color values (see Listing 14.24).
Public Sub LoadUserColors()

    '

    ' load colors from ini file

    '

    Dim cTemp As String

    '

    cTemp = GetIniStr("Forms", Me.Name + ".formBG", Str(Me.BackColor))

    lUserColor(lFormBG) = Val(cTemp)

    '

    cTemp = GetIniStr("Forms", Me.Name + ".formFG", Str(Me.ForeColor))

    lUserColor(lFormFG) = Val(cTemp)

    '

    cTemp = GetIniStr("Forms", Me.Name + ".controlBG", Str(Text1.BackColor))

    lUserColor(lControlBG) = Val(cTemp)

    '

    cTemp = GetIniStr("Forms", Me.Name + ".controlFG", Str(Text1.ForeColor))

    lUserColor(lControlFG) = Val(cTemp)

    '

    SetUserColors

End Sub
Add the following line to the Form_Activate event right after the LoadSysColors line. This forces the user colors onto the form at startup:
LoadUserColors
Now save and run the vbu1401.vbp project. The first time you run this, you won't see any difference in the color scheme. After you use the command buttons to select your colors, exit the form (don't use the Visual Basic Stop button). The next time you
start the program, you'll see the colors you selected instead of the original colors.
Another way to make sure your multi-user applications are able to handle individual user configuration is to allow users to control some aspects of the program behavior. Advanced users might not need to see a confirmation message each time they attempt
to update a value on-screen, for example, but novice users might like the feature. You can make this a user-configurable feature by adding a few lines of code and a new INI setting.
The code shown in Listing 14.25 adds a confirmation dialog box to the color setting command buttons. Add this code to the cmdColor_Click event. This code replaces the single SetUserColors line that is already in the routine.
    '

    ' check for confirmation first

    If gblConfirm = "YES" Then

        nTemp = MsgBox("Update Current Color Scheme?", vbInformation + vbYesNo,

                _"Color Configuration")

    Else

        nTemp = vbYes

    End If

    '

    ' if ok, then update colors

    If nTemp = vbYes Then

        SetUserColors   ' set colors

    End If

    '
This code first checks to see whether a confirmation message should be sent, and then acts accordingly. Be sure to add a line at the top of the routine to initialize the nTemp variable as an integer:
dim nTemp as integer
You also need to add a new line to the declaration section:
dim gblConfirm as string
Now add the following lines to the LoadINIVars routine:
    '

    ' get confirmation flag

    gblConfirm = UCase(GetIniStr("system", "Confirm", "YES"))

    '
Now save and run the project. When you attempt to change a color, you'll see a confirmation message (see Figure 14.4).
FIGURE 14.4. Displaying the optional confirmation message.
Load the vbu1401.ini file into Notepad, change the Confirm setting in the [System] section to No, and rerun the program. Now you will not see any confirmation when you attempt to change colors.
Usually applications provide check-off menu items to toggle these types of features on and off. The following listings add this menu feature to the current project. At the same time, the examples show another recommended feature for your
user-configurable applications. The Preferences menu enables users to restore the original color scheme. This is highly recommended because users often will create unusable color schemes and will want to immediately restore the default values to clear out
the unwanted selections.
Add one more line to the declarations section of the form. Place this line in the colors section of the listing:
Dim gblColorSet As String
Now create a subprocedure called LoadDefaultColors and enter the code shown in Listing 14.26. This routine resets the color variables to the initial startup values.
Public Sub LoadDefaultColors()

    '

    ' load the original color set

    '

    lUserColor(vbuFormBG) = &H8000000F

    lUserColor(vbuFormFG) = &H80000012

    lUserColor(vbuControlBG) = &H80000005

    lUserColor(vbuControlFG) = &H80000008

    '

    SetUserColors

End Sub
Now add the code that will read the new INI setting to the LoadINIVars routine:
    '

    ' get color set

    gblColorSet = UCase(GetIniStr("system", "ColorSet", "Default"))

    '
Then add the code to the Form_UnLoad event that will save the new INI value (see Listing 14.27). Also, wrap the lines that store the form color INI settings in an If...Then...End If structure. You only want to save the colors if they are the User
settings.
If gblColorSet = "USER" Then

        lTemp = WriteINIStr("forms", cForm + ".formBG", Str(lUserColor(vbuFormBG)))

        lTemp = WriteINIStr("forms", cForm + ".formFG", Str(lUserColor(vbuFormFG)))

        lTemp = WriteINIStr("forms", cForm + ".controlBG",

        _Str(lUserColor(vbuControlBG)))

        lTemp = WriteINIStr("forms", cForm + ".controlFG",

        _Str(lUserColor(vbuControlFG)))

    End If

    '

    lTemp = WriteINIStr("System", "ColorSet", gblColorSet)
Now add the menu to the project. Use Table 14.2 as a guide.
Caption |
Menu |
|
&File |
mnuFile |
|
E&xit |
mnuFileExit |
|
&Preferences |
mnuPref |
|
&Default Colors |
mnuPrefDefaultColor |
|
&System Colors |
mnuPrefSysColor |
|
&UserColors |
mnuPrefUserColor |
Now add the code shown in Listing 14.28 for each of the menu items.
Private Sub mnuPrefDefaultColor_Click()

    '

    mnuPrefUserColor.Checked = False

    mnuPrefSysColor.Checked = False

    mnuprefdefaultcolor.Checked = True

    gblColorSet = "DEFAULT"

    LoadDefaultColors

    '

End Sub

Private Sub mnuPrefSysColor_Click()

    '

    mnuprefdefaultcolor.Checked = False

    mnuPrefUserColor.Checked = False

    mnuPrefSysColor.Checked = True

    gblColorSet = "SYSTEM"

    LoadSysColors

    '

End Sub

Private Sub mnuPrefUserColor_Click()

    '

    mnuprefdefaultcolor.Checked = False

    mnuPrefSysColor.Checked = False

    mnuPrefUserColor.Checked = True

    gblColorSet = "USER"

    LoadUserColors

    '

End Sub

Private Sub mnuFileExit_Click()

    Unload Me

End Sub
These routines set the proper menu check item, update the color INI variable, and update the color set itself. Now you need to modify the Form_Activate routine to initialize the proper color scheme at startup. Replace the calls to LoadSysColors and
LoadUserColors with the lines of code shown in Listing 20.29.
    '

    Select Case gblColorSet

        Case "DEFAULT"

            mnuPrefDefaultColor_Click

        Case "SYSTEM"

            mnuPrefSysColor_Click

        Case "USER"

            mnuPrefUserColor_Click

     End Select

    '
Now the program will read the color set flag to determine the color set to use. If the color set flag is set to USER, the routine loads the user values from the INI file and updates the form.
Save and run the project. When you load the project, the default color scheme appears. You can change that by selecting a new scheme from the menu. You still can update the user color set and save that, too.
These are just a few examples of how you can design your application to allow multiple users to have their own customized version of your Visual Basic program. You can expand on each of the examples here to improve their flexibility and increase the
number of options and features you allow your users to customize.
Probably the most frequently talked about multi-user programming issue for Visual Basic (or any other language) is that of database locking. Although all database programmers must deal with this issue in some fashion, Visual Basic programmers have the
somewhat dubious honor of having to deal with database locking in a rather unique environment. The Microsoft Jet database engine provides three levels of locking within databases:
Those familiar with the common PC database packages (dBASE, FoxPro, Paradox, and so on) will notice that an important additional locking level is missing from this list: record-level locking. The Microsoft Jet database engine does not provide
record-level locking for the native database format (Microsoft Access MDB-type databases) and only provides record-level locking when the Microsoft Jet is used to directly open compatible non-Microsoft Jet databases, such as FoxPro, Paradox, and so on.
In this section, you'll review the three locking levels provided by Microsoft Jet, focusing more time on the issues related to page-level locking. This chapter also contains three other techniques for reducing the occurrence of locking conflicts and
speeding the processing of Visual Basic database programs. These other techniques include the use of Visual Basic Data Access Object Relation objects to improve cross-table integrity and locking, the use of a manual lock table to reduce unwanted lock
conflicts when updating databases, and a method of employing temporary local batch input tables to speed data entry and reduce the need for constant access to busy database tables.
Although it is essential to understand how Microsoft Jet locking behavior affects your multi-user applications, it is even more important to know when locking is an appropriate way to solve your programming problems. Typically, locking methods are used
whenever database updates (adds, edits, or deletes) occur. In these cases, the locking produces a static condition in the database until the update is completed. There are other times when your Visual Basic program might need to ensure a static database to
properly perform critical operations, such as totals calculations or lengthy report production.
Although some of these problems can be solved by locking the required tables or the entire database during the operation, it is not always necessary to do so. Time-sensitive calculations and reporting can be performed on a private copy of the needed
data tables. These private tables can be created at the moment the calculation or report is to be performed, and then destroyed at the end of the critical process.
Listing 14.30 shows how you can use table copies to increase integrity without using table locking when starting a lengthy set of reports for an accounting system.
Public Sub ProcMonthEndReports()

    '

    ' create copies of required tables

    '

    db.Execute "SELECT Master.* INTO MER_Master FROM Master;"

    db.Execute "SELECT Trans.* INTO MER_Trans FROM Trans;"

    db.Execute "SELECT Orders.* INTO MER_Orders FROM Orders;"

    '

    ' now run reports

    ReportMonthlyTrans' report transactions

    ReportMonthlyOrders' report orders

    '

    ' kill temporary tables

    db.Execute "DROP TABLE MER_Master;"

    db.Execute "DROP TABLE MER_Trans;"

    db.Execute "DROP TABLE MER_Orders;"

    '

End Sub
Using this technique often can reduce the number of database update conflicts you encounter in your program. It also can increase processing speed because users performing updates never experience any "hits" on their tables during the
reporting process. Reports also can run faster for the same reason.
If you need to perform mass updates to database tables, you cannot use the copy method because you need to act on "live" data throughout the update process. In these cases, you should consider database or table-level locking for your solution.
High-level locking schemes available within the Microsoft Jet engine include locking at the database level and at the data table or recordset level. This locking level is handy when you need to perform mass updates on one or more tables and you want to
reduce the chance of encountering update conflicts during the process.
Typically, database-level locking is used when your update operation will affect more than one table in the database. A good example of this kind of operation is an update that performs mass changes to the part numbers in an inventory database. It is
likely that this part number appears in not only the master parts table, but also in pending order tables, return or reject item tables, and other control and report tables. Changing the part number in just one record can affect several tables within the
database. If you have a busy application (a great deal of traffic and/or many users), it's quite likely that someone will be holding at least one record that contains the part number you are updating. If so, your entire update process could be halted
unless you clear all users out of the system before you start the update.
Locking at the table or recordset level typically is used when your update operation will affect multiple records within the same table or recordset. A good example of this operation is the mass removal of all records for a specific customer from the
history table of a revenue accounting system. Depending on the size of the data table, this operation could affect hundreds of records. You can reduce the chance that an operation of this type will fail by locking other users out of the table before you
begin.
You should consider using database-level locking whenever you are about to perform a mass update (or delete) operation that will affect more than one table within the database. Keep in mind that the existence of enforced database integrity relation
objects can widen the effects of even a simple single-record update. If you plan on deleting a single row from the master table of a database where you have well-defined and enforced relationships to several related transaction and history tables, for
example, this single delete could affect tens of records in several tables within the database. If you plan on deleting several rows from the same master table, you easily could be up for deleting hundreds of records from the database.
To lock a database, you must open it for exclusive use. This prevents any other users from opening the database until you close the database completely. You can open a database for exclusive use by setting the Exclusive property of the data control to
True or by using the optional Exclusive parameter in the OpenDatabase method (see Listing 14.31).
Private Sub Form_Load()

    Dim db As Database

    '

    ' open db exclusively

    Set db = WorkSpaces(0).OpenDatabase("c:\source\chap14\ch1402.mdb", True)

    MsgBox "Database Opened Successfully", vbInformation, "Open DB"

    '

End Sub
If you attempt to open a database exclusively and there is at least one other program that has the database open, you'll get an error 3356: Database is opened by user username on machine machinename (see Figure 14.5).
You may also get an error 3196, Couldn't use database name; database already in use, or an error 3045, Couldn't
use name; file already in use.
You can add logic to your Visual Basic program that traps for these errors and tells users to attempt to open the database later. You should add this code to the startup of your application if you intend to use database-level locking anywhere in your
program (see Listing 14.32).
FIGURE 14.5. Attempting to open a locked database.
Private Sub Form_Load()

    Dim db As Database

    '

    ' open db exclusively

    On Error GoTo FormLoadErr

    '

    Set db = OpenDatabase("c:\source\chap14\ch1402.mdb", True)

    MsgBox "Database Opened Successfully", vbInformation, "Open DB"

    '

    GoTo FormLoadExit

    '

FormLoadErr:

    If Err = 3356 or Err = 3196 or Err = 3045 Then

        MsgBox "Database Locked for Maintenance - Try again later", vbCritical,

        _"Open DB"

    Else

        MsgBox Error$, vbCritical, "Error " + Str(Err)

    End If

    Unload Me

    End

    '

FormLoadExit:

    '

End Sub
When you are using the Visual Basic data control to open the database with the Exclusive property set to True, you can trap for error 3196 by placing the error logic in the Error event of the data control, as shown in Listing 14.33.
Private Sub Data1_Error(DataErr As Integer, Response As Integer)

    If DataErr = 3356 or DataErr = 3196 or DataErr = 3045 Then

        MsgBox "Database Locked for Maintenance - Try again later", vbCritical,

        _"open DB"

    Else

        MsgBox Error$, vbCritical, "Error " + Str(Err)

        Unload Me

        End

    End If

End Sub
Table- and recordset-level locking should be used whenever you plan to perform mass updates on a single table or recordset (see Listing 14.34). If you plan to update all the wholesale prices in the inventory file, for example, you should lock the
inventory price table before you begin.
Public Sub UpdatePrices()

    '

    ' update all inventory wholesale prices

    '

    Dim dbFile As Database

    Dim rsTable As Recordset

    '

    ' open db

    Set dbFile = DBEngine.OpenDatabase("c:\source\chap14\ch1402.mdb")

    '

    ' open table exclusively

    Set rsTable = dbFile.OpenRecordset("InvPrice", dbOpenTable, dbDenyRead)

    '

    ' perform mass update

    '

    On Error Resume Next    ' ignore errors

    Workspaces(0).BeginTrans ' start trans tracking

    While Not rsTable.EOF   ' for every row

        rsTable.Edit        ' start edit

        rsTable.Fields("WholesalePrice") = rsTable.Fields("WholesalePrice") * 1.05

        rsTable.Update      ' end edit

    Wend                    ' get another

    If Err = 0 Then         ' no errors

        Workspaces(0).CommitTrans    ' final update

        MsgBox "Wholesale Prices Updated", vbInformation, "Inventory"

    Else                    ' trouble

        Workspaces(0).Rollback   ' undo all edits

        MsgBox "Wholesale Price Update Failed", vbCritical, "Error " + Str(Err)

    End If

    On Error GoTo 0         ' tell me about errors!

    '

    ' close and release lock

    dbFile.Close

End Sub
Notice the use of transaction processing in Listing 14.33. If any error occurs during the update, the entire process can be rolled back. The use of transaction keywords is highly recommended whenever you perform mass updates to databases.
You can open a table for exclusive use by using the Visual Basic data control, setting the Options property to 2 (dbDenyRead), and filling in the DataSource property with the name of the table you want to lock. This can be done at design time or at
runtime with Visual Basic code.
The code example in Listing 14.35 sets the Options property of a data control in order to perform an exclusive table open.
 '

' set to open table exclusively

'

Data1.Options = 2

Data1.DatabaseName = c:\source\chap14\ch1402.mdb

Data1.RecordSource = InvPrice
If your Visual Basic program will perform any table locks, you should provide error-handling code in all your startup routines or any other location that attempts to open a table. You can trap for Error 3008, Table tablename is exclusively locked
and Error 3009, Couldn't lock table name; currently in use. Add this code in the same module that contains the OpenRecordSet statement. If you are using the Visual Basic data control, add the error trapping logic to the Error event of the data
control.
Locking at the recordset level affects all underlying tables used to make up the data set. If you have only one table as the source of the recordset, you will see the same effects you see when you perform a lock on a table object. However, if your
recordset is the product of a complex query that contains JOINs, UNIONs, or subqueries, the lock could affect several tables at once.
For example, the query shown in Listing 14.36 contains a JOIN statement that combines two tables into a single query.
SELECT [Department Name],

FirstName & " " & LastName AS Name

FROM Departments LEFT JOIN Employees

ON Departments.[Department ID] = Employees.[Department ID]

ORDER BY [Department Name];
This query affects two tables (Departments and Employees). If this query were used to create a locked recordset, both tables would be locked to all users.
Although multi-table recordset locking is very useful when performing mass updates, it can be annoying in a multi-user environment. Because multiple tables are affected, it often is difficult to successfully open a locked recordset in a busy
application. Also, once the recordset is locked, it is possible that many users will be adversely affected by the lock operation. This can lead to numerous access denials, attempted re-reads, and time-out conditions. All this might make users think your
application is coming loose at the hinges! Because the effects of a recordset lock can be far-reaching, it is recommended that you use it sparingly, if at all. If you need to perform an update on a complex, multi-table recordset, consider performing a
database lock before you begin the update process.
The lowest level of locking provided by the Microsoft Jet database engine is at the page level. A page is always 2K in size. Page locking is automatic and cannot be turned on or off through Visual Basic code or via any property settings. Each time you
attempt to save or edit a record, the Microsoft Jet automatically locks a page of data.
A data page can contain one or more records, depending on the size of the record. If the data record is 2K in size, each data page contains a single data record. If the data record is 200 bytes in size, then each data page contains 10 records. If a data
record is larger than 2K, Microsoft Jet locks all the pages needed to lock an entire data record.
The Microsoft Jet database engine has two forms of low-level page locking: pessimistic (the default) and optimistic. Under pessimistic locking, data pages are locked as soon as a user begins to edit a record. Under optimistic locking, data pages are
locked only at the moment a user attempts to save the updated record to the database. In both pessimistic and optimistic locking, the page lock stays active until the Edit operation is completed successfully or canceled by the user.
You can set the page-locking option (pessimistic or optimistic) by setting the LockEdits property of the record set. When LockEdits = True, pessimistic locking is in place. When LockEdits = False, optimistic locking is in place. The code examples in
Listing 14.37 show how this is done.
' setting page locking with the data control

Data1.Recordset.LockEdits = True ' pessimistic locking

Data2.Recordset.LockEdits = False ' optimistic locking

'

' setting page locking with Visual Basic code

rsObject1.LockEdits = True ' pessimistic locking

rsObject2.LockEdits = False ' optimistic locking

'
Pessimistic locking is the default page-locking method. Under the pessimistic locking scheme, pages are locked when the Edit method is invoked using Visual Basic code. If you are using the Visual Basic data control, the page is locked when the current
record is selected using the reposition event. The lock stays in effect until the Visual Basic code Update or Cancel method is used or when the record pointer is advanced past the previously locked record using the data control.
Under pessimistic locking, the data pages stay locked the longest amount of time (from Edit to Update). Once USERA begins to edit a record, for example, that record cannot be edited by USERB until USERA commits an Udpate or Cancel operation to match the
Edit that started the page lock. This ensures the greatest level of database integrity because both users cannot edit the same record at the same time.
The disadvantage of pessimistic locking is that the long locks increase the odds that users will encounter page-locking conflicts. This is especially true if your data tables have small record sizes. Because all locking is done in 2K increments, updates
of small records result in page locks in several records at the same time. If a page contains twenty 100-byte records, for example, each time USERA edits record 1, USERB will not be able to edit records 1 through 100 (but USERB can edit record 101).
There are several possible errors that can occur within your Visual Basic program if you attempt to edit a record that is on a data page that is already locked. The most common errors you'll encounter are Error 3260 and Error 3197. Error 3260 occurs
whenever you attempt to edit a record that is stored on a page that is already locked by another user or program. You can handle this error by attempting a read at another time. Error 3197 occurs when your program attempts to read a record that has been
updated or deleted since you last refreshed the data set. You can handle this error by reloading the record into the data set (usually by invoking the Edit method again). Refer to Listing 14.38 as an example.
Public Sub PageLockErrors(LockErr As Integer)

    '

    ' handle errors due to page locks

    '

    Static nTries As Integer

    Dim nMaxTries As Integer

    Dim nLoop As Integer

    Dim nTemp As Integer

    '

    nMaxTries = 3

    '

    Select Case LockErr

        Case 3197

            ' data changed

            rsObject.Edit    ' re-read changed record

        Case 3260, 3816

            ' currently locked

            nTries = nTries + 1 ' try again

            If nTries > nMaxTries Then  ' too manytimes?

                nTemp = MsgBox(Error, vbRetryCancel, "Error " + Str(Err))

                If nTemp = vbRetry Then ' user said try again

                    nTries = 1  ' start all over

                End If

            End If

    End Select

    '

    DBEngine.Idle  ' free up old locks

    DoEvents            ' let messages catch up

    '

    For nLoop = 1 To 2000 ' 2000 millisecond pause

        ' empty loop

    Next nLoop

    Resume

    '

End Sub
Notice the use of the Idle and DoEvents methods in the error handler in Listing 14.38. These two lines allow Visual Basic and Windows to pass any backlogged messages to each other that may relate to old page locks that are no longer active.
The key to handling these errors is to trap for the error at the moment the user attempts the edit. If you are using the data control, you can place your error-handling logic in the Error event of the control. If you are using Visual Basic code, place
the error handler in the same routine that invokes the Edit method (see Listing 14.39).
On error goto LocalErr

rsTable.Edit

'

' more code to edit record

'

rsTable.Update

'

Exit Sub

'

LocalErr:

Call PageLockErrors Err
If you are using the data control, you can place the same logic that is in the PageLockErrors routine directly into the Error event of the control, or you can call the error handler, passing the error code into the remote handler.
Under the optimistic locking scheme, pages are locked only during the time the actual physical Update method is in operation. This is the shortest possible page-locking method. The advantage of this method is that the chance that two users will both
perform updates on the same page at the same time is very small.
The main disadvantage of the optimistic locking scheme is that is it possible for two different users to edit the same record (not page) at the same time. This can result in locking errors at update time. If USERA begins to edit record 1 and then USERB
begins to edit record 1, and then USERB saves record 1 back to the data set, USERA receives a locking error when attempting to save record 1 back to the data set. This is because USERB changed the data that USERA initially read; USERA has an outdated copy
of record 1. The only way to remedy this situation is for USERA to abandon the update operation, read in USERB's version of the record, and start editing again (let's hope USERB doesn't do the same thing again!).
The most common locking errors received under optimistic locking are Errors 3186, 3260, and 3197. Error 3186 occurs when another user has locked the page you are attempting to update. Errors 3260 and 3197 were discussed in the preceding section,
"Pessimistic Locking." Error 3186 should be handled in the same way 3260 is handled—clear any locks and try again.
Regardless of which page-locking scheme you are using (pessimistic or optimistic), lock conflicts for adding new records always occur at the moment your program attempts to save the new record to the data set. This is the same scenario as updating an
existing record under optimistic locking. Even though you might be using pessimistic locks for all existing records, you still will see update errors when users encounter page locks while adding new records.
If your application has several users entering data at the same time, you are likely to see many update errors. This is because all new records are added to the last data page of the data set. If you have five people entering new data, you have five
people all attempting to lock the same data page. Also, the shorter the record, the more likely users are to see data page locks.
Sections later in the chapter show you a few techniques for reducing update conflicts.
Page-level locking is affected by the use of the BeginTrans, CommitTrans, and RollBack methods in Visual Basic. When you are performing a transaction set, all page locks established during the transaction set are maintained from the time the BeginTrans
method is invoked until the CommitTrans or Rollback method is invoked. This can lead to several page locks on one or more tables.
In Listing 14.40, every row of the data table is affected by the update within the transaction. This means that, in effect, you have created a table-level lock. If you attempt this while others have one or more pages locked, you will not be able to
complete the transaction. Conversely, if you are successful, you will have locked the first page of the table for quite a long time (and the last page for a short time).
    WorkSpaces(0).BeginTrans ' start trans tracking

    While Not rsTable.EOF   ' for every row

        rsTable.Edit        ' start edit

        rsTable.Fields("Field1") = rsTable.Fields("Field1") * 1.05

        rsTable.Update      ' end edit

    Wend                    ' get another

    If Err = 0 Then         ' no errors

        WorkSpaces(0).CommitTrans    ' final update

        MsgBox "Table Updated", vbInformation

    Else                    ' trouble

        WorkSpaces(0).RollBack   ' undo all edits

        MsgBox "Table Update Failed", vbCritical, "Error " + Str(Err)

    End If
If you use nested transactions and/or transactions that span multiple tables, you must keep in mind that you will be placing and holding locks on all affected records until the CommitTrans or RollBack method is invoked.
If you have a highly relational data design, your Microsoft Jet locking-scheme performance can be affected. If you have defined multiple relationships between tables within your database, even single-row updates can affect several rows in the database
and require a number of locked pages in order to successfully complete the update operation. This can be both a blessing and a curse. It is a blessing to know that you can use Microsoft Jet to define and enforce multi-table update and delete integrity. It
is a curse to know that you might be creating a page-locking demon when you build your database structure.
If you define enforced integrity relation objects within your database, you will be able to ensure that your update operations will cascade properly to all related tables within the database. This also points out the need to use transaction methods for
all your critical database updates.
You can use the VisData sample application that ships with Visual Basic to create and maintain relation objects within your database (see Figure 14.6).
FIGURE 14.6. Using VisData to create a relation object.
You also can create and store relation objects using Visual Basic code. Listing 14.41 creates a new database, adds two tables with indexes, and then creates a relationship object. This particular relation object enforces cascading updates and deletes to
make sure any changes to the master table are reflected in the related table.
Private Sub cmdRelation_Click()

    On Error Resume Next

    '

    Dim dbFile As DATABASE

    Dim tdTemp As TableDef

    Dim idxTemp As Index

    Dim fldTemp As Field

    Dim relTemp As Relation

    Dim proTemp As Property

    '

    Dim cDBName As String

    Dim cTblLookUp As String

    Dim cTblMaster As String

    Dim cIdxLookUp As String

    Dim cIdxMaster As String

    Dim cRelName As String

    '

    cDBName = "\source\chap14\ch1400.mdb"

    cTblLookUp = "ValidUnits"

    cTblMaster = "MasterTable"

    cIdxLookUp = "PKUnits"

    cIdxMaster = "PKMaster"

    cRelName = "relUnitMaster"

    '

    ' erase database if it's already there

    Kill cDBName

    '

    ' create database

    Set dbFile = CreateDatabase(cDBName, dbLangGeneral, dbVersion20)

    '

    ' create list table

    ' this has the stuff to lookup

    Set tdTemp = dbFile.CreateTableDef(cTblLookUp)

    '

    ' add fields to the table

    Set fldTemp = tdTemp.CreateField("UnitID", dbText, 10)

    tdTemp.Fields.Append fldTemp

    '

    Set fldTemp = tdTemp.CreateField("UnitDesc", dbText, 30)

    tdTemp.Fields.Append fldTemp

    '

    ' add main index to ValidUnits table

    Set idxTemp = tdTemp.CREATEINDEX(cIdxLookUp)

    idxTemp.PRIMARY = True

    idxTemp.Required = True

    Set fldTemp = tdTemp.CreateField("UnitID")

    idxTemp.Fields.Append fldTemp

    tdTemp.Indexes.Append idxTemp

    '

    ' append table def to database

    dbFile.TableDefs.Append tdTemp

    '

    ' now create master table

    ' this table will need a reference to lookup

    Set tdTemp = dbFile.CreateTableDef(cTblMaster)

    '

    ' now add some fields

    Set fldTemp = tdTemp.CreateField("MasterName", dbText, 20)

    tdTemp.Fields.Append fldTemp

    '

    Set fldTemp = tdTemp.CreateField("MstrUnitID", dbText, 10)

    tdTemp.Fields.Append fldTemp

    '

    ' add main index to master table

    Set idxTemp = tdTemp.CREATEINDEX(cIdxMaster)

    idxTemp.PRIMARY = True

    idxTemp.Required = True

    Set fldTemp = tdTemp.CreateField("MasterName")

    idxTemp.Fields.Append fldTemp

    tdTemp.Indexes.Append idxTemp

    '

    ' append table to db

    dbFile.TableDefs.Append tdTemp

    '

    ' now set a relationship

    Set relTemp = dbFile.CreateRelation(cRelName)

    relTemp.TABLE = cTblLookUp ' table for lookups

    relTemp.ForeignTable = cTblMaster ' table to check

    Set fldTemp = relTemp.CreateField("UnitID") ' field to lookup

    fldTemp.ForeignName = "MstrUnitID"  ' field to check

    relTemp.Fields.Append fldTemp   ' add field object to relation object

    relTemp.Attributes = dbRelationUpdateCascade ' for cacading updates

    dbFile.Relations.Append relTemp ' book the completed relation object

    '

    ' enumerate the relation object

    Me.Cls

    For Each relTemp In dbFile.Relations

        For Each proTemp In relTemp.Properties

            Me.Print proTemp.Name,

            Me.Print ">";

            Me.Print proTemp.VALUE;

            Me.Print "<"

        Next

        '

        Me.Print "Relation Fields:"

        For Each fldTemp In relTemp.Fields

            Me.Print "",

            Me.Print "Name: ";

            Me.Print fldTemp.Name,

            Me.Print "ForeignName: ";

            Me.Print fldTemp.ForeignName

        Next

    Next

    '

End Sub
The down side of this power is that you will need to be prepared for multiple page locks when you attempt to update or delete highly dependent data objects in your database. If you want to change the CustomerID value in a master table, for example, you
probably will affect a number of related transaction and history tables within the database. This will call for several page locks. If you are a good database programmer, you'll encapsulate this action within a single transaction. If you create a long
transaction that spans multiple tables, you'll commit many page locks and hold them for some time before you finally complete and commit the transaction.
Most programmers prefer to use the optimistic page-locking scheme. This results in the shortest locks and the least number of lock conflicts at edit time. If your application experiences heavy data entry, however, it is possible that your users will
experience many update lock conflicts during peak load times. You can reduce the number of conflicts users encounter by creating a Lock table that contains information on all current locked records. By forcing your code to check this table before beginning
an edit operation, you can reduce the number of update lock conflicts your users encounter under optimistic locking.
Here's how you can establish a Lock table for your application. Create a single table in your database called AppLock. This table should have four fields: UserID, TableName, RecordID, and LockStamp. The LockStamp field is a date/time field, and the rest
are text fields (set their length to about 10 to 20 characters each). Each time a user attempts to edit a record in a table, the program first checks to see whether that TableName/RecordID pair is already on file in the table. If so, the user is told that
the record is locked and to try again later. You could even add the user who holds the record and the time that user started his or her lock operation). If the TableName/RecordID pair was not found in the AppLock table, a new record is added to the table
containing the UserID, TableName, RecordID, and current time. When the user has completed the edit work, the program can remove the record from the lock file to allow others to read the record.
Public Function CheckLockTable(cTable$, cRecID$) As Boolean

    '

    ' check lock table to see if

    ' we can edit this rec

    '

    rsLockTable.FindFirst "TableName=" + cTable$ + " and RecordID=" + cRecID$

    If rsLockTable.NoMatch = False Then

        MsgBox cTable$ + "." + cRecID$ + " is Locked - Try again later.",

        _vbCritical, "CheckLockTable"

        CheckLockTable = False

    Else

        CheckLockTable = True

    End If

    '

End Function
You can place CheckLockTable function right before the Edit method in Visual Basic code or as part of the Reposition event of the Visual Basic data control (see Listing 14.43).
Public Sub EditRec()

    '

    ' check locks, then edit

    '

    Dim cTable As String

    Dim cRecId As String

    '

    cTable = rsEditTable.Name ' get table to lock

    cRecId = rsEditTable.Field(0) ' first field is primary key

    '

    If CheckLockTable(cTable, cRecId) = True Then

        rsEditTable.Edit

        '

        ' perform edits

        '

        rsEditTable.udpate

        ClearLock cTable, cRecId

    End If

End Sub
The main drawback to this approach is that updating the lock table itself can result in locking conflicts. Also, this design essentially has tripled the number of database disk operations needed to save a single record (read lock record, write lock
record, read edit record, write edit record, and delete lock record). A routine like this might be overkill in a tiny data-entry application, but it works well in a large application that experiences heavy data input from multiple users.
Another way to reduce page-locking conflicts is to perform data table updates via SQL statements. The basic concept here is to use snapshots to load data onto the workstation, and then use SQL statements to actually perform the update. Finally, after
the update, requery the snapshot object to get an updated picture of the data. This method works well in an environment where the centrally located data file is some distance away and the updates are rare and/or small.
The code for this kind of process might look like Listing 14.44.
Public Sub SQLProcess()

    '

    ' perform updates via SQL statements

    '

    Dim db As Database

    Dim rs As Recordset

    Dim cSQL As String

    '

    Set db = DBEngine.OpenDatabase("c:\source\chap14\ch1403.mdb")

    Set rs = db.OpenRecordset("Table1", dbOpenSnapshot)

    '

    ' add new record

    cSQL = "INSERT INTO Table1 VALUES('MCA','Weather Ballon','FirstClass','RoundTrip');"

    db.Execute cSQL

    '

    db.Close

    '

 End Sub
The limitations of this system include possible wait time to load the data set and the chance that the data set will be too large to fit into workstation memory. Also, even though record adds and deletes are quite easy with this method, updates can be
tougher because they involve a series of SQL UPDATE statements (one for each field). Still, although this is a somewhat restrictive system, many ODBC applications still use this basic model for reading and writing remote data sources.
One of the most annoying problems in multi-user database work is handling heavy data entry loading from multiple users. In Visual Basic Microsoft Jet, all new records are added to the last physical page in the database. If you have several users all
attempting to add records at the same time, it is very likely that users will see numerous update locking conflicts because they are all trying to add records to the same physical data page.
One way to reduce the update conflicts is to have users enter their data into private temporary tables. Then, when they have completed a batch of entries, this private table can be used to update the master database table. The update can be accomplished
with a SQL APPEND query, and then the temporary table can be deleted.
Listing 14.45 shows how you could structure a batch-update application.
Public Sub BatchUpdate()

    '

    ' provide temporary table

    ' for batch loading of

    ' master table

    '

    Dim dbFile As Database

    Dim rsTable As Recordset

    Dim cSQL As String

    '

    Set dbFile = DBEngine.OpenDatabase("c:\source\chap14\ch1402.mdb")

    '

    cSQL = "SELECT InvTrans.* INTO MyTrans SELECT * FROM InvTrans WHERE

    _InvID='JUNK';"

    dbFile.Execute cSQL

    '

    Set rsTable = dbFile.OpenRecordset("MyTrans", dbOpenTable)

    '

    ' allow user to peform batch processing on local table

    '

    cSQL = "INSERT * INTO InvTrans FROM MyTrans;"

    dbFile.Execute cSQL

    '

End Sub
This method works very well on applications that handle a large volume of transaction-type data entry work (accounting entries, for example). This method does not work well for data tables that act as master records that must be related to other child
tables in the system (such as customer master records).
There are several INI/registry settings that you can adjust to control the page-level locking behavior of the Microsoft Jet database engine. These settings control the number of times Microsoft Jet will attempt to lock a page, the number of pages held
in memory, and the length of time Microsoft Jet will hold unused pages in memory. Usually the default values for these settings will work fine. However, if you are having problems with your database reads and writes over a network, you might want to
experiment with these settings.
When working with Microsoft Jet 2.5 data format, these settings can be placed in the [ISAM] section of your VB.INI file or the INI file that has the same name as your executable Visual Basic program. For Microsoft Jet 3.0 databases, these values can be
found in the JET\3.0\ENGINES\JET folder of the registry.
Table 14.3 shows the INI settings that are used to control page-lock behavior. The first column contains the complete INI setting, as it would appear in your VB.INI file including the default value. The second column contains a brief description of the
setting and its meaning.
INI Key |
Comment |
|
PageTimeOut=5 |
Release unused data pages after 500 milliseconds. |
|
LockedPageTimeOut=5 |
Release used (locked) pages after 500 milliseconds. |
|
MaxBufferSize=512 |
This is the total memory cache used by Microsoft Jet. Enlarging this cache can help speed ODBC processing. |
|
LockRetry=20 |
Microsoft Jet will attempt to perform a page lock 20 times before reporting an error. |
|
CommitLockRetry=20 |
Microsoft Jet will attempt to commit changes to a database 20 times before returning an error. Each "commit" attempt involves executing a lock. The attempt involves executing a lock. The number of locks attempted is controlled by the LockRetry setting. The default settings will result in 20 CommitLockRetries, each attempting 20 LockRetries before Microsoft Jet will return an error. This is 400 locking attempts in all. |
|
ReadAheadPages=16 |
Microsoft Jet will preload 16 data pages when reading records. Increasing this number can speed sequential processing since it reduces the number of disk operations. Excessive pages in memory can also increase the chances of update errors in optimistic locking mode since users are preloading data pages that may be edited by other users. |
You can add user- and group-level security to your Microsoft Jet database Visual Basic applications by installing the SYSTEM.MDA security file created when you install Microsoft Access. This system security file contains information on defined users and
groups along with permission profiles. You can use a single SYSTEM file to manage multiple databases or you can use a different security file for each database or application you use.
This section covers the advantages and disadvantages of using the SYSTEM security file; you'll review the security objects and permission levels available through the SYSTEM file and you'll see some examples of how you can use Visual Basic code and the
VisData sample application to create and maintain Microsoft Jet security features.
There are several advantages and disadvantages to using Microsoft Jet security with your Visual Basic database applications. Some programmers love the SYSTEM.MDA, but others don't. It's up to you to determine whether the SYSTEM security file will work
for you and how you will use it.
The main advantage of using the SYSTEM.MDA file is that you can use the Microsoft Jet security scheme as a basis for creating secure database applications. You can define users and groups that have carefully defined permissions and you easily can
enforce this security scheme within your Visual Basic program.
The primary drawback of using Microsoft Jet security is that all the security features are stored in one single file. If you lose this file (it gets erased or corrupted), you might not be able to recover your data. Also, you easily can overwrite the
security file with a clean security file that gives you (or anyone else) free access to all your secured data.
You also can manage multiple databases from within a single SYSTEM.MDA file. This is a real advantage for sites that have several Visual Basic or Microsoft Access programs in production. A system administrator easily can control access rights to all
Microsoft Jet databases active on the server from one single point.
The default name for the Microsoft Jet security file is SYSTEM.MDA. However, if you want to define a special security scheme for each database installed at your site, you can rename the SYSTEM.MDA file to a name more appropriate like ACCOUNTING.MDA or
INVENTORY.MDA.
When you use the SYSTEM.MDA file with Visual Basic, you can secure only table and QueryDef objects. You cannot set permission rights for forms, reports, or program modules.
Even if you have designed a tight security scheme, other non-Microsoft Jet data tools (ODBC-enabled query tools) might simply ignore the SYSTEM.MDA file altogether and allow users free access to the data within your secured database.
In summary, while the SYSTEM security file is useful, you should not count on the SYSTEM.MDA file alone to properly secure your databases. Also keep in mind that other software that needs access to the database might ignore the SYSTEM security file
altogether. Still other applications might use the security file, and those users will need security profiles defined in the SYSTEM file.
The name of the security file that will be loaded by your application at startup is determined by the SystemDB setting in the INI startup file. If you are running Microsoft Access, this is stored in the Microsoft Access INI file. If you are running a
specific Visual Basic application, your application can be pointed to a specific security file by using the SystemDB INI setting in your applications INI file:
 [Options]

SystemDB=C:\MSOFFICE\ACCESS\SYSTEM.MDA
If your program will be running in a 32-bit environment, you can use the SystemDB property of the DBEngine to point to the SYSTEM security file:
    '

    DBEngine.SystemDB = "c:\msoffice\access\system.mda"

    '
You cannot create a Microsoft Jet security file using Visual Basic. Only Microsoft Access can create the SYSTEM.MDA file needed to define and maintain database security profiles. If you have Microsoft Access, you can copy the SYSTEM.MDA data file to a
new location (your application directory) and use that as the security file for your Visual Basic application.
Once the SYSTEM security file is in place, you can use the VisData sample Visual Basic program to create and maintain user and group objects and set permission rights for all identified QueryDefs and Databases (see Figure 14.7).
FIGURE 14.7. Using VisData to create and maintain Microsoft Jet security.
After you copy a clean SYSTEM.MDA to the application or Visual Basic directory, you must add the SystemDB setting to your Visual Basic and application INI files in order to be able to access the security system (see Identifying the Microsoft Jet
Security File, earlier in this chapter). In other words, unless you actually tell Visual Basic applications the exact name and location of the SYSTEM security file, no security features will be in place; your data will not be secure.
Now that you have a clean SYSTEM security file and it has been activated, you are ready to start creating users and groups for your Visual Basic application.
Once the security features are in place, users will be prompted to provide a Login Name and Password each time they attempt to open a secured database (see Figure 14.8).
Figure 14.8. Login dialog box for secured database.
You can bypass this dialog box by setting the DefaultUser and DefaultPassword properties of the DBEngine object before you execute an OpenDatabase statement. Listing 14.46 shows how this can be done.
Private Sub Form_Load()

    '

    ' set defaults before login

    '

    On Error GoTo FormLoadErr

    '

    DBEngine.DefaultUser = "MCA"

    DBEngine.DefaultPassword = "MyPassword"

    '

    Workspaces(0).OpenDatabase ("c:\source\chap14\ch1403.mdb")

    '

    Exit Sub

    '

FormLoadErr:

        MsgBox Error$, vbCritical, "Error Opening Database [" + Str(Err) + "]"

        End

End Sub
In Listing 14.46, the Login Name and Password are supplied via hard coding. These could also be stored in an INI setting/registry or in another database. However, storing login information in this manner can defeat the security system. An alternate
approach might be to store the UserName parameter in an INI setting and prompt the user to provide the password.
Notice also that the routine in Listing 14.46 contains an error trap. If the UserName and Password parameters are not valid for this SYSTEM.MDA, an error will be reported and the database will not be opened (see Figure 14.9).
Figure 14.9. Error attempting to login to secured database.
The Microsoft Jet allows you to secure two data objects: Tables and QueryDefs. You toggle on or off seven permission values:
There are several possible security-related error codes that Visual Basic could return. The most common ones are listed in Table 14.4.
Error Code |
Error Text |
|
3028 |
Can't start your application. The system database is missing or opened exclusively by another user. |
|
3029 |
Not a valid account name or password. |
|
3030 |
Account name isn't a valid account name. |
|
3031 |
Not a valid password. |
|
3032 |
Can't perform this operation. |
|
3033 |
No permission for name. |
You can trap for these errors in the Error event of the Visual Basic data control. You also can check for them during data table AddNew, Edit, Update, and Delete methods.
This chapter concentrated on four challenges you will encounter when you create multi-user applications using Visual Basic 4.0:
![]()
![]()
![]()
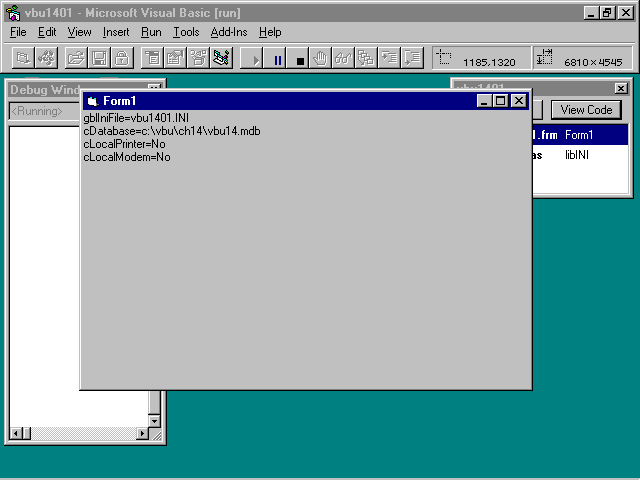
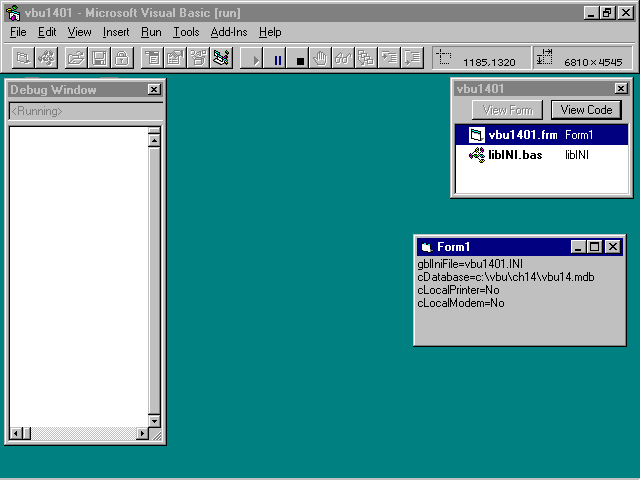
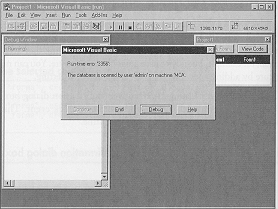
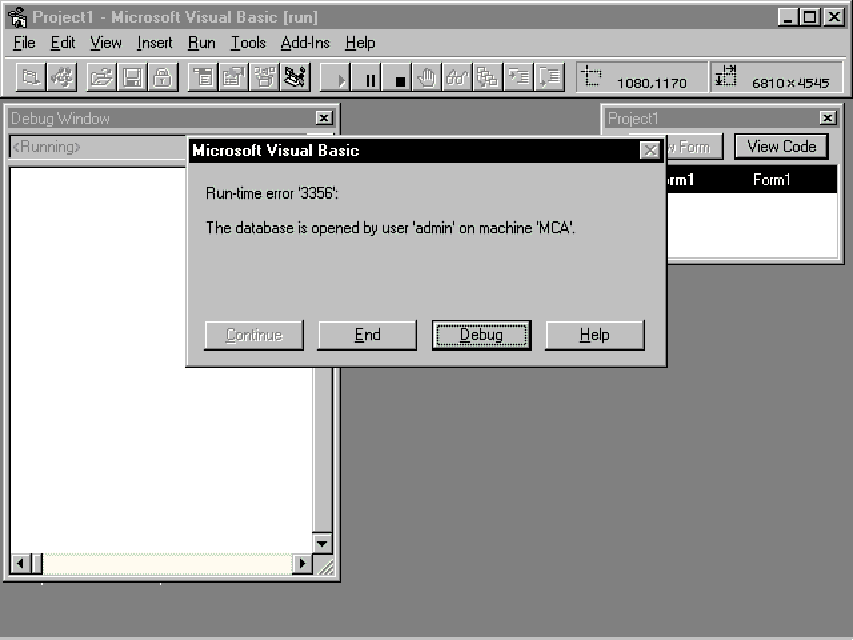
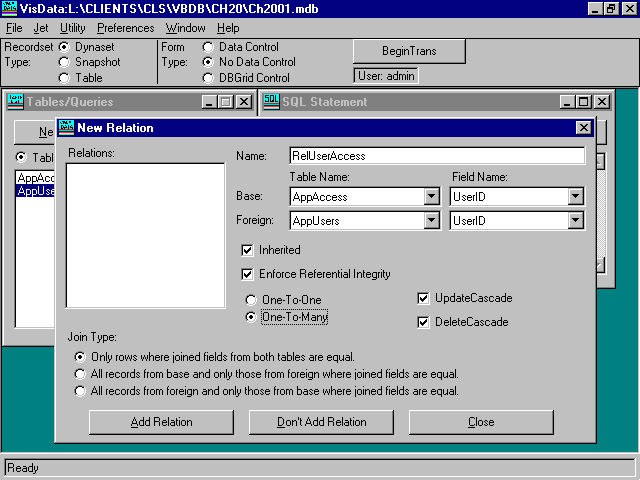
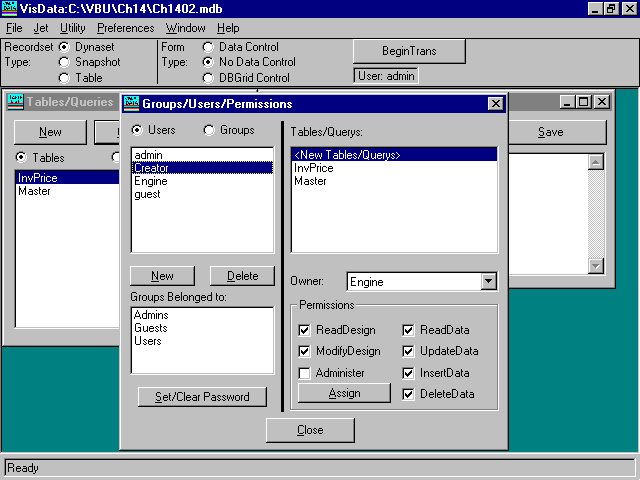
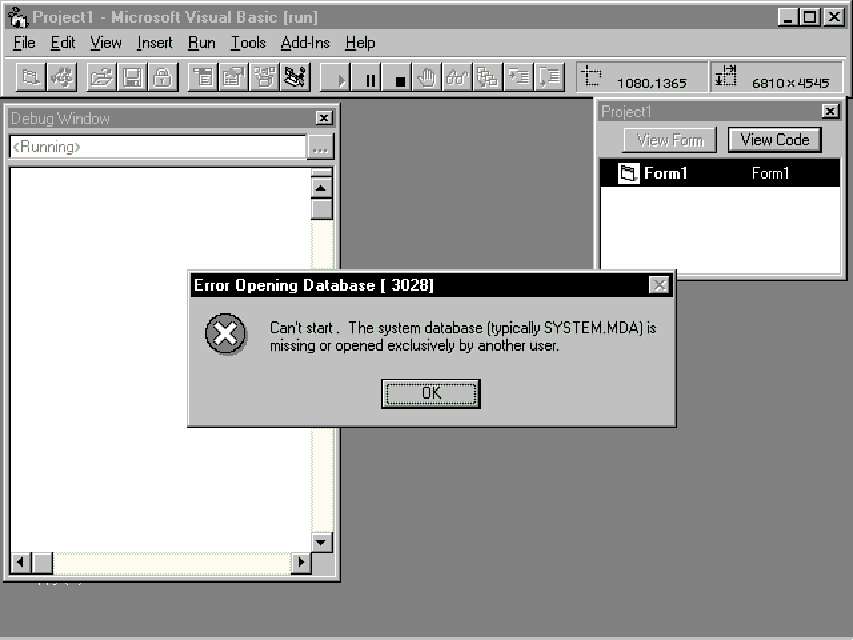