![]()
![]()
![]()
This hour explains the printing options available to you as a Windows 95 user. The printer is one of those devices that you don't want to think a lot about; you want to print a document within your word processor or from within your spreadsheet program and a few moments later, grab the resulting printed output from the printer. Most of the time, you do not have to think about how Windows 95 relates to your printer.
The reason this hour spends time discussing the printing capabilities of Windows 95 is that once you understand the Windows 95 printer subsystem (the internal program that automatically controls all printing from within Windows 95), you will be better equipped to handle advanced printer management. There are times when you may want to print output, but change your mind once you've issued the print command. The printer subsystem lets you rearrange, reroute, and redo printer output before that output gets to the printer.
The highlights of this hour include:
When you print documents, Windows 95 automatically starts the printer subsystem.
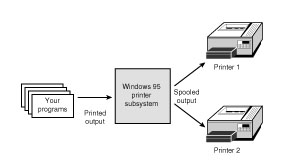
The printer subsystem controls all printing from within Windows 95, whereas the MS-DOS
environment sent data directly to the printer when you printed data, Windows 95 spools
output through the printer subsystem as shown in Figure 15.1. When spooled, the printed
output goes to a disk file, managed by the printer subsystem, before being sent directly
to the printer.
Figure 15.1.
Windows 95 spools output to the printer subsystem disk file.
JUST A MINUTE: Every document you print creates a unique print job that appears on the spooler. Windows 95 gives you access to these print jobs.
By routing printed output to a spooled disk file instead of sending the output directly to the printer, you can intercept the printed output before that output goes to paper. You therefore have more control over how the output appears on the printer. You also can select which printer receives the output, in case more than one printer is connected to your computer.
3.1 Step Up The Windows 95 printer subsystem is more integrated into Windows 95 than the Windows 3.1 Print Manager. The Windows 95 printer subsystem lets you manage all printing from a special folder labeled Printers.
If you add a printer to your system, remove a printer from your system, or set up Windows 95 to use a printer for the first time, you'll have to inform Windows 95. Windows 95 helps guide you as you set up printers by giving you the Add Printer Wizard.
JUST A MINUTE: As mentioned in Hour 2, a wizard is a procedure that Windows 95 guides you through with a series of dialog boxes.
A special Printers folder available from the Start | Settings menu contains
all information about your computer's printer hardware. If you have yet to set up
a printer, you will have to open the Printers folder and walk through the Add Printer
Wizard so that Windows 95 knows exactly which printer to use.
Task 15.1: Using the Add Printer Wizard
Step 1: Description
Windows 95 needs to know how to format the printed output that you want printed.
Almost every printer supports different print functions, and almost every printer
requires different kinds of print codes that determine how the printer outputs
specific characters and character-formatting options. The Add Printer Wizard handles
necessary details and asks you appropriate questions that determine how printed output
eventually appears.
CAUTION: If you use a network and you need to set up a network printer in Windows 95, use the Network Neighborhood window and double-click the network printer's icon; you can browse the network to find the printer if the printer's icon does not appear. Then set up the printer following the instructions that appear on the screen.
Step 2: Action
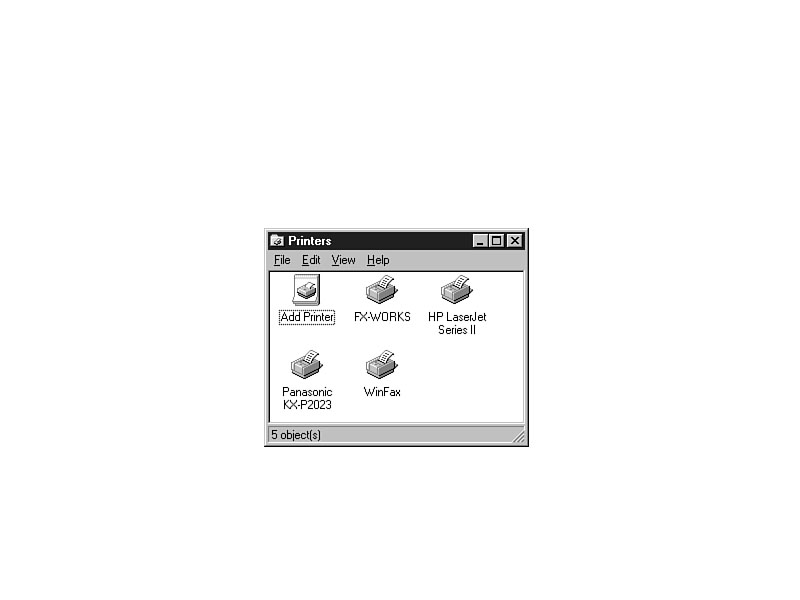
JUST A MINUTE: If you have not yet set up any printer, you will see only the Add Printer icon in the Printers window.
Figure 15.2.
The Printers window controls the setup and operation of printers.
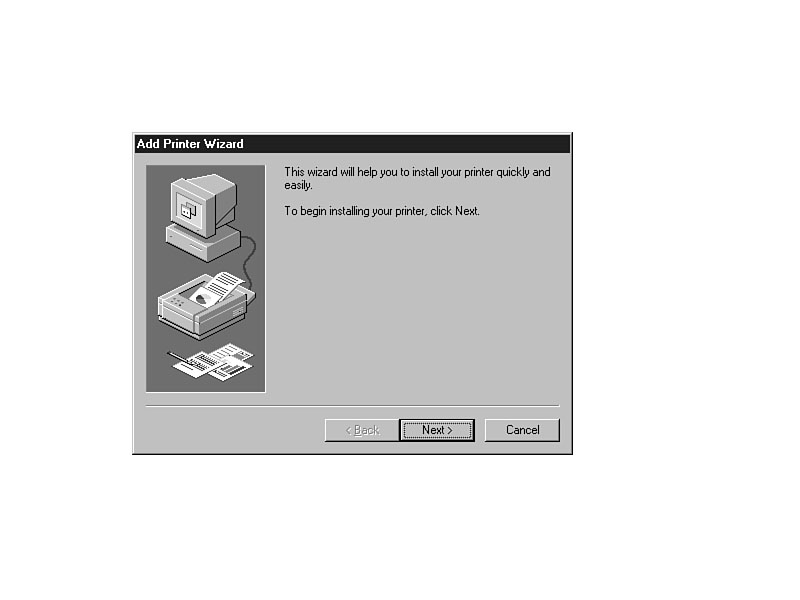
Figure 15.3.
The Add Printer Wizard walks you through the setup of a new printer.
TIME SAVER: As you walk through a wizard, you can click the Back command button to back up a step and answer any previous prompt differently.
JUST A MINUTE: If you cannot find your printer's exact model, there is probably a printer in the list that closely matches your printer. You may have to check your printer manual for models that are compatible. Choose the printer that most closely matches your printer's model.
TIME SAVER: Microsoft routinely adds new printer makes and models to their list of supported printers. You can often find printer drivers (printer description files) for new printers on bulletin board systems, as well as on the Microsoft Network and other major online services.
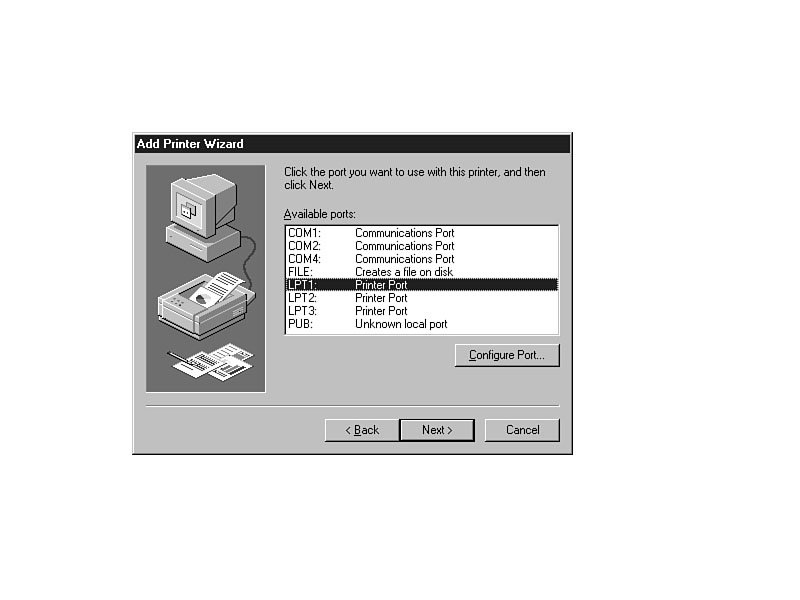
Figure 15.4.
The Add Printer Wizard needs to know where your printer is.
TIME SAVER: If you want to route an image of the printed output to a disk file, you can select FILE:. Every time you print, Windows 95 will then ask you for the name of a file that you want Windows 95 to use for collecting the printed output. Once it is sent to a file, you can edit the file, view the file, or print the file.
Windows Minute
Printer Ports
If you have more than one parallel printer port, you will see at least one additional
port listed inside the wizard's listbox. COM1: and COM2: are names
for the first two serial ports on your computer.
Rarely do today's printers attach to serial ports because these ports are better used for modem and mouse connections. Nevertheless, there are some printers that use the serial ports. The name LPT1: (and possibly LPT2:) refers to the parallel port where most printer cables are connected.
Figure 15.5.
You must tell Windows 95 how to refer to the printer.
CAUTION: Windows 95 rarely has the proper printer setup file on the hard disk. You will probably have to insert a Windows 95 installation diskette or the installation CD-ROM so that Windows 95 can find the proper information for the printer you've selected. Windows 95 prompts you for this extra disk or CD-ROM if needed.
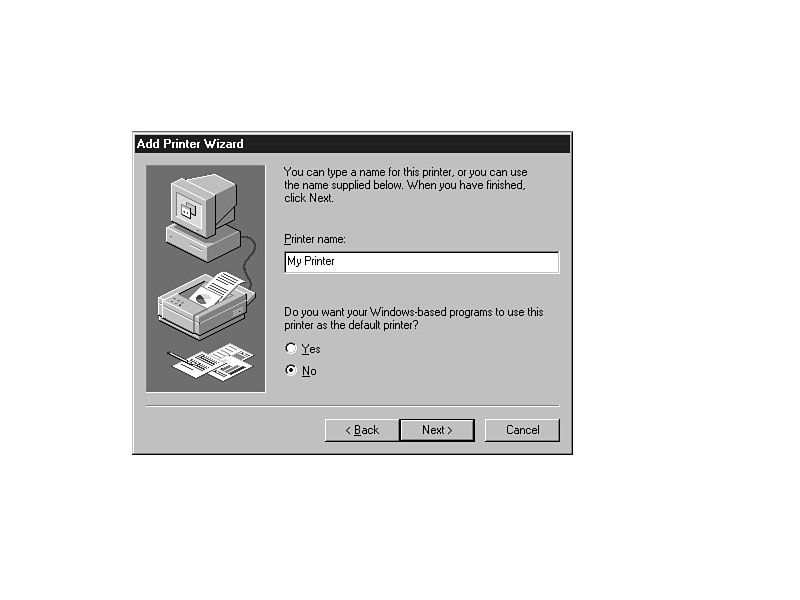
Step 3: Review
Windows 95 must know exactly what kind of printer you have connected to your computer.
Depending on the hardware you have, you may have more than one printer physically
attached to your computer. If so, you have to run the Add Printer setup wizard for
each printer you will print to. When running the Add Printer Wizard, you specify
which printer Windows 95 should use for the default printer. Of course, any time
you print documents, you can select a printer that differs from the default printer
if you want output to go to a secondary printer source. You can also change the default
printer by right-clicking over the printer you want to set as the default printer
and selecting the Set As Default command from the right-click menu.
TIME SAVER: If you use your computer for accounting or personal finance, you might have a laser printer for reports and a dot-matrix printer for checks. The default printer will be the printer that you print to most often. If your laser printer is the default printer, you'll have to route output, using the Print dialog box explained in the next section, to the check printer when you want to print checks.
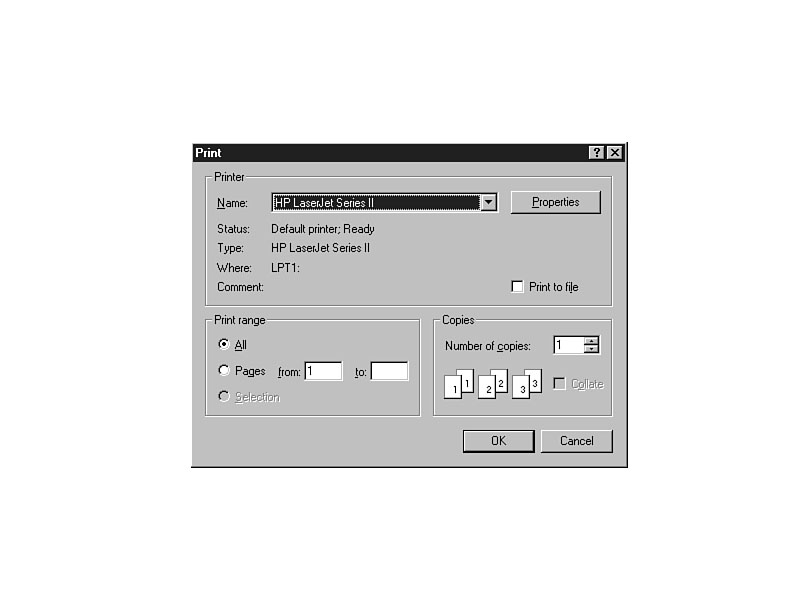
When you print from an application such as WordPad, you'll see the Print dialog
box shown in Figure 15.6. The Print dialog box contains several options from which
you can choose. Most of the time, the default option values are appropriate, so you'll
simply press Enter to select the OK command button when printing.
Figure 15.6.
The Print dialog box controls the way a print job routes output.
The Print dialog box contains a dropdown listbox of every printer you've added to
Windows 95. The default printer will be the printer you've chosen using the Add Printer
Wizard's final screen.
TIME SAVER: Even if you have not set up a file-based output device (see Task 15.1's description of the FILE: port), you can route the printer's output to a file by clicking the Print-to-file option. If you want output to go to a physical printer as soon as possible, as is most often the case, leave this option unchecked.
The Print range will be All if you want to print all pages. For example, if you are printing 20 pages from a word processor, the All option sends all 20 pages to the printer. If you select the Pages option, you can enter a starting page number and ending page number to print only a portion of the document.
The Copies section determines how many copies you want to print. The default is one copy, but you can request an additional number of copies. If you enter a number greater than 1, check the Collate option if you want the pages collated (you usually do). If you highlight part of the text before beginning the print process, you can click the Selection option button to print only the selected text.
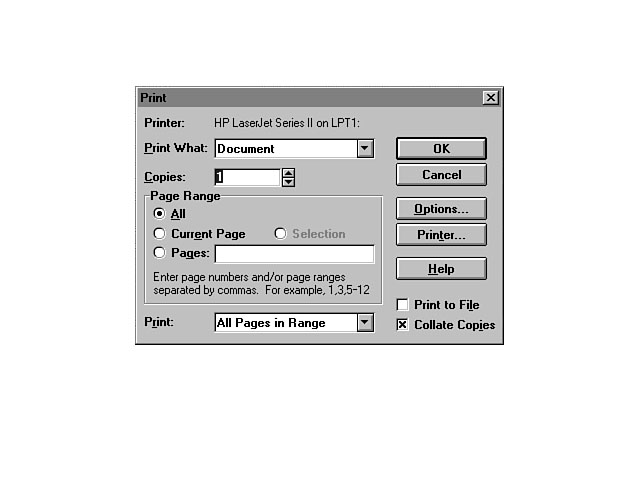
JUST A MINUTE: There still are many Windows 3.1 programs in existence. They use the Print dialog box shown in Figure 15.7. The options of the Windows 3.1 Print dialog box work just like those in the Windows 95 Print dialog box.
Figure 15.7.
You'll probably see Windows 3.1 Print dialog boxes from time to time.
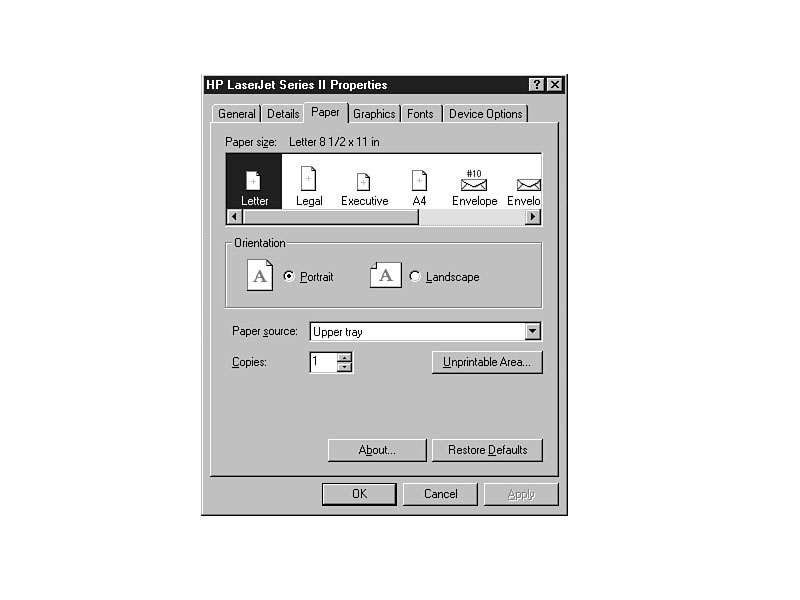
For special print jobs you can click the Properties command button to display
a printer Properties dialog box such as the one shown in Figure 15.8. Each printer
model supports a different set of options so each printer's Properties dialog box
contains different options as well. In the Properties dialog box, you specify the
type of paper in the printer's paper tray, the orientation (the way the printed
output appears on the paper), and the printer resolution (the higher the printer
resolution, the better your output looks, but the longer the printer takes to print
a single page), among other options that your printer might support.
Figure 15.8.
A printer Properties dialog box controls your printer options.
Keep in mind that the output goes to the print spooler and not directly to
the printer. The next section explains how you can manage the print spooler.
CAUTION: Some applications begin printing as soon as you click a printing toolbar button instead of displaying the Print dialog box before beginning to print. Be sure that you understand the way each of your applications handles printing. If you click such a toolbar button several times, you could inadvertently send many copies of output to your printer.
TIME SAVER: Some print jobs take a while to spool their output to the spool file and, subsequently, to the printer. The taskbar displays a printer icon to the left of the clock during the printing process. If you rest the cursor over the printer icon, Windows 95 displays a roving help box that describes how many jobs are in line to print. If you double-click the print icon, Windows 95 displays the list of all print jobs (the next section describes the window of print jobs). If you right-click over the icon, Windows 95 gives you the choice of displaying a window containing a list of all print jobs or the print jobs for specific printers that are queued up waiting for printed output.
Explorer and Open dialog boxes all display documents, as you've seen already throughout this book. If you want to print a document, such as a bitmap graphic document file, a text document file, or a word processing document file, the right-click menu contains a Print command that automatically prints the selected document (or documents) that you right-click over. The right-click does not produce the print dialog box described in this section; rather, Windows 95 automatically prints one copy of the document on the primary default printer.
JUST A MINUTE: Windows 95 cannot print all types of documents. For example, executable programs (such as those ending with the .EXE or .COM extension) are not printable. When you right-click over these non-printable files, the right-click menu does not contain a Print command.
There's yet one more way to print documents that works well in some situations. If you have the My Computer window open or if you are using the Explorer, you can print any printable document by dragging that document to any printer icon inside the Printers window. Windows 95 automatically begins spooling that document to the printer that you drag to.
TIME SAVER: If you copy a printer icon from the Printers window to your desktop (by holding Ctrl and dragging the icon to your desktop), you will eliminate the need to open the Printers window every time you need to access your printer. You can drag files directly to the desktop's icon instead of first having to open the Printers window. In addition, you can access your printer's Properties page by right-clicking over the desktop's printer icon and selecting Properties from the pop-up menu.
When you print one or more documents, from whatever program you print, Windows
95 formats the output into the format required by the Print dialog box's selected
printer, and then sends that output to a spool file. Once the output completes, the
printer subsystem begins to route the output to the actual printer, as long as your
printer is connected and
turned on.
Suppose that you want to print several documents to your printer in succession. Although today's printers are fairly fast, the computer's disk drives and memory are much faster than the relative speed of printers. Therefore, you can end up sending several documents to the printer before the first document even finishes printing on paper.
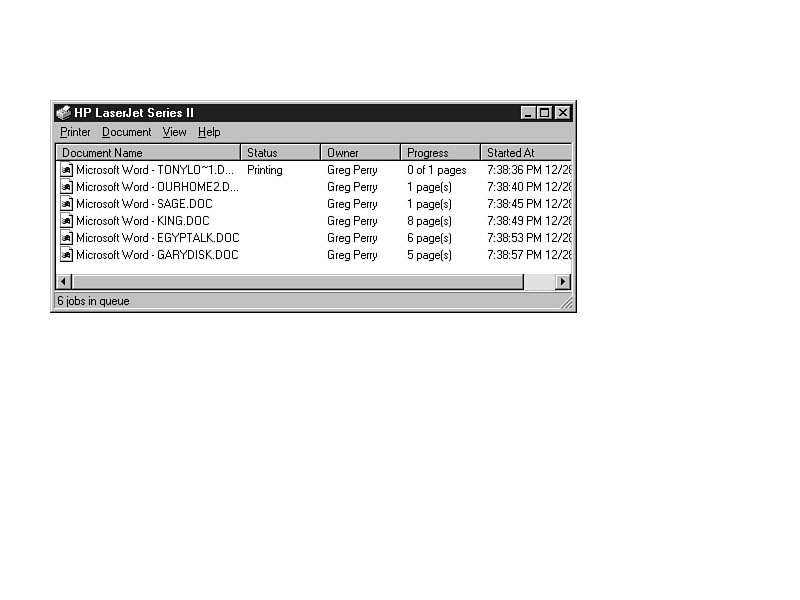
After printing one or more documents, you can open the Printer window and double-click
the printer icon that matches the printer you've routed all your output to. A scrolling
list of print jobs, such as the one shown in Figure 15.9, appears inside the window.
Figure 15.9.
You can see all the print jobs spooled up, waiting to print.
Each line in the window describes one print job. If you've printed three documents,
all three documents appear inside the window. The window describes how far along
the print job is. The Progress column tells you how many pages of the current print
job have been completed. The remaining print jobs await their turn in the list.
3.1 Step Up When you printed under Windows 3.1, it automatically started the Print Manager. If you wanted to check on the print jobs, you could switch to the running Print Manager using Alt+Tab. The printer subsystem used by Windows 95 is more integrated into the operating environment and does not appear on the taskbar as a separate program. Therefore, you cannot switch to the print jobs inside Windows 95 using Alt+Tab. If you want to manage the list of print jobs, you can either click on the printer icon inside the taskbar or open the Printers folder using the Start menu.
If you want to move one of the print jobs to the top or bottom of the queue (the list of print jobs), you can drag that print job to the top or bottom. Dragging a print job around in the list changes the priority for that print job. For example, your boss may be waiting over your shoulder for a report. If you had several jobs waiting to print before your boss showed up, you could move the boss's print job to the top of the list so it prints next.
Right-clicking over a print job gives you the option of pausing a print job (putting it on hold until you resume the job) or canceling the print job altogether.
TIME SAVER: If you select more than one print job by holding down the Ctrl key while you select print jobs, you can pause or cancel more than one print job at the same time.
There are times when you'll print several documents but not want those documents to appear on a printer! Often people carry a laptop with them but not a printer. Even if you don't have a printer with you, you may create expense reports and other documents that you want to print as soon as you get back to your office.
Instead of keeping track of each document you want to print later you can go ahead and issue a deferred printing request so that Windows 95 spools the document or documents to the disk drive in the target printer's image. The printer subsystem will not attempt to send the spooled data to a printer just yet.
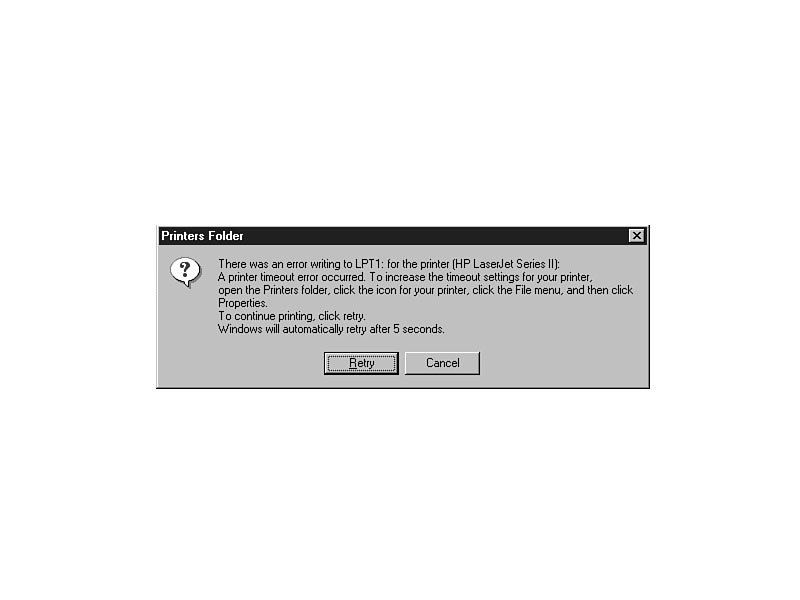
Ordinarily, if you were to print a document to a printer but you had no printer
attached to your computer, Windows 95 would issue the error message shown in Figure
15.10. Although Windows 95 can spool the output properly and set up a print job for
the output, Windows 95 cannot finish the job due to a lack of a printer, and so the
dialog box lets you know about the problem.
Figure 15.10.
Windows 95 cannot print to a printer if a printer does not exist.
JUST A MINUTE: If you do have a printer attached to your computer but you get the error dialog box shown in Figure 15.10, you probably forgot to turn on the printer or turn the printer online so that the printer can accept output. You can correct the problem and click Retry to restart the printing. If you do not click Retry, Windows 95 will automatically retry printing every five seconds.
If you want to defer printing for another time, open the Printers folder and click over the icon that matches the printer you want to defer printing to. Once you highlight the icon, select File | Work Offline. Once you return to your office or plug a printer into the printer port, you can repeat this process to uncheck the Work Offline option. As soon as you set the printer icon back to its normal online status, Windows 95 will begin printing to that printer port.
CAUTION: If your printer icon's File menu does not have a Work Offline option, you can select Pause Printing to achieve the same delayed printing effect. The actual printing will begin when you click Pause Printing once more to turn off the pause. The Work Offline option is available only on certain laptop and networked computer configurations.
If you share a network printer with others, you'll often send print jobs to the printer at approximately the same time as a co-worker. Windows 95 ensures that the first print job to arive prints first, in its entirety, before the second print job, so that you don't have to worry about conflicting and shuffled output. Nevertheless, print jobs can sometimes be time-consuming to separate from a stack of several print jobs that await you and others at the networked printer. Therefore, you might want to designate a page separator for the printer. A page separator is a page that prints between print jobs. You can place text or graphics on the page so that the page helps you more easily locate user divisions within a large stack of printer output.
CAUTION: Windows 95 will print a separator page before each print job. If your printer is rarely used by two or more people at once, you'll always get a separator page before your print job even if yours is the only print job sent to the printer. Therefore, designate a separator page only if you share a printer with other users and often print at the same time as them.
Task 15.2: Designating Separator Pages
Step 1: Description
Separator pages do not have to be fancy. Designate a separator page, as this task
demonstrates, if you and others send print jobs to the same printer often.
TIME SAVER: If you don't use a network printer but you often send several documents to your printer before picking up the output, a separator page will help you find the division between the various print jobs. In other words, separator pages aren't just for networked printers.
Step 2: Action
Step 3: Review
By setting the separator page option on your printer's Properties sheet, you can
designate a separator page that Windows 95 prints before each print job. The separator
pages help you separate multiple outputs from one another. When you search through
a large printed stack of output, you know you're at a new print job's output when
you get to the next separator page.
This hour explored the printer options you have with Windows 95. Before using a printer for the first time, you must set up the printer using the Add Printer Wizard available inside the Printers folder. Windows 95 supports several hundred makes and models of printers so you'll probably find your printer in the list.
Windows 95 does not send output directly to a printer. Instead, Windows 95 spools output to a disk file and then, once the spooled output is completed, Windows 95 sends the output to a printer. You can defer the printing if you do not have a printer hooked up at the time you issue the print command.
Windows 95 supports more than one connected printer at the same time. If you have two or more printers set up under Windows 95, you can, at the time that you print a document, direct that document to any printer on the system. In addition, if you share a printer with lots of users, you can designate separator pages to make separating the output easier.
deferred printing The process of issuing print commands but delaying the physical printing of those documents until later. Sometimes deferred printing is called delayed printing.
offline A printer is offline when the printer is turned off or on, but not ready to accept output (you might turn the printer offline when you need to feed pages through the printer manually).
online A printer is online when the printer is turned on and ready to accept output.
orientation The position of output on the printed page.
parallel port A connector on your computer where most printer cables plug into.
print codes Special characters that dictate how printers output and format characters.
print jobs Every document that you print creates a print job on the print spooler.
printer drivers Small descriptor files that allow Windows 95 to communicate properly with specific printers.
printer subsystem A program automatically started by Windows 95 that controls the way output appears on the printer.
queue A list, such as the list of print jobs, that you see in the Printers window when you double-click a printer icon.
separator page A page that prints before each print job to separate multiple print jobs on an output stack for networked printers.
spooled output Output that is sent to a disk file before being routed to a printer.
Windows metafile A special Windows 95 file that ends with the .WMF filename extension. You can use Windows metafiles for separator pages that you create yourself as long as you have a program that can create metafiles with the .WMF filename extension.
![]()
![]()
![]()