


- Hour 21 -
The Basics of Sound
This hour extends last hour's multimedia discussion by describing some of the
Windows 95 sound features. In the previous hour, you learned how Windows 95 provides
support for CD and video sound and graphics. This hour explores the way you can add
sounds to typical Windows 95 events. An event is a common task you do while
using Windows 95. For example, when you open or close a window you'll be able to
add a sound to each of those events, making Windows 95 more fun.
Perhaps you've already heard some sounds coming out of your PC's speakers as you've
worked with Windows 95. If you like the sounds, you're going to learn here how to
add new sounds and change the ones that you want to change. If you don't want the
event sounds, you can also eliminate them.
JUST A MINUTE: The Windows 95 event sounds can
help those who are visually impaired. The audio feedback verifies that an event took
place, and the sounds can also signal that an error occurred.
In addition to adding sounds provided by Windows 95 and other software, you can
record your own sounds using the Sound Recorder application. All you need is a microphone
attached to your sound card, and you're ready to turn your computer into a home recording
studio.
The highlights of this hour include:
- What Windows 95 events are all about
- How you can assign sounds to specific events
- When predefined sound schemes make sense
- How the Sound Recorder acts like a digital tape recorder
- What to do if you want to embed a sound file in the middle of a text document
Event Sounds
Some Windows 95 users do not like sounds attached to events, and others do. The
event sounds certainly can be obvious, because you can request sounds for all of
the following common Windows 95 events:
- Dialog box opening and closing
- User errors
- Starting Windows 95
- Exiting Windows 95
- Minimizing and maximizing windows
- Starting programs
- Displaying menus
- Displaying help screens
You can assign sounds to several more events, in addition to these more common
ones. You can even attach sounds to some networking events, such as the appearance
of an electronic message.
If you want, you can attach sounds to specific events or use a predetermined set
of sounds that comes with Windows 95. The next two tasks describe how to initiate
event sounds. Programs written for Windows 95 can access your own sounds; the display
of a dialog box from your word processor, then, might produce a sound that you've
assigned to that dialog box event.
Task 21.1: Assigning Your Own Event Sounds
Step 1: Description
If you want to assign a specific sound to every Windows 95 event, or just some Windows
95 events, you can do so. There are many kinds of sounds available, and you can,
as you familiarize yourself with the available sounds, customize Windows 95 so that
anyone within hearing range will know it's you using Windows 95 and nobody
else.
Step 2: Action
- 1. Open the Control Panel.
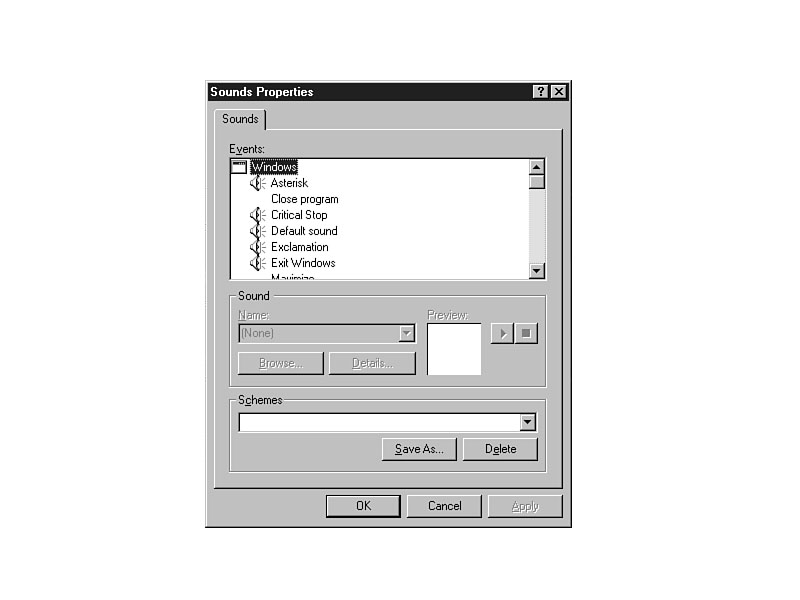
2. Double-click the Sounds icon to open the Sounds Properties dialog box, shown
in Figure 21.1.
Figure 21.1.
Specify event sounds with the Sounds Properties dialog box.
3. Scroll through the Events list to see all the events to which you
can assign sounds. The events are listed by application. The first application is
Windows 95 itself. As you scroll through the list, you'll see specific events listed
for Explorer, the Control Panel, and other Windows 95 applications.
Some of the events may seem cryptic to you, but as you use Windows 95 more, you'll
better understand their purposes. For example, the event labeled Exclamation occurs
when an application displays a message dialog box with an exclamation mark, indicating
an important message that you need to read.
JUST A MINUTE: The events with a speaker icon
next to them have associated sounds. The events without the speaker icons do not
have sounds associated with them, but you can add sounds to those, as you'll do in
this task.
- 4. Select the event titled Maximize. You may or may not see a speaker
icon next to it.
5. Press Alt+N to move the cursor to the Name dropdown listbox. Open the
listbox to see the list of choices. Select Chimes. A large speaker icon appears in
the box labeled Preview. Click the Play button to the right of the speaker icon to
hear the chimes sound. The chimes will sound whenever you maximize a window. If you
want to change an event's sound, highlight the event and double-click the sound.
You can always preview the sound by pressing Play.
3.1 Step Up Windows 95 controls the
sounds, not individual applications. Therefore, no matter which program you run,
even those programs written for Windows 3.1, the chimes will sound whenever you maximize
any window.
- If you want to select a different sound for the maximizing of windows, go ahead
and do so. Finish adding and removing the sounds that you want.
TIME SAVER: If you see only three or four sounds
in the Name list, you may need to run the Windows Setup program (see Appendix
C for help) to install additional sounds from the installation disks or CD.
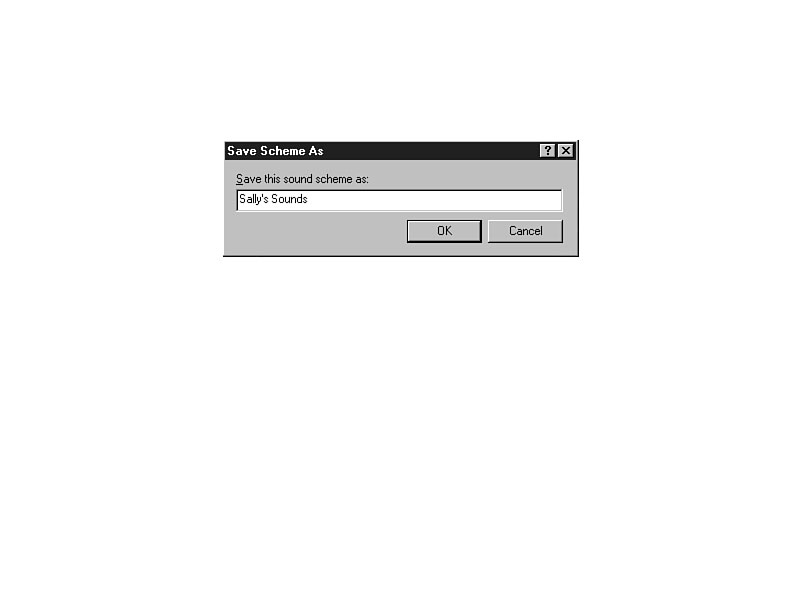
- 6. Now that you've customized your own Windows 95 sounds, you can save
that customized sound by clicking the Save As command button and entering
a name for the sound scheme (your customized set of Windows 95 sounds) in
the Save Scheme As dialog box that appears. Figure 21.2 shows the Save Scheme As
dialog box.
Figure 21.2.
Save your customized Windows 95 sounds to select them in the future.
7. Close the Sounds dialog box by clicking the OK key and try the sounds out.
Open windows, minimize windows, maximize windows, and display message boxes and dialog
boxes to hear your sound scheme.
Step 3: Review T
he Windows 95 Sound dialog box lets you attach sounds to various system events. If
you don't know what a sound sounds like, you can preview the sound by clicking the
Play button.
Task 21.2: Using a Predefined Sound Scheme
Step 1: Description
This task shows you how to load a sound scheme that you or someone else has saved.
The Windows 95 installation disk supplies you with several predefined sound schemes
that are interesting, as you'll hear during this task.
Step 2: Action
- 1. Open the Control Panel and double-click the Sounds dialog box.
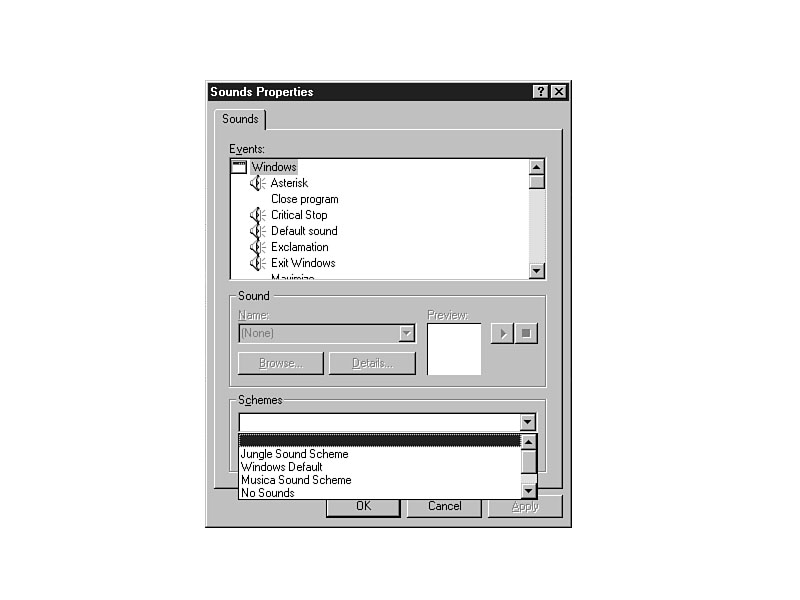
2. Click the arrow next to the Schemes dropdown listbox to display the
list of sound schemes currently defined for your system. Figure 21.3 shows one such
list.
3. Select the Jungle Sound Scheme. Instead of listening to each sound, using
the sound dialog box's preview button, close the Sound dialog box by clicking OK.
4. Minimize (don't close) the Control Panel... Look out, here come the tigers!
5. Display the Start menu, and you'll hear the rattle of snakes.
6. Every menu that you display produces the snake sound.
7. Start a program to hear the program's open sounds of the jungle.
8. Close a program to hear its close sounds.
9. Return to the Sounds dialog box and select the Musical Sound Scheme and try
that sound scheme out. You'll enjoy the variety of sounds Microsoft Windows 95 can
generate.
Figure 21.3.
Numerous sound schemes are available to you.
Step 3: Review
By using the predefined sound schemes, you can customize your computing session to
fit the mood you're in. Explore the Explorer application using African wild jungle
sounds. Have fun writing letters to friends using the melodic sounds of the musical
sound schemes.
TIME SAVER: If you tire of the sounds, select
the sound scheme named No Sounds to turn off all system sounds.
Recording Your Own Sounds
As long as you have an MPC-compatible sound card that accepts a microphone, you
can record your own sounds for the event sounds, as well as for other programs that
use sound. The Sound Recorder saves your voice or sounds as digital document files
on the disk. The multimedia capabilities of Windows 95 can play back those digitized
sounds.
CAUTION: Sound files can take a lot of disk space.
If you try to record complete songs but you have only two or three free megabytes
of disk space, you might run out of disk storage.
Remember that Microsoft wrote Windows 95 to be a data processing environment and,
in today's world, data does not mean just textual and numeric data. Multimedia
requires text, numbers, sounds, graphics, and full-motion video. Most of today's
Windows 95 word processors let you insert a sound (or even a full-motion video file
such as you saw in the previous hour) inside a document. The word processor will
place a speaker or some other kind of icon where the sound goes. When the user to
whom you give the document double-clicks on the sound icon, the user hears your voice!
Task 21.3: Using the Sound Recorder
Step 1: Description
If you've used a tape recorder or a VCR, you'll have no trouble using the Sound Recorder
application. All the play, fast forward, rewind, record, stop, and pause controls
appear on the Sound Recorder window, just as many of these same VCR-like controls
appear on the Media Player's window, as you saw in the previous hour.
This task introduces you to the Sound Recorder application. You'll record a sound
and assign that sound to a Windows 95 event.
Step 2: Action
- 1. Display the Accessories menu by clicking Start | Programs and
traveling to the Accessories menu.
2. Click the Multimedia menu.
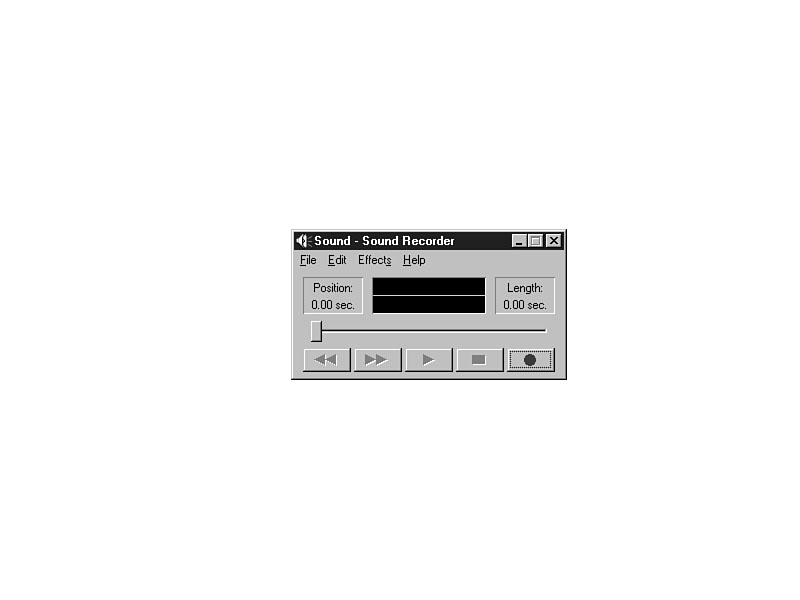
3. Select the Sound Recorder menu. Windows 95 opens the Sound Recorder window,
shown in Figure 21.4.
Figure 21.4.
Get ready to record your own sound using the Sound Recorder.
4. You'll recognize the familiar rewind, fast forward, play, stop, pause,
and record buttons that you know from other recording devices.
5. Get your microphone ready. Turn on the microphone (if it has a switch), put
the microphone to your mouth and click the record button. Say the following phrase
distinctly and clearly: I'm a Windows 95 wizard!
6. As soon as you finish the sentence, click the Stop button. While you recorded
the sentence, Sound Recorder displayed the digital wavelength of your voice in the
center window.
7. Of course, you now want to hear yourself. Click the rewind button to reset
the sound file pointer back to the beginning and click the play button.
8. Perhaps the quality is not what you'd like to hear. As long as you've got
ample disk space, you can improve the quality of the recording. Select Edit
| Audio Properties. Windows 95 displays the Audio Properties window, shown
in Figure 21.5.
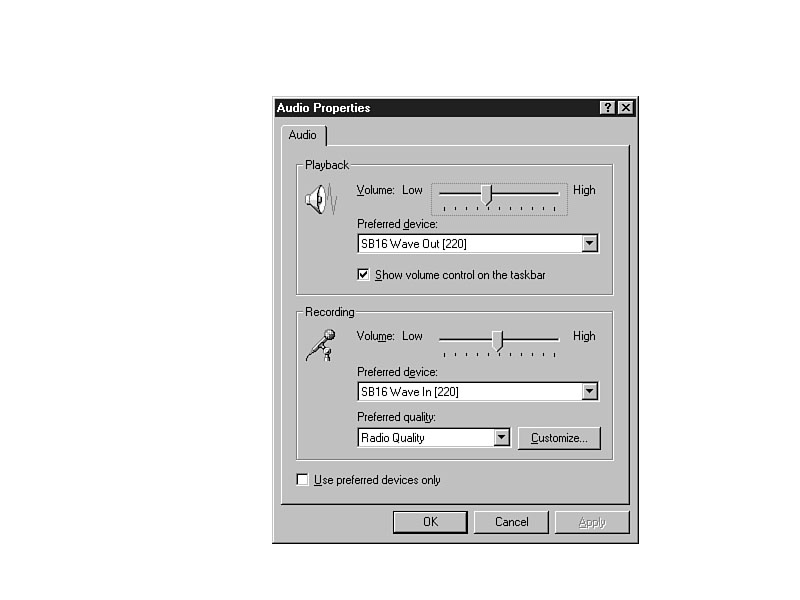
Figure 21.5.
You can adjust the quality of the recording.
9. Depending on your sound card, the settings listed on your Audio Properties
screen may differ from those in Figure 21.5. The important setting for now is the
setting listed beneath the Preferred quality dropdown listbox. Click the listbox
and select CD Quality. Although your sound files will now consume more disk space,
they will sound better.
10. Click the OK command button to return to the Sound Recorder window.
11. Click the rewind button to reset the sound file pointer back to the beginning
of the file.
12. Click the record button and, following steps 5 and 6's instructions, record
the sentence once again.
13. When you rewind and play back the sentence, your voice should now be clearer.
If you want to adjust the volume of the playback, you can double-click the taskbar's
volume control speaker icon and adjust the volume, using the volume control window.
JUST A MINUTE: There are increasing and decreasing
options available on the Sound Recorder's Effects menu, but the volume control
window is a better window for adjusting your system sounds.
- 14. Try adding a special effect. Select Effects | Add Echo
and play the sound again. Your sound will appear to be coming from a hole.
15. For fun, select Effects | Reverse, rewind the sound, and
play the sound again. The sound comes out backwards! Straighten things out by reversing
the sound once more.
16. Select Effects | Increase Speed (by 100%) and replay the
sound.
17. Decrease the speed once again and replay the sound to make sure that the
sound is now normal.
You can apply all kinds of special effects and editing actions to sound files that
you record. You may also edit songs and sound files from other sources, such as the
event sound files. The Edit menu contains instructions for inserting other
sounds into your sound files and for removing parts of sound files to shorten sound
clips.
The sound work that you do with Windows 95 is all digitally recorded. Therefore,
you can speed up, slow down, reverse, and re-reverse sound files without losing any
quality that you'd normally lose if you were dubbing from one standard tape-based
recording device to another.
The File | Open menu lets you load other sound files and edit or change
them. For this task, do not load another sound file until you've saved your recording
in the next step.
18. Save your file using File | Save. Store the file in the
Media folder located within the Window folder if you want your sound recording file
to be saved in the same area as Windows 95's system sounds.
JUST A MINUTE: Windows 95 stores all sound document
files using the .WAV filename extension.
TIME SAVER: For this task, use the Windows Media
folder, but if you want to store your files in your own folder, right-click over
the Save dialog box's white document area. Select New Folder, and create a
new folder for your own sounds.
- 19. Exit the Sound Recorder and open the Control Panel's Sound window.
20. Select the Maximize event, press Alt+N, and select the name of your recording
from the list of sounds.
21. Click the OK command button. Resize the Control Panel window, then double-click
the Control Panel's title bar to maximize the window, and you'll hear your message.
JUST A MINUTE: For fun and frolic in the office,
secretly assign a voice message to one of your co-worker's Windows 95 events.
- 22. You may keep the sound or assign another sound to the Maximize event.
Close the Control Panel for now.
Step 3: Review
The Sound Recorder application records your own voice. Once you create sounds, you
can embed those sounds in other document files or save the sounds in the Windows
Media folder so that you can add the sounds to Windows 95's repertoire of possible
sound events. The Sound Recorder works just like a tape recorder but lets you add
special effects, and even cut and insert sections of sounds within one another.
Windows Minute
Embedding Sound Files
If you want to see how to embed a sound file in a document, open WordPad. Select
Insert | Object. Click the Create from File command and type
the name of your sound file or click Browse to find the file. Windows 95 then
finds and inserts your sound file into the document and puts a speaker icon where
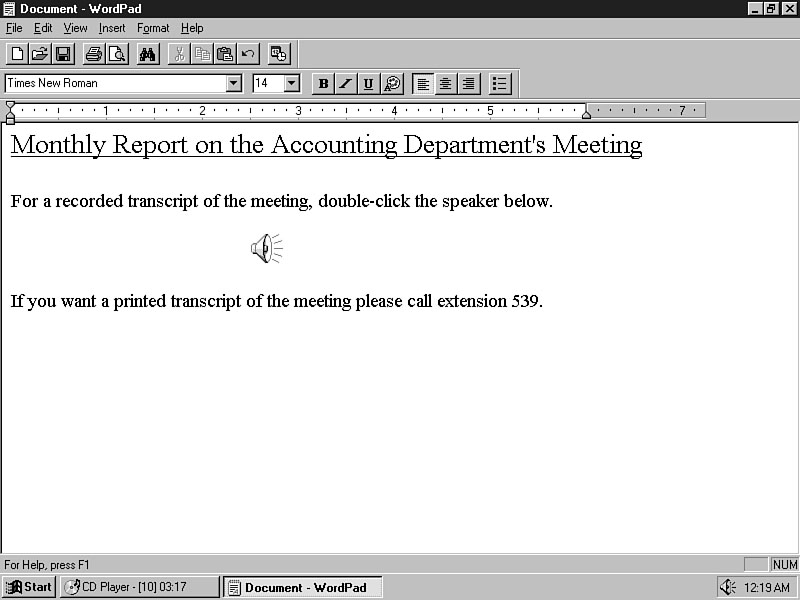
the sound goes. Figure 21.6 shows such a document.
The speaker icon works like any character in a document. You can cut and paste,
as well as move, the icon around in the file. When someone reading the document wants
to hear the sound file's contents, he or she needs only to double-click the speaker
icon.
Figure 21.6.
A WordPad document with an embedded sound file.
Summary
This hour explained what Windows 95 events are and how you can attach sounds to
them. Windows 95 comes supplied with several sounds, or you can turn off all sounds
from all events, if you prefer.
To help customize your own sounds and store different collections of event sounds,
you can create sound scheme files. When you want to use one of the sound schemes
for a particular Windows 95 session, you need only to select that sound scheme from
the list, and Windows 95 assigns all the sounds to the proper events.
The Sound Recorder lets you make your own recordings. It works like a digital
tape recorder. You can edit the sounds that you make and add special effects to them.
Perhaps the most important use for the Sound Recorder is to make recordings that
you can embed in other kinds of documents, such as a word processor or spreadsheet
document.
Workshop
Term Review
analog recording All sounds coming from a sound source are stored as continuous
analog noise impulses that cannot be reproduced or changed without loss of quality.
There are some modern-day digital tape recorders in use, but most tape recorders
use an analog signal, so you cannot make copies of recordings without losing some
quality, the opposite of digital recording.
digital recording All sounds coming from a sound source are stored as discrete
digital impulses that can be reproduced or changed without loss of quality,the opposite
of analog recording.
event Windows 95 actions you perform, such as opening and closing windows
or displaying a menu.
Sound Recorder The Windows 95 application with which you can record and
edit sounds.
sound scheme A collection of customized Windows 95 event sounds. Once you
add sounds to Windows 95 events, you can save that collection of sounds in a sound
scheme file.
Q&A
- Q Why would I want event sounds?
A Event sounds can be fun, but they also can, over time, get irritating in
the wrong environments. Some people, understandably, do not want to hear a bell ring
every time they see an error message. Other people like to hear sounds sometimes
to help reinforce certain events that take place. There are visually-impaired individuals
who can benefit from event sounds, because the sounds provide audible feedback that
certain events took place, either successfully or unsuccessfully. (If you use screen
savers, you'll still hear event sounds so you'll know if you get an e-mail message.)
If you don't want to hear sounds every time you start a program or maximize a window,
you may do one of two things: turn off all event sounds, using the Control Panel's
Sound dialog box, or remove sounds from common events but keep them available for
those rare events that you really want to know have happened.
Q How can I tell what a sound sounds like if I assign a sound to an event that rarely
happens?
A The Sound dialog box lets you preview any sound. Select a sound for an event
and click the play button beneath the Preview box to hear it. If you like what you
hear, leave the assignment, and if you do not like the sound, you may assign another
one.
Q Can I add my own sounds to Windows 95 events?
A Of course. You can purchase sound files, download sound files from online
services, such as Microsoft Network, and record your own sounds, using the Sound
Recorder. Assign the name of the sound file to an event, just as you have been doing
with predefined sounds from Windows 95.
In addition, the Microsoft Plus! Windows 95 add-on program includes a large collection
of additional event sounds.
Q I share my computer with my family. My kids like system sounds and we, the parents,
don't. How can we coexist in harmony?
A I'm not sure that I can tell you how to coexist in perfect harmony, but
I can solve the computer sound conflict. Open the Sound dialog box and select No
Sounds. Save your scheme under the name Dad and Mom. Let your kids then assign
their favorite sounds to Windows 95 events and save their sound scheme under the
name Crazy kids. When you use Windows 95, open the Sound dialog, and select
your sound scheme. You'll be able to work without the sounds. When your kids use
the computer, they can select their sound scheme, so they can beep and chime all
they want while computing.
(You know that Windows 95 event sounds aren't the real problem, don't you? It's all
those games they play that really make noise!)