![]()
![]()
![]()
For the next hour, you are going to learn a lot about Windows 95's interface. You will become comfortable with managing windows and icons.
There are several examples to follow along in this hour. Some people who have used Windows for years may not know more than you'll learn this hour. Once you master the fundamental approach to managing Windows 95's screens and elements, you'll see that this hour's techniques will follow you and help you manage almost every other aspect of Windows 95 that you work with in the future. In other words, once you master the basics of the window and screen management tools, you'll use those abilities in all your Windows 95 applications work.
The highlights of this hour include:
JUST A MINUTE:: Windows appear all over the place when you work with Windows --that's why it's called Windows! Therefore, taking a moment to learn proper windows management now will reap big-time savings and reduce confusion in the future.
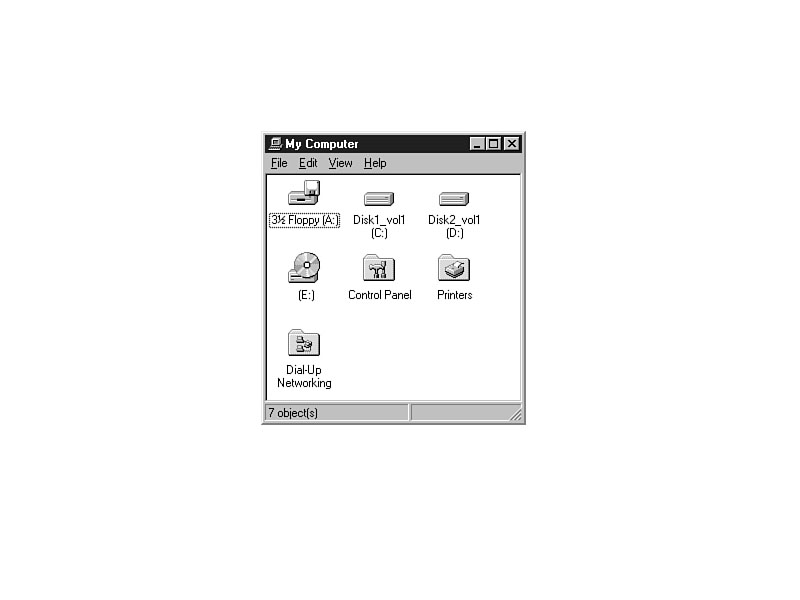
The first window that you will work with is called the My Computer window. In this hour you will look at that window to learn how to work with windows. Once you master window management in this hour, the next hour will explain how to use the contents of the My Computer window. Locate the My Computer icon on your Windows 95 desktop. Double-click the icon to open the My Computer window. Most icons on the desktop open to windows when you double-click them as you'll see throughout this book.
Figure 2.1 shows the My Computer window with all its control buttons and window
components labeled. You will find this same window structure in almost every window
that you open. You will even find windows like these in the Windows 95 applications
that you run, such as a database program. Although you saw a couple of simpler windows
in this book's previous hour, the window in Figure 2.1 is more typical of the windows
you'll work with most often.
Figure 2.1.
Use a window's controls and menus to manage the window.
Familiarize yourself now with the buttons and window sections called out in Figure
2.1 because almost every window contains these windows controls or a subset of them.
Here are some of the more general things you can do with such a window on the screen:
You can have one or more windows on your screen, some overlapping other windows, some completely covering others, and you will sometimes see windows side by side or above other windows. In a typical Windows 95 user's day, the user may have two or more applications running at the same time. Each of those applications might display one or more windows of its own.
You must learn how to manage all those windows if you want to be as productive as possible. Don't jump to the conclusion, though, that all those windows result in confusion. On a typical desk, even the desks of the most organized people (the author not being one of them!), you'll find all sorts of paper stacks, and those stacks don't imply disorganization. The desk's user simply has to know how to organize the stacks and bring the most important stacks to the forefront when he or she wants to work on them.
JUST A MINUTE:: When you start a program, the taskbar gets a new taskbar button with the name of that application appearing on the taskbar button.
Some applications display single windows. Other applications might display multiple windows. For example, there are word processors that can display two documents side by side in two different windows.
If you temporarily finish working with a window, you can minimize that window by pressing the window's Minimize button. Minimizing a window keeps the program in the window loaded and active but puts the program out of the way until you are ready to return to that program again. Even if you minimize a window, the window's icon and description remain on the taskbar at the bottom of the screen. The taskbar continues to hold the application's button until you completely close the application.
3.1 Step Up Notice how the icons on Windows
95's control buttons illustrate the purpose of those buttons better than the equivalent
control buttons in Windows 3.1.
Task 2.1: Minimizing a Window
Step 1: Description
The Minimize button clears the window from your desktop. The program that you have
running inside the window is still loaded and active, but the program no longer takes
up screen space. The taskbar continues to list the program because the program is
still active.
Step 2: Action
Step 3: Review
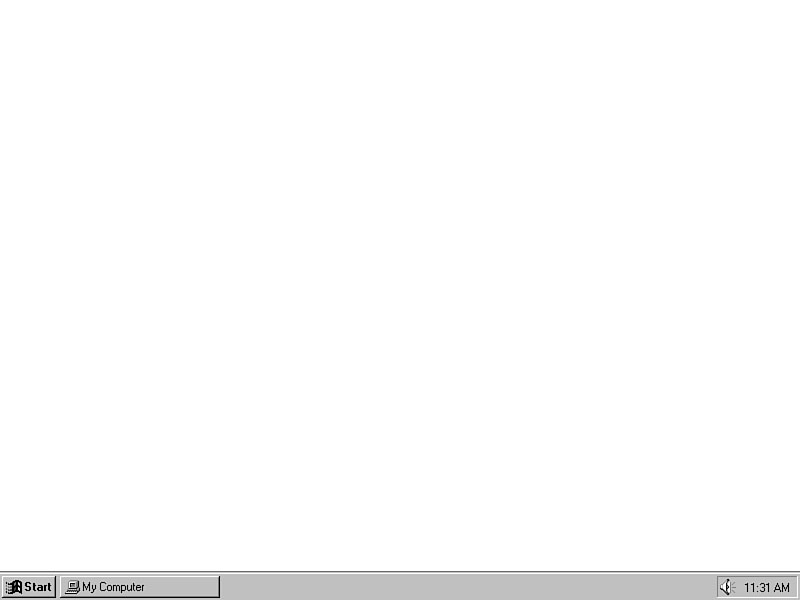
When you minimize a window, whatever window or icon is behind that window will then
appear. Remember that the way you know a window is still active is that its icon
and description still appear on the taskbar as shown in Figure 2.2.
Figure 2.2.
The window's taskbar button still appears after you minimize a window.
The taskbar button in Figure 2.2 contains the caption My Computer. The caption says
My Computer because the minimized window's title bar contained the title My Computer.
The taskbar button always contains the same title listed in the application's title
bar.
JUST A MINUTE:: Depending on the length of the title and the number of items in the taskbar, the taskbar may only show the first few letters of a window's title.
Windows 95 supplies several ways to enlarge a window. You can enlarge a minimized window from its taskbar status to the window's regular size. You can also maximize a window that's already showing, to take up the entire screen space. Here are the ways to enlarge a window:
This section discusses the first two window enlarging methods that utilize buttons,
and the next section explains how to enlarge a window manually.
Task 2.2: Enlarging a Minimized Window
Step 1: Description
Use the taskbar buttons to display minimized windows. In other words, if you have
one or more minimized windows and want to work with one of those window's programs,
click the matching taskbar button, and the window reappears at its original size
before you minimized the window.
Step 2: Action
Step 3: Review
The taskbar lists windows that represent all running programs. Some of those programs
may have their windows showing on the screen; other programs are minimized so they
take no screen space but are still loaded. Clicking a taskbar button causes a minimized
window to return to its original size.
JUST A MINUTE:: You'll see icons other than the open windows on your taskbar. At the right of most taskbars lie the time of day along with other icons such as the speaker icon.
Task 2.3: Maximizing a Window
Step 1: Description
As long as a window contains a Maximize button, you can maximize that window to the
screen's full size. (Some windows are designed to be no larger than a preset size;
these windows do not have Maximize buttons.) When you want to dedicate the entire
screen to a window, you can usually maximize the window by clicking the window's
Maximize button.
TIME SAVER: You also can maximize a window by double-clicking the window's title bar.
Step 2: Action
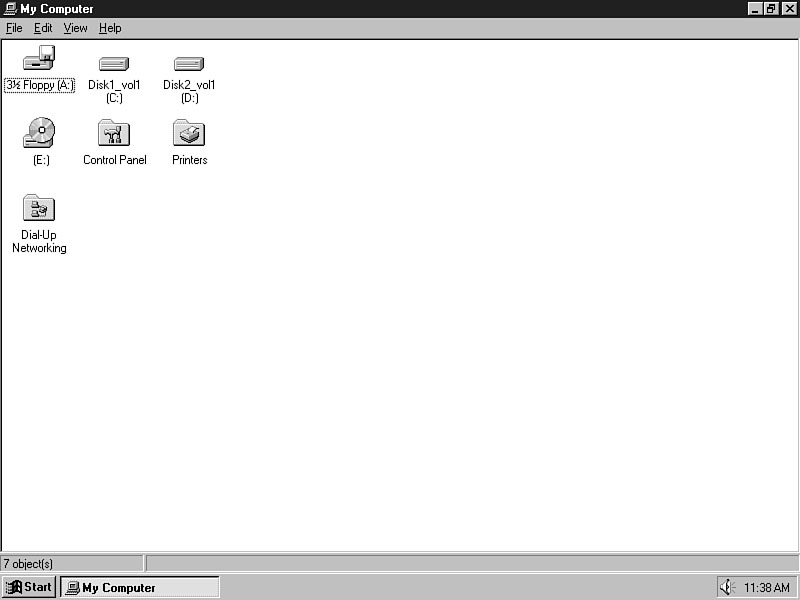
Figure 2.3.
A maximized window fills the entire screen.
Step 3: Review
You will often want to maximize a window if you are doing a lot of work within that
window's program. For example, most word processor users maximize the word processing
window while typing a document so that more screen real estate goes to that document
and, therefore, more of the document appears on the screen at one time. You can maximize
a window by clicking the window's Maximize button or by double-clicking the title
bar.
TIME SAVER: If you have loaded several programs and one program's window is covering up another program, you can click the hidden program's taskbar button to bring that covered window to the top of the window stack and into view.
So far, you've seen how to minimize a window so it shrinks to a taskbar button. You've seen how to maximize a window to fill the screen. You've also seen how to restore that maximized window to its original size. This section shows you how, by dragging the mouse, you can resize a window to any size you want.
When you point to any window's edge or corner, the mouse cursor changes from its default shape (the pointing arrow) to a bidirectional arrow. The bidirectional arrow indicates that you are at one of the edges of the window and that you can drag that edge or corner inward or outward to change the size of the window.
When you drag one of the four straight edges, the window grows or shrinks left,
right, up, or down. When you drag one of the four window corners the window grows
or shrinks in both height and width in the direction of the cursor's bidirectional
diagonal shape. (See the Windows Minute "How to Operate the Mouse," or
the terms review in Hour 1, for common mouse actions including how to drag the mouse.)
Task 2.4: Manually Resizing a Window
Step 1: Description
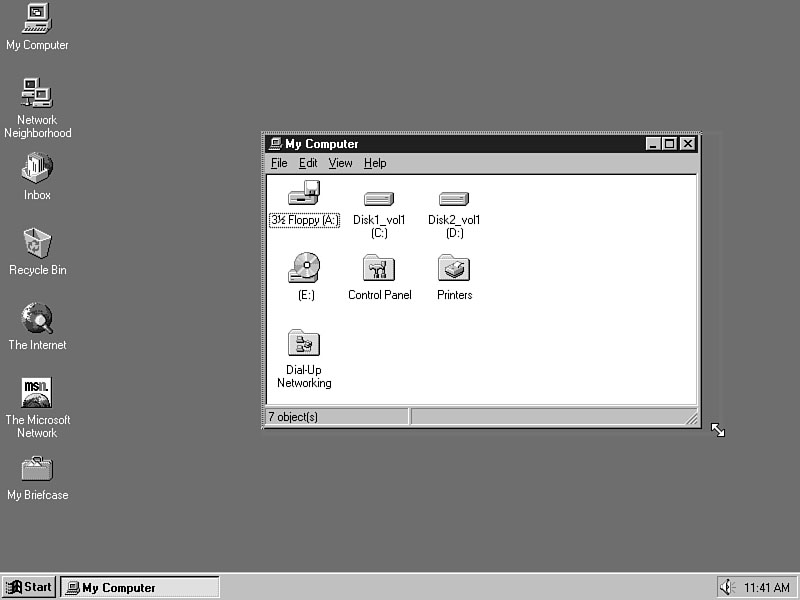
Figure 2.4 shows the My Computer window after it is expanded down and to the right.
In this task, you'll duplicate the figure's window size by manually enlarging your
own My Computer window's size.
Figure 2.4.
You can manually enlarge a window with the mouse.
Step 2: Action
Step 3: Review
When you touch the corner of the window, the mouse cursor's shape changes to a bidirectional
arrow that indicates manual resizing is now available. When the bidirectional arrow
appears, you can drag the mouse left, right, up, down, or diagonally to move that
edge or corner of the window and resize the window.
JUST A MINUTE:: You cannot resize some windows due to the way they are designed. Some windows will only enlarge or shrink to dimensions pre-set by the window's programmers. The Welcome screen that you see when you start up Windows 95 is one such screen. You cannot resize or minimize the Welcome screen.
The windows that appear on your Windows 95 desktop don't always appear in the
location you want. That's okay. Using the mouse, you can easily drag a window to
another location on the screen. The title bar acts like a handle for the window--to
move the window, you drag the window's title bar.
Task 2.5: Moving a Window
Step 1: Description
Sometimes, you'll need to rearrange the windows on your screen so they form a more
logical appearance as you work. To move a window, drag its title bar. As you move
the window by dragging the title bar, an outline of the window follows the mouse.
When you release the mouse button, the window appears in the new location.
Step 2: Action
Step 3: Review
Any time the order of your screen's windows is inappropriate, you can move one or
more windows to different locations.
Windows 95 is obviously full of windows and those windows contain executing programs that work with data values of all kinds. This windowed concept gives you a flexible and manageable way to run and control several programs at one time. When you open a window in the real world, you are using that window to let air inside a building. Opening a window in Windows 95 means that you are using the program or data area located within that window. Whenever you start a windowed program or enlarge a window that's been minimized, you are opening the program's window.
When you're through with an open window, both in the real world and in Windows 95, you must close the window. Closing a window eliminates the window from view and if that window contained a running program (as most do), that program will cease executing. The window's taskbar button will no longer appear on the taskbar.
CAUTION: Remember that closing a window differs from minimizing the window. Closing a window stops a program; minimizing a window keeps it running in the background.
If you open a window from an icon, as you did when you first opened the My Computer window earlier in this hour, closing the window eliminates the window from your desktop area, but the window's icon will remain on the screen in its original place. Unless you take some advanced steps to erase the icon and its contents, the icon remains on your Windows 95 desktop area whether the corresponding window is open or closed.
TIME SAVER: You can rearrange icons on your screen by dragging them with the mouse just as you rearrange windows.
Keep in mind that some windows contain running programs (such as the window you see when typing in a word processor program) while other windows contain icons and even more windows (such as the My Computer window). You can close both kinds of windows by clicking the Close button. When running a program you can also close its primary window, and hence terminate the entire program, by double-clicking the program's icon in the upper-left corner of the window or by terminating the program (normally by selecting File | Exit from the program's menu).
3.1 Step Up Unlike Windows 3.1, Windows 95
contains folder icons. These icons, when you double-click them, open up still
more folders or windows of icons. In Windows 3.1, a program group could not contain
other program groups, but Windows 95's folders (the new representation for program
groups) can contain other folders. Folders also represent directories on your disk
when you see folder icons in file listings.
Task 2.6: Closing a Window Using the Mouse
Step 1: Description
When you're done with a window, you can close the window by clicking the Close button
(the window control button with an X that appears in the upper-right corner
of the window), double-clicking the window's icon, or (if the window represents a
running program) using the program's termination commands to close the program and
the window.
Step 2: Action
Step 3: Review
Closing a window is like taking a paper file off your desktop and storing that file
away in a file cabinet. The window is completely gone from your work area just as
the paper file would be. If you want to work in the window again you'll have to reinitiate
the commands that displayed the window to begin with (usually by double-clicking
an icon that represents the window).
All windows contain icons in their upper-left corners. The icon is the same icon that you'll see when the window is closed. For example, you clicked a large PC icon on the Windows 95 desktop to open the My Computer window. Once opened, the My Computer window contains a small icon that matches the start-up icon you double-clicked to start the program.
Earlier (in the section labeled, "Closing a window") you learned to
double-click this icon to close a window. The icon also represents a Control menu
with which you can control the window's size and placement. Figure 2.5 shows the
Control menu for the My Computer window. Almost every Windows 95 program contains
this same menu.
Figure 2.5.
You can control a window's size and placement through the Control menu.
Just as a menu in a restaurant is a list of food items you can choose, a Windows
menu is a list of commands you can select. The Control menu is a typical Windows
95 menu. Many menus operate the same way that the Control menu operates--that is,
the list of menu choices stays out of the way until you are ready to choose from
it. You've seen another kind of menu in Hour 1: The Start menu. Once you display
a menu, you can move through the menu selections using the keyboard's up and down
arrow keys, as well as with the mouse.
The first thing you'll notice about Figure 2.5 is that the top choice, Restore, is grayed out. Often one or more menu items will be grayed out, meaning that the choice is unavailable at this time but, depending on circumstances, may be available from this menu at a later time.
Just like the Start menu, the Control menu offers a list of shortcut keys with which you can quickly select a menu item. For example, Alt+N selects the Control menu's Minimize command as long as the Control menu is shown at the time you press Alt+N.
There's another kind of shortcut key you'll see on the Control menu. Both Alt+C and Alt+F4 select the Control menu's Close command. The Alt+F4 key, however, is an accelerator key meaning that the Control menu does not have to be showing when you press Alt+F4 to close the window. Accelerator keys generally involve function keys and appear to the right of their associated menu choices.
As with the Start menu, you can also select from the Control menu using the mouse. You now know everything there is to know about using and choosing from Windows 95 menus!
JUST A MINUTE:: If you accidentally open a window, such as the Start or Control menu, press Esc to close the menu.
TIME SAVER: Later in this hour, when you use the My Computer window's menu bar (shown previously in Figure 2.1), you'll select commands and shortcut keys from the menu bar just as you do from the Control menu. The only difference is that the commands on the menu bar always appear at the top of the window whereas the Control menu appears only when you click the Control menu icon.
Table 2.1 explains what each Control menu command does.
Table 2.1. The Control menu commands.
| Command | Description |
| Restore | Restores a window that you've maximized. The Restore command is available (not grayed out) only when the window is maximized. |
| Move | Moves a window on the screen to a different location. |
| Size | Resizes a window by enlarging or shrinking the window. |
| Minimize | Shrinks the window to the taskbar icon and description. |
| Maximize | Enlarges the window to full-screen size. |
| Close | Closes the window. If the window is a running program, the program terminates. |
Step 3: Review
The Control menu lets you use the keyboard to mimic window commands available with
the mouse and window buttons. The Control menu also contains the Alt+F4 accelerator
key that closes the window at the press of a keystroke even when the Control menu
is not displayed at the time.
Mastering fundamental windows management, as you've done so far this hour, is like learning to drive a car. You have to learn the basics before getting into traffic. Now you are ready to begin traveling the road toward the Indy 500, by seeing what Windows 95 can really do. The first step requires understanding how Windows 95 views your specific computer, and the contents of the My Computer window shows you just that.
This hour taught you the ins and outs of windows management. Learning how to manage windows is a fundamental skill that Windows 95 users must understand. Windows 95 lets you open, resize, move, and close windows. The windows on your desktop contain the running applications, and part of running Windows 95 programs requires being able to position those windows where you want them.
accelerator key A key found on a menu, usually a function key used in conjunction with the Alt key (such as Alt+F4), that lets you initiate a menu command from the keyboard without first having to display the menu.
closing a window The practice of eliminating a window from view and terminating any program that might be running within the window at the time.
Control menu A menu available on all windows within Windows 95 that lets you move and resize windows from the keyboard; it is accessed by clicking the window's icon in the upper-left corner of the window.
folder A special icon that contains other icons which are displayed when you double-click the folder icon; a grouping of related files stored under the same subdirectory.
maximized window A window that you've expanded to the size of the entire screen.
minimized window A window that you've shrunk down to a taskbar icon.
opening a window The process of starting a program in a window or double-clicking
an icon to display a window.
shortcut key An underlined letter on a menu that you can combine with the Alt
key to issue a menu command.
![]()
![]()
![]()