![]()
![]()
![]()
Windows 95 includes a comprehensive program that you might use every time you turn on your computer. The Windows 95 Explorer graphically displays your entire computer system in a hierarchical tree structure. With Explorer, you have access to everything inside your computer (and outside if you are networked). Even though the My Computer window also displays all the devices in your computer, Explorer can do so inside a single window whereas you must open separate windows for each device to see the contents of devices within the My Computer window. The advantage of the single window is that you have much more freedom to manage files, folders, icons, and even electronic mail using a single Explorer window.
This hour demonstrates the Windows 95 Explorer and shows you its ins and outs. You have already mastered some of Explorer's commands in the previous hour because Explorer uses some of the same copy and move techniques that Open dialog boxes use. Explorer goes far beyond the capabilities of dialog boxes, however, by letting you manipulate all of your computer's software and hardware. Once you've learned about Explorer, the hour wraps up by showing you some time- and disk-saving features of Windows 95.
The highlights of this hour include:
You'll find the Windows Explorer program listed on the Start menu's second cascaded
menu. Click the Start button now to display the Start menu. Select Programs,
and then select Windows Explorer. The Explorer window will open up to look like the
one shown in Figure 6.1. Figure 6.1 shows the Explorer screen fully maximized, but
you can run Explorer in a smaller window if you want something else to appear on
your screen as well.
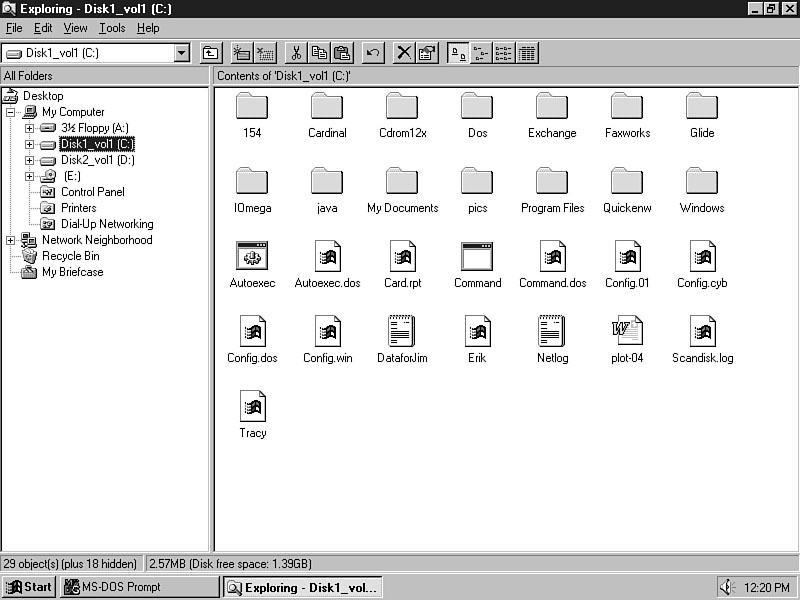
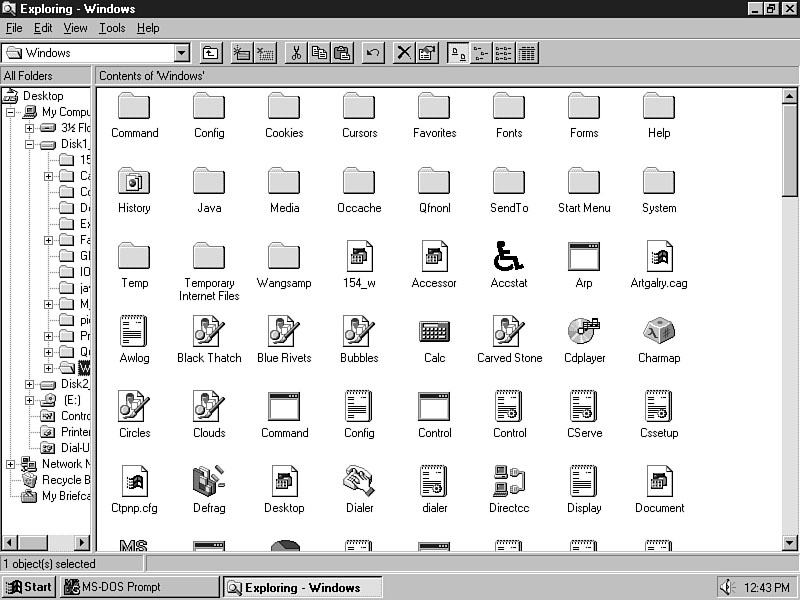
Figure 6.1.
Explorer's opening window.
JUST A MINUTE: Your Explorer screen may look slightly different depending on your Windows 95 configuration. You'll see how to change your view of Explorer in the next task.
TIME SAVER: Quickly start Explorer by right-clicking over the Start menu and selecting Explore from the pop-up menu that appears.
The left side of the Explorer screen contains a hierarchical overview of your computer system. Click the vertical scroll bar on the left window, if there is one, to see the rest of the hierarchical system tree.
JUST A MINUTE: If a folder icon appears with a plus sign to the left of it, as the Windows folder does, that folder contains additional folders. Folder icons without the plus sign contain only documents (as you learned in Hour 5, "Cruise with Documents and Windows," a Windows 95 document might be any kind of file, including programs that you can run), but not additional folders. When you open a folder and display its contents, the plus sign changes to a minus sign, as you'll see in the first task.
The right window contains a pictorial overview of the contents of whichever device or folder that you select in the left window. The overview might contain large or small icons depending on the view you click. As you select different items in the left window, the right window changes to reflect your changes. Task 6.1 guides you through an initial exploration of Explorer.
3.1 Step Up Did you ever use the full capabilities of the Windows 3.1 Program Manager and File Manager? Rarely do people, even experts, know or use all the capabilities in those programs. The two utility programs are simply too cumbersome to use all of their power.
The document architecture of Windows 95 goes a long way toward simplifying the
things you could have done, but often did not do, in Program Manager. The Windows
95 Explorer makes working with the Windows 3.1 File Manager seem like working with
a rock tablet and chisel. The Explorer is not just a disk and file manager but a
complete system manager. Instead of getting a single view of a single disk, Explorer
continuously maps out your entire computer system so you can easily work with multiple
hardware devices. The Windows 95 Explorer is not even limited to directories and
files, but displays folders, including your networked folders, as well as online
Microsoft Network and Internet services.
Task 6.1: Changing Explorer's View
Step 1: Description
This task teaches you how to adjust Explorer's display to see the Explorer screen
in different ways. As you use Explorer, you may change the display to offer the best
option for the information you're looking for at the time.
This task assumes that you've already started Explorer as requested in the previous section.
TIME SAVER: There are several ways to do the very same things in Windows 95. You can start Explorer by right-clicking over the My Computer icon.
Step 2: Action
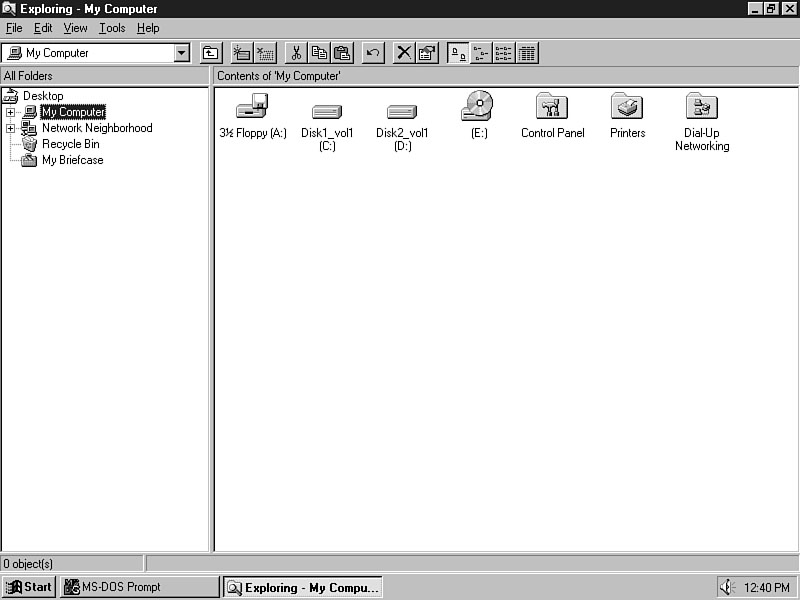
JUST A MINUTE: Notice that the right window does not change as you click the C: icon in the left window. The reason is that the right window always displays the contents of whatever you highlight in the left window. Whether or not the C: icon is open (with a minus sign) or closed (with a plus sign), the C: icon is highlighted. The right window displays that selected drive C's highest level folders and documents. If you were to click on one of those documents on drive C, the right window would then update to show the contents of that folder (don't click on a folder just yet).
Figure 6.2. You can
view the desktop contents in the Explorer.
CAUTION:: Your toolbar may already be on your Explorer screen. If so, selecting View | Toolbar will make the toolbar go away. Select View | Toolbar until you see the toolbar. A checkmark will appear next to Toolbar on the View menu.
Figure 6.3.
The toolbar makes common tasks easier.
Figure 6.4. Sometimes
you want more detail about the Explorer items.
Figure 6.5.
Adjust the Explorer window sizes if you need more room.
JUST A MINUTE: If you make the left or right window too small (such as this figure's left window is), Windows 95 adds a horizontal scroll bar to the small window so you can scroll its contents back and forth to see what's highlighted or to select another item.
JUST A MINUTE: When viewing your system and its folders inside Explorer, all of the techniques that you learned in the previous hour's discussion on Open dialog boxes apply for Explorer as well. For example, you can open a folder by double-clicking it, and then return to the previous (parent) folder by clicking the Up One Level icon on the Explorer's taskbar.
Figure 6.6.
Select multiple documents and folders if you need to copy several at a
time.
TIME SAVER: If you want to select all but one or two documents and folders inside a window, first Ctrl-click on the one or two that you don't want to select (which selects those) and choose Edit | Invert Selection to reverse the selection. All the items that were not selected will now be selected, and the one or two that were selected are not selected anymore.
Step 3: Review
The Explorer windows give you both high-level and detailed overviews of your computer
system and the computer's files. Explorer offers two windows for two different views:
A computer-level view and a folder view, if you need one. Clicking on folder icons
inside either window opens those folders and gives you a view of more documents and
folders deeper within your computer system.
Once you display documents and folders, you are free to copy, move, delete, and rename those items as you learned to do in the previous hour inside the Open dialog boxes.
CAUTION:: You cannot select parts of a document to copy or move inside Explorer as you could do with Open dialog boxes. Remember that once you open a document using a program, such as a spreadsheet, you see the contents of that document. The text selection commands you learned in the previous hour selected text only from documents you had already opened; you cannot do that inside Explorer.
3.1 Step Up The File Manager's windows displayed only a single disk drive at a time. Therefore, when you wanted to copy or move a file from one directory on one disk to another directory on a different disk, you had to open two windows using the File Manager non-intuitive menu. Then you had to select the two directories on the two disks, and then issue the command to copy or move.
The strength of Explorer is that your entire computer system appears in the left window at all times. When you want to drag a document or folder to a different directory on a completely different drive (or even to another computer on the network if you are connected to a network), the target disk drive always appears in the left window. As long as you've clicked the disk drive's plus sign to display that disk's directories, you can drop a file into that directory from elsewhere in the system.
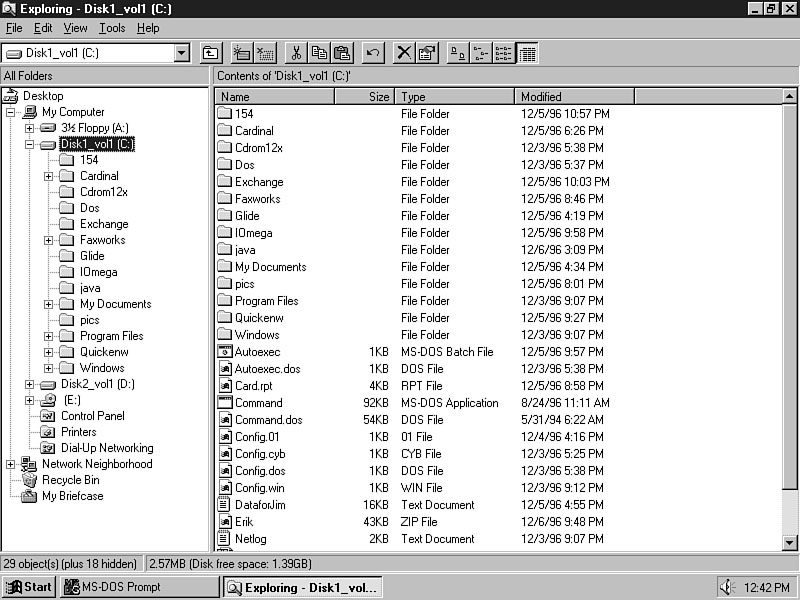
Explorer supports various display options for the items inside its windows. As you'll recall from previous hours, Windows 95 supports the use of filename extensions. The View | Options command displays tabbed dialog boxes that let you control the items in the Explorer display.
3.1 Step Up Windows 95 often uses filename
extensions as a means of registering file types. Although two files of different
types can have the same extension, the extension is often a clue as to the purpose
of the file.
Task 6.2: Changing Explorer's Options
Step 1: Description
Different users require different output from the Explorer program. There are types
of documents that you simply don't need to display during normal work inside Explorer.
The system files are good examples of files that the typical user does not need to
see.
In addition, the actual location of the file, known as the path, does not always
match the sys-tem of embedded folders. (See Hour 4, "Take Windows 95 to Task,"
for more information on pathnames.) In other words, a document may be located inside
two embedded folders shown with the Explorer display, but the actual file might be
embedded three levels deep on your hard disk. The system of folders--but not always--matches
the system of directories on your disk. If you need to know exactly where folders
and documents are located on your disk drive, you can request that Explorer display
the full pathname of those folders and documents.
Step 2: Action
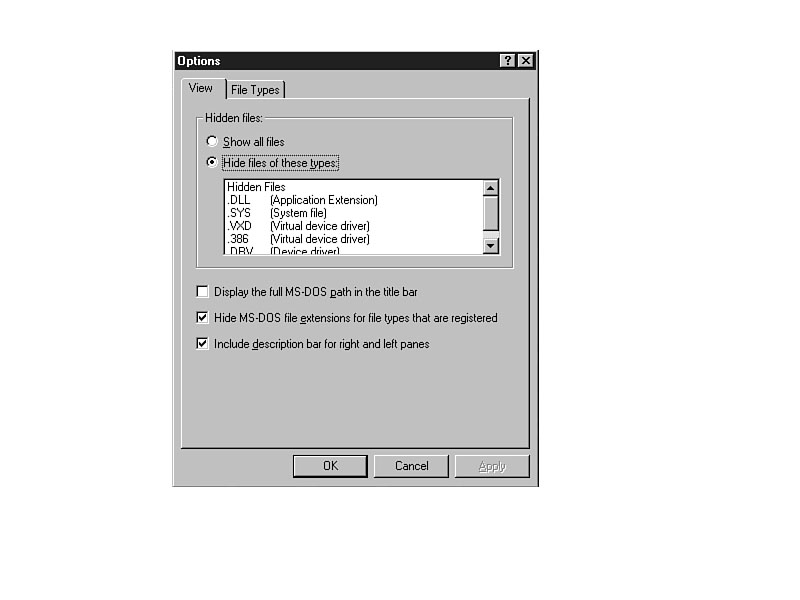
Figure 6.7.
The Options dialog box determines the appearance of Explorer.
TIME SAVER: If you are familiar with MS-DOS and filenames, you might feel more comfortable if you display the file extensions on the Explorer screen documents. Hiding the extensions reduces clutter in the right window, but with the extension, you can determine the exact name of the file when you need the exact name.
CAUTION:: If you hide filename extensions in Explorer, Windows 95 hides those extensions in almost every other file listing. For example, if you hide Explorer's extension display, you will no longer see extensions in WordPad's Open dialog boxes. You won't even see them in applications that you purchase in addition to Windows 95 applications, such as Microsoft Excel.
Step 3: Review
If you don't like the way Explorer displays information, you can probably change
the display. Explorer's options let you determine how documents appear, how large
their windows are, and whether or not filename extensions should appear.
Task 6.3: Registering File Types
Step 1: Description
As the previous hour explained, Windows 95 makes the document, rather than the program,
the focus of everything you do. When you want to edit a graphic image, you ought
to be able to click on that image instead of starting a graphics program, and then
loading the image from there. By registering file types, and the file's extension,
you teach Windows 95 how to work with all files of that extension.
Suppose that someone designs a new graphics format after you begin using Windows 95. The format increases the computer's graphic compression ability and lets you store huge graphics files in a small amount of space. Suppose these compressed graphic files have an extension of .CPR and the program that displays those graphics is called Compress Graphics. You can associate the .CPR filename extension to the Compress Graphics program name so that when you click on any file whose extension is .CPR, even if that extension is not showing in the Explorer window, Windows 95 knows to start the Compress Graphics program and automatically loads the image you double-clicked.
This task shows you how to view and change any associations that currently reside on your system.
CAUTION:: You are probably better off not changing any file associations at this time. The only reason to change a current association is if you install a program you like that works with a certain type of file better than one already registered for that type. Most Windows 95 installation programs automatically register their file types when you install the programs. Therefore, this task is more informative than active so you can better understand the purpose of file associations.
Step 2: Action
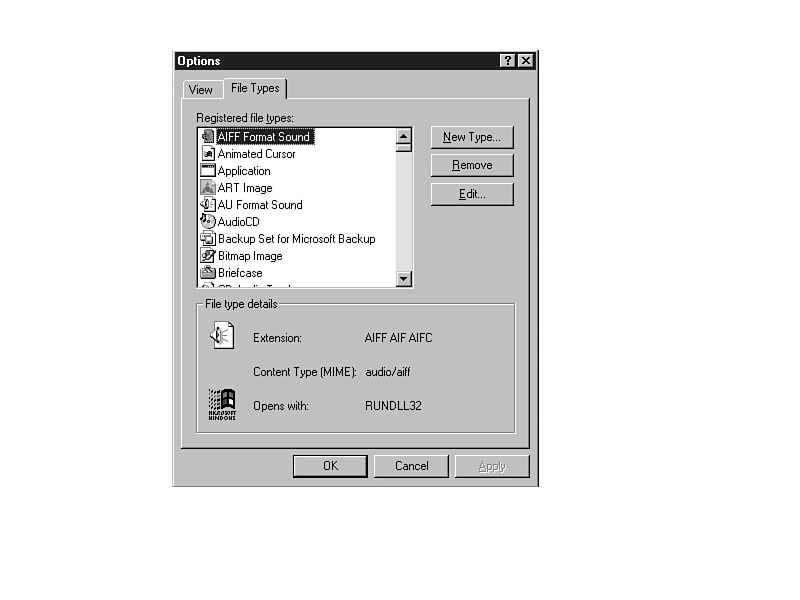
Figure 6.8.
The File Types dialog box where you register file types.
JUST A MINUTE: When double-clicking a file to start that file's associated program, the file's extension does not have to show on the screen. Remember that many users hide the display of filename extensions when using Windows 95.
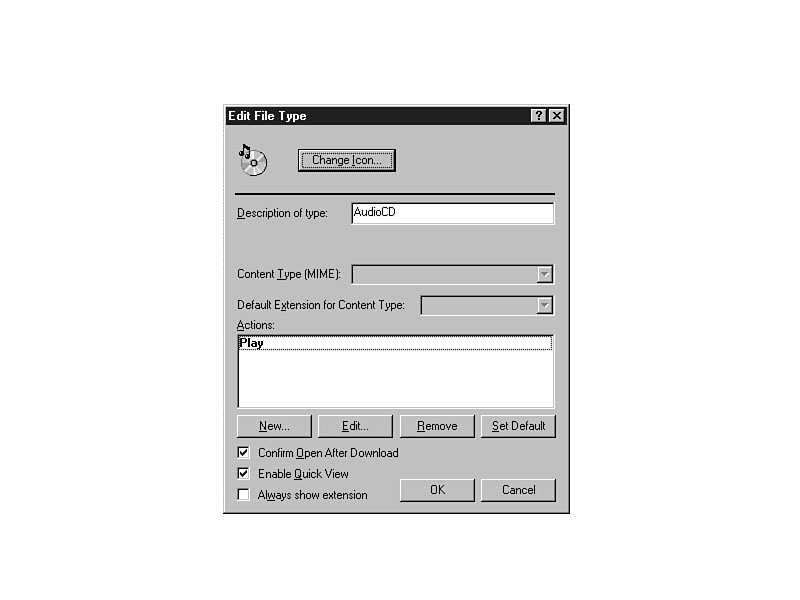
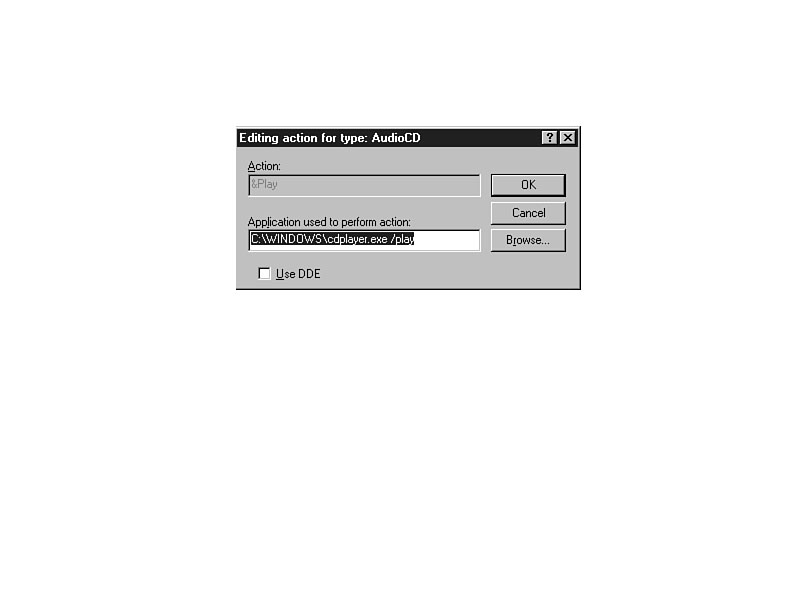
Figure 6.9. The Edit File Type dialog box controls the details of file associations.
Figure 6.10.
The lowest level of detail available when you associate a file type.
Step 3: Review
The file type registration is fairly complex. Rarely will you have to associate files
with applications because the application's installation program should register
its file types automatically. You might be curious as to how Windows 95 "knows"
how to open programs when you click over those programs' document files, however,
so you may want to return to the File Types dialog box once in a while to study various
file associations as you've done here for the .CDA audio file types.
JUST A MINUTE: Want to know what those song files are all about? The fourth part of this book, entitled "Into the Nighttime," describes the multimedia capabilities of Windows 95, including the CD Player program and audio files stored on your system.
These days, computers are powerful. Not only are they powerful but they hold lots of information, and wading through that information looking for something can be daunting. Windows 95 offers a powerful find feature, available both through Windows 95 Explorer, and on the Start menu, that searches your computer for files and folders that you are looking for.
JUST A MINUTE: The Find system hunts for files and folders across networks, hard disks, floppy disks, CD-ROM drives, and even Microsoft's online service called Microsoft Network. This hour describes how to look for documents and folders on the disks and CD-ROM drives only, because that's where you'll be using Find most of the time.
Task 6.4: Using Find
Step 1: Description
The Find command locates files that meet a search criteria. You can search
an entire disk for a specific file or for a document that contains a certain word
or phrase.
Have you used the Windows 3.1 File Manager to search for files? As you might expect, Windows 95 offers a more powerful tool for searching through documents and folders.
If you know a partial filename, you can find all files that contain that partial
filename. If you want to search for a file that you modified two days ago, you can
find all files with modified dates that fall on that day. You can even save searches
that you perform often so you don't have to create the search criteria each time
you need to search.
Step 2: Action
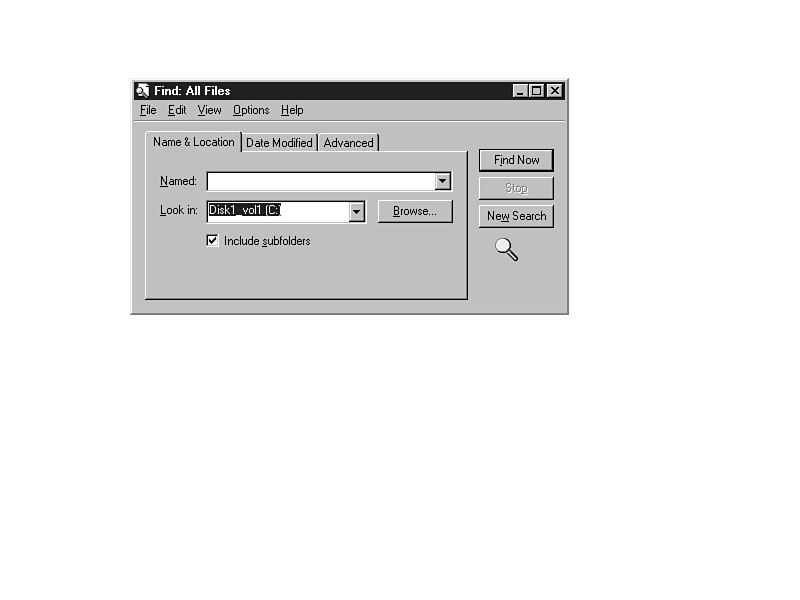
Figure 6.11.
The Find dialog box searches across drives for specific documents and folders.
CAUTION:: If your Windows folder is located on a different drive, type that drive's letter instead of C, or open the Look in dropdown listbox and select the drive and folder.
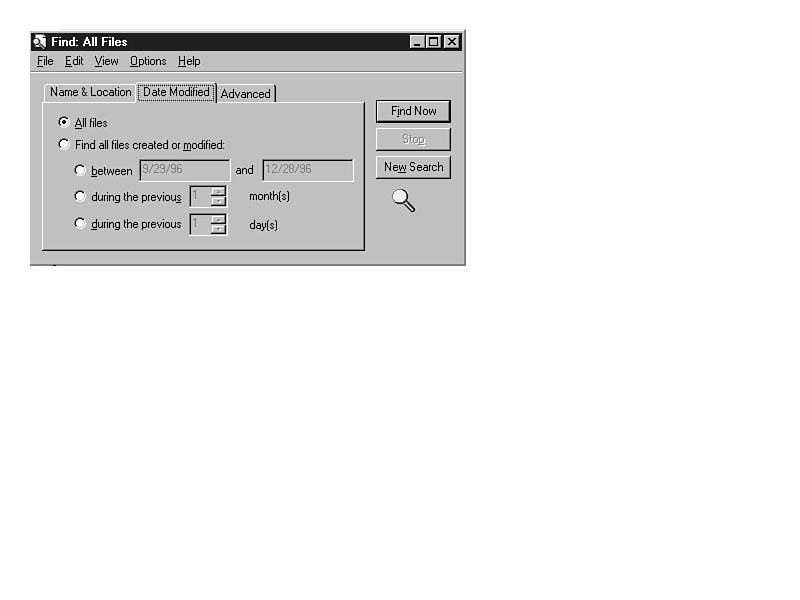
Figure 6.12.
You can narrow the search to specific dates.
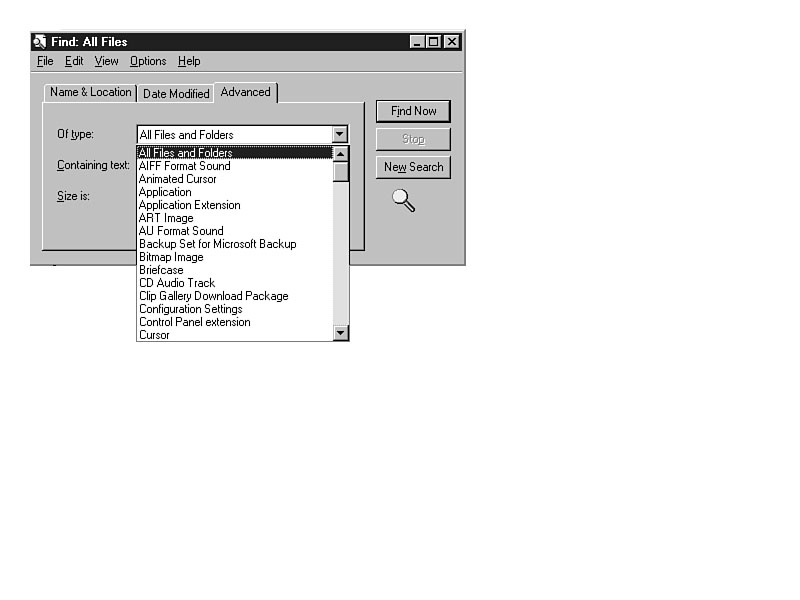
Figure 6.13.
Search through specific file types with the Advanced dialog box.
JUST A MINUTE: For this task keep All Files and Folders selected to perform a search across every file in the Windows folder.
TIME SAVER: During a long search you can click any button on the taskbar to start or switch to another program. The file search can continue in the background while you write a letter to someone or play a game.
TIME SAVER: Remember that the Start menu contains a Find command that displays the Find dialog box. The Start menu's Find command is available to you even when you're not using Explorer. You can both left-click and right-click the Start button to access the Find dialog box.
Step 3: Review
The searching capability of Windows 95 finds documents and folders on your system
that match certain criteria that you provide. You can search for documents by name
or by a search string. If you want to limit the search to specific modified date
ranges you can do so.
When you delete files using dialog boxes or Explorer, you now know that those files go to the Recycle Bin. Once in the Recycle Bin, those files are out of your way and deleted in every respect except one: They are not really deleted! Those files are gone from their original location, but they stay in the Recycle Bin until you empty the Recycle Bin.
Periodically, you'll want to check the Recycle Bin for files that you can erase completely from your hard disk. The following task explains the Recycle Bin in more detail.
TIME SAVER: The Recycle Bin icon changes from an overflowing bin to an empty one when you empty the Recycle Bin. Therefore, you can tell at a glance whether or not your Recycle Bin is empty.
Task 6.5: Using the Recycle Bin
Step 1: Description
The Recycle Bin appears on your Windows 95 desktop. Any time you want to view or
delete items from the Recycle Bin, display your desktop and access the Recycle Bin
icon.
TIME SAVER: If your desktop is completely covered up with running applications, you don't have to close those applications to see the desktop. Minimize your application windows until you can see the Recycle Bin on the desktop. If you want to quickly minimize your desktop open windows, right-click the taskbar and select Minimize All Windows.
Step 2: Action
Figure 6.14.
The Recycle Bin lists deleted files that you can recover.
JUST A MINUTE: If you've deleted portions of a file (the scraps), the Name column contains the first few characters from that deleted text.
CAUTION:: The Recycle Bin dialog box contains all deleted files on your system--not just the deleted files on one of your disk drives.
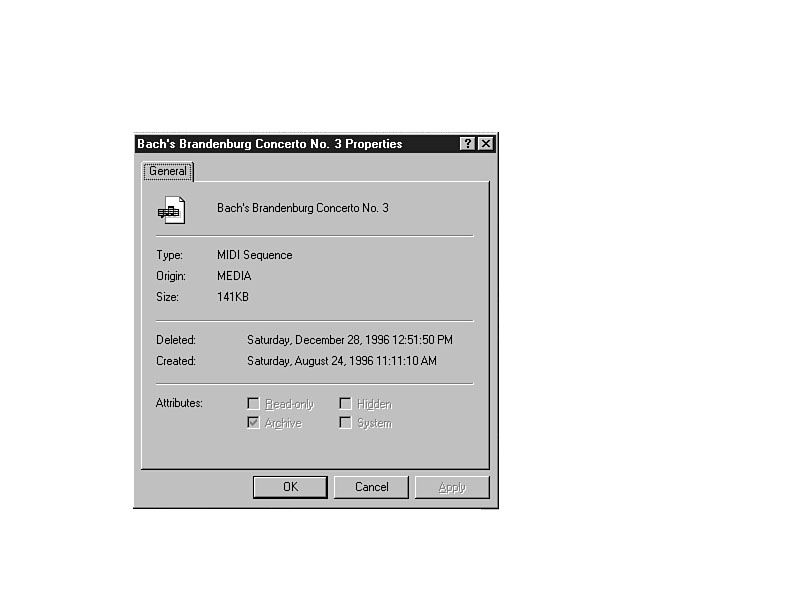
Figure 6.15.
You may display the properties of any selected item.
TIME SAVER: Select View to look at a Recycle Bin document if you want to verify the contents before deleting the document.
JUST A MINUTE: Using a dialog box, Windows 95 asks once more if you are sure you want to empty the Recycle Bin. This precaution ensures that you don't inadvertently erase files that you might really need.
Step 3: Review
The Recycle Bin lets you delete files without really removing those files from your
disk. All deleted files go to the Recycle Bin. Those files are not truly deleted
from your disk until you empty the file from the Recycle Bin. You can empty a single
selected file, several selected files, or the entire Recycle Bin.
CAUTION:: Remember that the Recycle Bin does not hold files you delete from the MS-DOS prompt. When you use MS-DOS to delete a file, Windows 95 erases the file as soon as you issue the command. Unlike the MS-DOS that came with earlier versions of Windows, Windows 95's MS-DOS does not include an UNDELETE command. Make sure you want to delete a file when you issue the MS-DOS DEL or ERASE commands.
There are numerous ways to make Windows 95 easier for your day-to-day work. Three often confusing time-saving techniques are
It's not that these three time-saving techniques are difficult to understand,
but they are difficult to set up. Once you set them up, though, these three techniques
make life easier for the Windows 95 user. Once you create single-key access to a
program, or a shortcut, or change the Start menu, those time-savers stay in effect,
making work inside Windows 95 much more efficient.
Task 6.6: Adding Time-Savers
Step 1: Description
The time-savers described in this task may not be for everyone, but they often help
users of Windows 95. You'll have to experiment with the techniques until you find
the ones that help you the most.
Step 2: Action
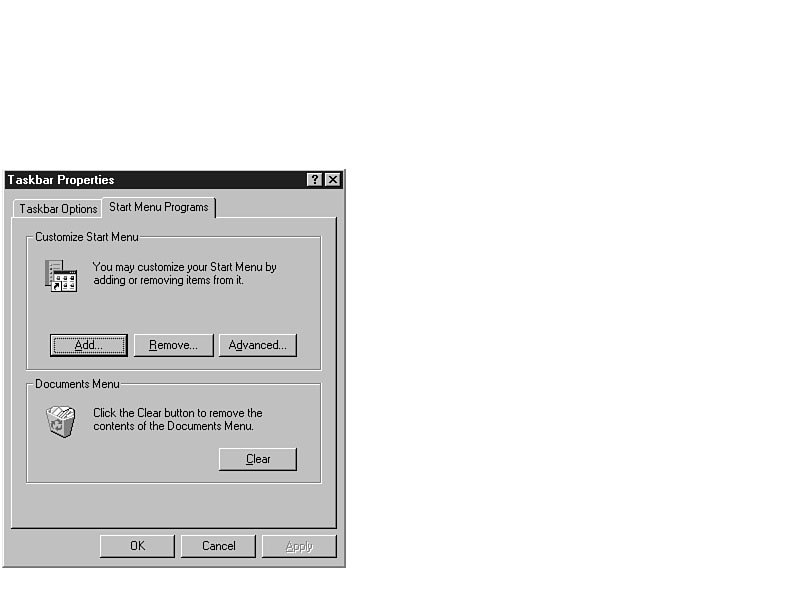
Figure 6.16.
Add or remove programs from the Start menu here.
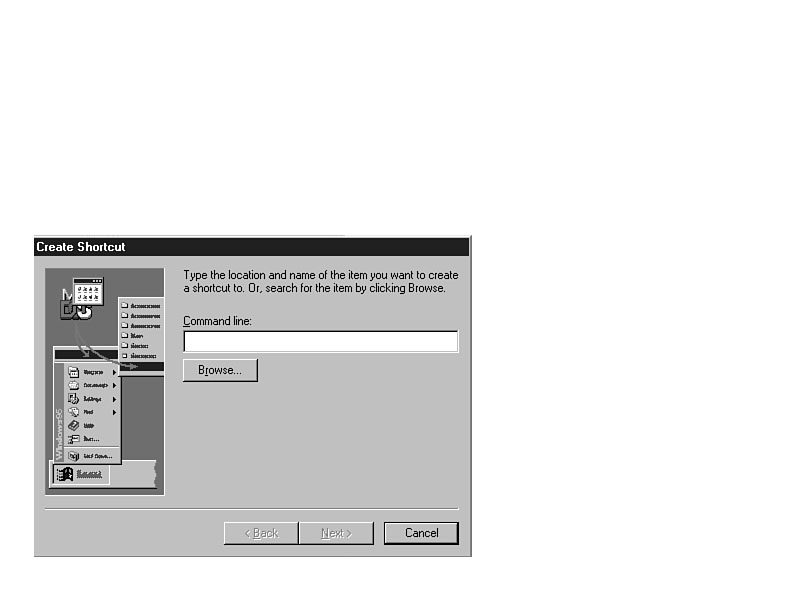
Figure 6.17.
Use the Create Shortcut dialog box to add a specific program to the Start
menu.
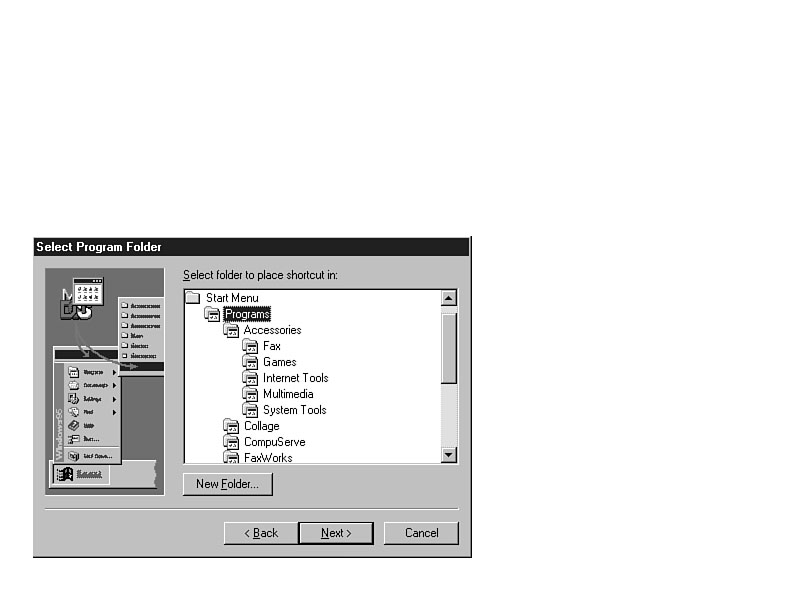
CAUTION:: Before adding programs to the Start menu, you must know the command and location of the program you are adding. If you do not know the path to the program, you can use the Browse command button to search the computer for the program.
Figure 6.18.
You must tell Windows 95 where to store the shortcut.
CAUTION:: Don't change the Start menu too dramatically until you are comfortable with Windows 95. The Start menu is probably best left alone in its current helpful state until you get more acquainted with Windows 95. If you share a computer with others, you could confuse your co-workers if you change the Start menu too much.
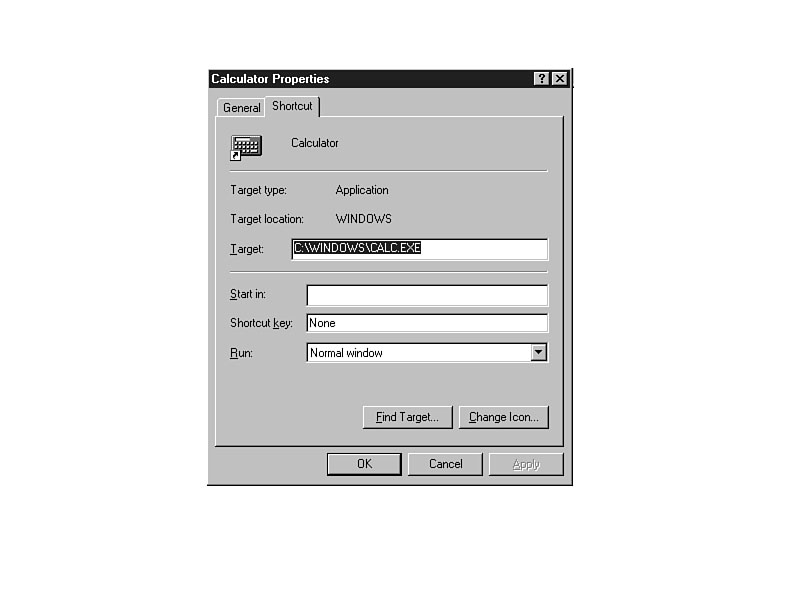
Figure 6.19.
You can now access the calculator quickly within Windows 95.
Windows Minute
Shortcuts
The name shortcut has a double-meaning in Windows 95--one of the reasons that
this task's time-savers can get confusing.
A shortcut is actually better termed an alias file. When you create a shortcut--whether that shortcut is a shortcut menu command, such as having the calculator now on the Start menu bar, or whether that shortcut is a shortcut you create in Open dialog boxes or through Explorer--Windows 95 does not make a copy of the calculator program in every location where you place the icon. Windows 95 actually creates a link to that program, called a shortcut in Windows 95 terminology, that points to the program on your disk wherever its location may be.
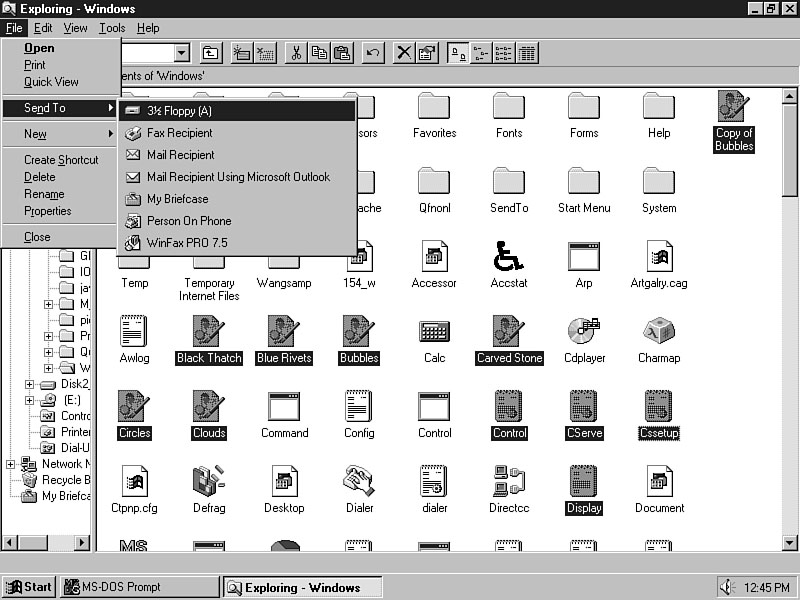
If you were to right-click over a document or folder in Explorer's right window, you would see the Create Shortcut command that creates a shortcut to the document or folder you are pointing at. Windows 95 creates a new icon and title (the title begins with Shortcut to_) but does not actually create a copy of the item. Instead, Windows 95 creates a link to that item. The link reduces disk space taken up by multiple copies of the same files. You may create a shortcut even to a networked item that resides on a different computer altogether; the networked shortcut appears to exist on your own computer's desktop or menu, while it actually resides on the other machine.
Figure 6.20.
Explorer starts so that you can add a single-key quick access to any program.
Figure 6.21.
You can now add a single-key shortcut that will start the calculator program.
Step 3: Review
You can now add a shortcut to the Start menu, to any of Start's cascaded menus, to
the desktop, and even a single-key shortcut to the programs you use most often. Although
it may not always be obvious how to create shortcuts, each of the ones presented
in this section helps you get started faster with the programs that you want to run.
Just wait until you get to Hour 8's chapter! Hour 8 explains a faster way to add programs to your Start menu. As you'll learn throughout this book, Windows 95 typically gives you many ways to do different jobs. The taskbar at the bottom of your screen provides many shortcuts as Hour 8, "Manage Your Desktop," explains.
This hour showed you how to use the Explorer to search your computer system for documents and folders, as well as how to manage the computer system using a uniform interface for all your storage devices. Copying and moving among folders and documents are painless functions when you use Explorer's two-window interface. You can display the item to be moved in the right window and drag that item to any device listed in the left window. It is also inside Explorer that you associate file types to programs so that you can click a document and run the appropriate program that works with that particular type of document.
Not only can Explorer help you manage your system, it also helps you locate information quickly. By using the Find command in Explorer (also available from the Start menu), you can search for files based on the file name, contents, size, and date last modified.
There are three shortcuts that help you access your programs. You can add a shortcut to the desktop, to the Start menu system, and even to the keyboard to start programs quickly.
byte One character of storage.
Explorer A powerful system-listing application that gives you both high-level and detailed descriptions of your computer system and the files on the system.
Microsoft Network An online service available from Microsoft.
registered A file is registered when you've associated an application with that file's extension.
search string A string of one or more characters, such as a filename, that you want to search for.
shortcut When you create a shortcut by adding programs to the Start menu or by creating shortcuts within Explorer or within Open dialog boxes, Windows 95 creates a link (the shortcut) to that item instead of wasting disk space with two separate files that have the same contents.
status bar A message area at the bottom of a window that updates to show you what is happening at any given moment. For example, when you click over a menu item, the status bar tells you what that menu item will do.
title bar A location above many Windows 95 windows (such as the Explorer right-hand window) that describes the documents you are currently viewing.
![]()
![]()
![]()