![]()
![]()
![]()
Whereas Windows 3.1 began to pioneer the idea that documents should be the user's focus rather than the programs that work on the documents, Windows 95 extends that document concept more fully by integrating it into the heart of the operating environment. The document concept is the centerpiece of Windows 95's power.
This hour explains some of the ways you manage the documents on your system. Windows 95 enables you to find the documents you need when you want them. The files you create and use with programs (the documents in the Windows 95 environment) are more important than the programs themselves because those files are the results of your labor. Windows 95 gives you the tools to access those document files when you need them. After all, when you work on your computer, you run programs to create documents, load documents, change documents, erase documents, move data between documents, and store documents. Rarely do you run programs without doing work with a document (except to play games!).
When I wrote this book's first edition, I debated at length with reviewers who thought a chapter on the Windows 95 document concept was unneeded. After winning the debate, I've since received letters from readers who told me they never fully understood Windows 95's underlying document-centered concept until this chapter put things into perspective for them. You will not learn about just Windows 95 documents here; in addition, you'll master Clipboard and Windows 95 view skills that you can use throughout Windows 95.
The highlights of this hour include:
When you write a letter in a word processor, you store that letter as a document file on the disk. Most computer users have little trouble understanding that the data from their word processors are known as documents. There is hardly a user in existence today who does not use some kind of word processor in addition to the other programs on the system.
A Windows 95 user should think of a document as being far more than just a word processed document. All of the following are documents:
At first glance, it may seem strange that a program or sound file is a document. In several instances, Windows 95 treats programs as data documents. When you use Windows 95 to arrange files in the folders on your disk drive, Windows 95 considers programs to be documents that contain data and unique filenames.
TIME SAVER: Think of a document as being any file on your computer's disk drive. A collection of Windows 95 documents, therefore, goes into a folder. As you learned in the previous hour, Windows 95 folders often represent directories of disk files.
The rest of this hour explains how the Windows 95 tools help you manage, move, load, and store document files on your system. As computer disk drives get larger and larger you'll need more help managing those disk drives and their contents. The Windows 95's document-centered design gives you the help you need to wade through tons of files by mimicking file cabinet actions when you work with files on your disk.
3.1 Step Up Windows 95 supports long filenames (files that don't have to conform to the old 8-letter name and 3-letter extension requirement). To take advantage of long filenames you'll have to use dialog boxes written specifically for Windows 95 as explained in the next section.
When you want to work with a document file, no matter what kind of file it is, you'll need to open that file. Open is the Windows term for loading a document file from the disk drive and using the file in a program. Perhaps the easiest example is a document file you open with a word processor in order to make changes to the document.
There are three common ways to open documents:
It may sound strange to be discussing the Windows 3.1 dialog box in a Windows 95 book. Actually, this hour will not spend a lot of time with the Windows 3.1 Open dialog box, but some time is needed. For a few years, programs that you run using Windows 95 will have been written for the Windows 3.1 environment. Even though you use Windows 95 to run those programs, they still have the properties of a Windows 3.1 program, including the same file-opening procedures.
3.1 Step Up The Windows 3.1 Open dialog box is fairly simple, and your first impression of the Windows 95 Open dialog box may be that it is more involved and thus more complicated. After you get used to the Windows 95 Open dialog box (as well as the other common dialog boxes such as the Save and Print dialog boxes), you'll see that Windows 95's dialog boxes are much more powerful than were those in Windows 3.1 and are just as easy to use. As with most of the Windows 95 environment, "different" does not imply more difficult.
When using a program written for the Windows 3.1 environment inside Windows 95,
such as Microsoft's Word 6 for Windows word processor, you select File | Open
from the program's menu bar to inform the program that you want to load a document
into memory and work on that document. If you are just now switching to the Windows
95 environment from 3.1, you probably still use Word 6 for Windows as your word processor.
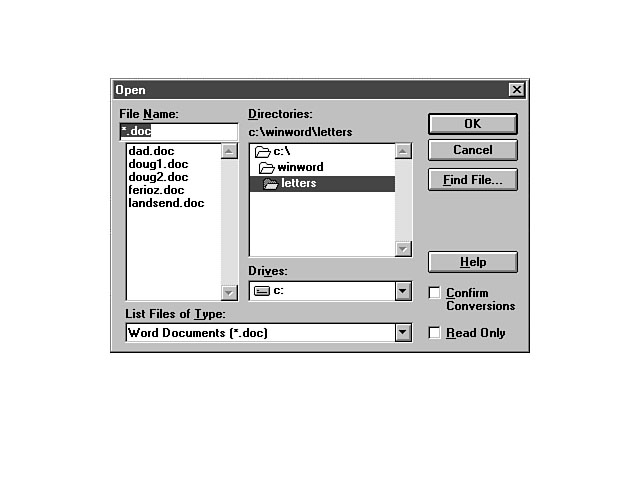
Figure 5.1 shows the Open dialog box supported by several Windows 3.1 programs when
you open a document file.
Figure 5.1.
An Open dialog box originally written for Windows 3.1.
TIME SAVER: Ctrl+O is the accelerator keystroke for the File | Open command in all Windows 95-compatible programs.
Anytime you need to specify a document to open, you must tell Windows 95 the document's filename and the location of that file on the disk (the pathname). Some programs also request additional information such as the type of file. The Windows 3.1 Open dialog box always contains a text prompt where you can enter the filename. You'll also see a scrollable list from which you can select a filename with the mouse.
Another scrollable list appears where you can select the proper pathname where the document is located. The disk drive list always appears as a dropdown listbox. Other information, such as file types, also appears in dropdown listboxes in many Open dialog boxes.
An Open dialog box will always have an OK command button and a Cancel command
button. Clicking OK after specifying the filename and location information opens
the file. Pressing Cancel closes the dialog box without opening the file. Optionally,
some Open dialog boxes contain Help command buttons and other buttons as the application
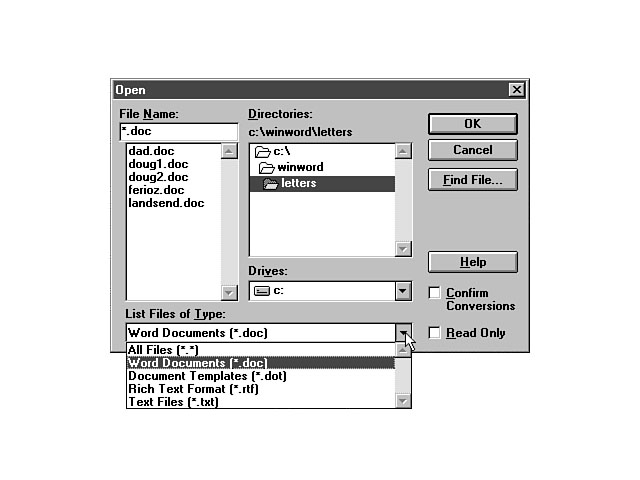
requires. Dropdown Listboxes A dropdown listbox is a special Windows
control that works like a scrolling list but consumes much less screen space. Figure
5.2 shows the same Open dialog box shown in Figure 5.1 except the file type dropdown
listbox is open, showing a list of file types.
Figure 5.2.
The dropdown listbox is now open for the user to select a value.
Unlike other kinds of listboxes such as the filename list in the two figures, a dropdown
listbox normally consumes only a single line in a dialog box. When the user clicks
the down arrow at the right of the dropdown listbox, Windows 95 displays the list
of choices. Once the you select one of the choices, the dropdown listbox closes again
to give room back to the rest of the dialog box.
Task 5.1: Opening Documents with a Windows 3.1 Open Dialog
Step 1: Description
Not everybody using this book will have a Windows 3.1 Open dialog available for practice.
If you are a new computer user having just purchased your computer and software,
you may have software that was all written for Windows 95. In that case, your programs
will use the new (and improved) Windows 95 version of the Open dialog box, and you
can skip this task for now. Be warned, however, that you're bound to run across
a program eventually that still uses this document-opening dialog box so you should
be familiar with it.
This task describes how you might use the Microsoft Word 6 for Windows Open dialog
box to open a document, called LETTER.DOC, stored on drive D. The document is stored
in the directory named MYFILES. You may not have Word for Windows; even if you do,
you probably don't have a directory named MYFILES with a file named LETTER.DOC, so
just read along and use Figures 5.1 and 5.2 as your guides as you read through this
task.
Step 2: Action
CAUTION:: Again, this is theory-only task for you. Even if you have Word for Windows you will not have a file named LETTER.DOC in a directory named MYFILES.
JUST A MINUTE: Always remember that Windows 95 calls directories folders and files documents. The folder concept makes selecting files using Windows 95 Open dialog boxes easier than having to select from lists of directories as you have to do with Windows 3.1 Open dialog boxes.
Step 3: Review
Although you may not use Word 6 for Windows, keep in mind the importance of mastering
the older style Windows 3.1 Open dialog boxes. Whenever you use a program inside
Windows 95 that was not specifically written for Windows 95 (there are still many
in use out there!), you'll run across this same kind of dialog box.
As a productive computer user you must focus on documents because documents hold the work that you create with the programs that you run. When you need access to a document and you've started a program in Windows 95, you'll be loading those documents through Open dialog boxes like the one shown in this section.
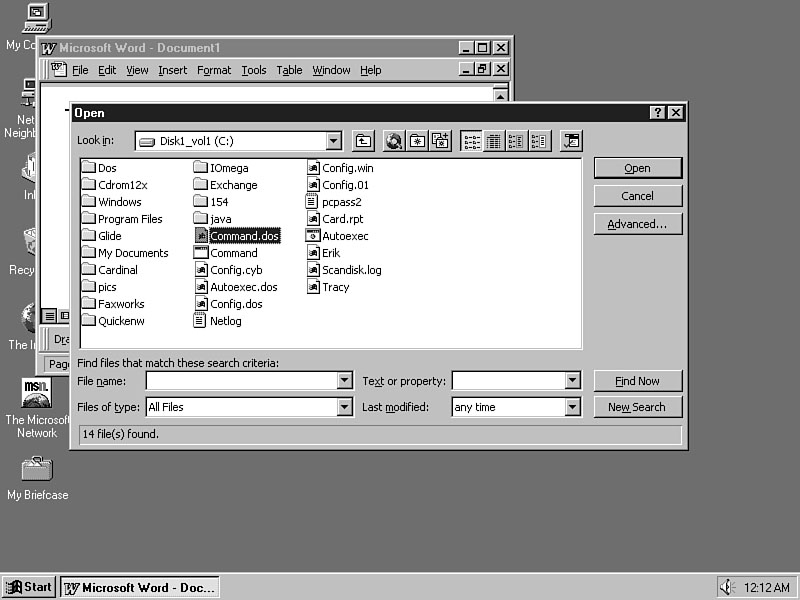
Over time, as more and more software vendors update their software to be fully
compatible with Windows 95, you'll see the new Windows 95 Open dialog box shown in
Figure 5.3. The Windows 95 Open dialog offers more document control than the older
Open dialogs provided.
Figure 5.3.
Opening a file in Windows 95.
When you want to work with a file using a program written specifically for Windows
95, you'll get the Windows 95 Open dialog box when you enter the File | Open
command in the application. No matter what kind of document you are opening (text,
multimedia, or graphic), the File | Open command produces this common
Windows 95 Open dialog box.
TIME SAVER: By using this standard Open dialog box, all Windows 95 applications will be easier for you to master. You have to learn only one Open dialog box to know how all of the Windows 95 Open dialog boxes operate.
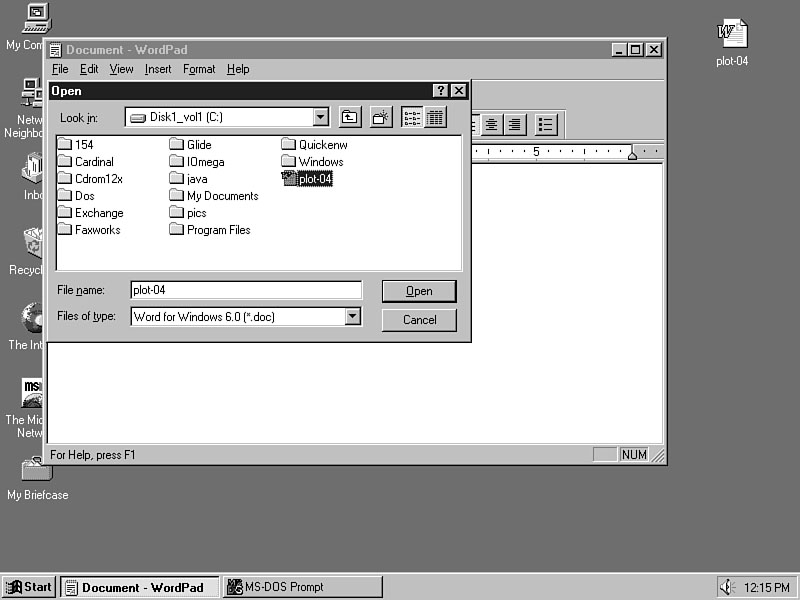
Task 5.2: Using the Windows 95 Open Dialog Box
Step 1: Description
This task will be available to all readers (not just those using Word 6 for
Windows version 3.1) because Windows 95 comes with several accessory programs written
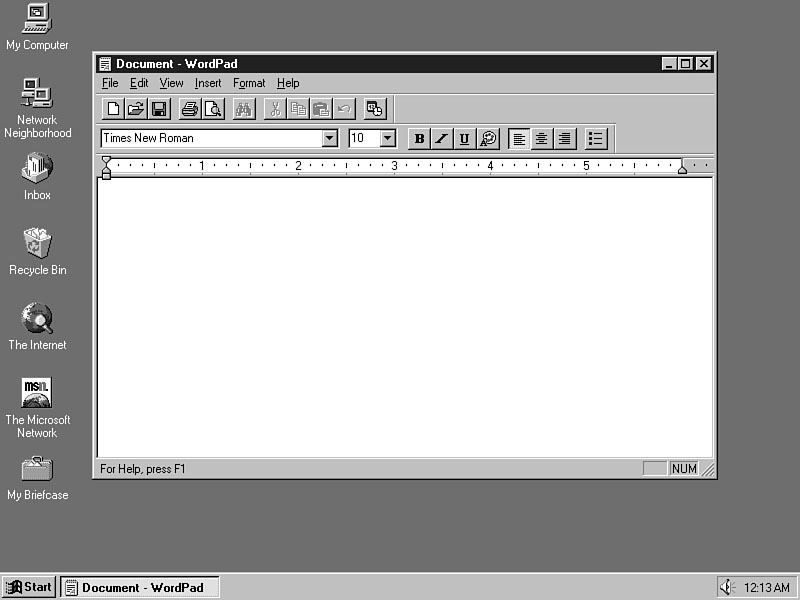
specifically for Windows 95 that you can try out. This task uses the WordPad program
found in the Accessories folder.
WordPad is a simple word processor that recognizes the several document file formats. The supported formats mean that you can quickly look at and edit files of several types of documents, including Microsoft Write, Microsoft Word for Windows, text files, and RTF files. RTF stands for Rich Text Files and refers to an industry-standard document file format. You'll need to open only one program (WordPad) to view and make simple edits to document files consisting of any these file types.
You don't have to be a master at WordPad to follow this task. Every Windows 95
installation gets a copy of WordPad so you should be able to follow this task. The
purpose of this task is to familiarize you with the appearance and use of the Windows
95 Open dialog box because you will see this dialog box so often as you work with
Windows 95. You will also get more experience with the Start button's cascading menus
as well.
Step 2: Action
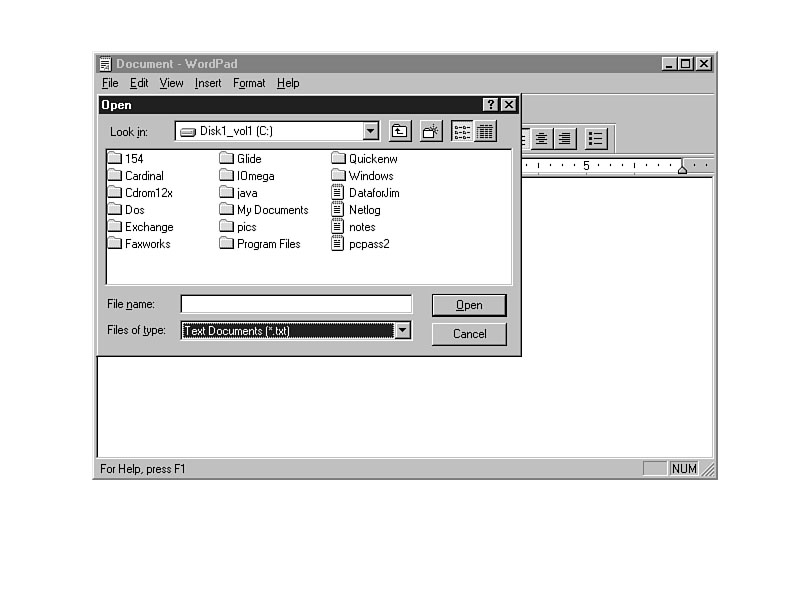
Figure 5.4.
The WordPad program window is now open.
Figure 5.5.
Viewing text files that you can now open.
3.1 Step Up In a way, file extensions
are slowly being phased out of Windows. Due to the long filenames that Windows 95
supports and the ease of election provided by the folder concept, the extension may
not be needed as frequently. Windows 95 displays an icon that identifies the file
type instead of the file extension. For example, Word 6 files appear in file listings
with a Word 6 icon instead of the .DOC extension.
JUST A MINUTE: WordPad does not, by default, display filename extensions. There is no reason to show the .txt extension because the file type that you chose earlier requested only files that end with the characters .txt.
TIME SAVER: If you cannot find a file you're trying to open, click All Documents to display all document files in the folder instead of the default documents only.
Step 3: Review
The Windows 95 Open dialog box that you've seen so far works a lot like the Windows
3.1 dialog box. The reason you're having to spend so much time in this hour with
the Open dialog boxes is that you have to know how to access the documents you need.
There is more than meets the eye, however, with the Windows 95 Open dialog boxes! Underneath the Open dialog box lies a tremendous amount of hidden power as the next section shows.
The Open dialog box contains a large number of features that go far beyond the act of simply opening a file. When you display an Open dialog box you might decide you need to do something other than open a document file at that point. You might see the list of folders and document files before you and decide to rename a file, copy a file, or delete a file, before actually opening one of the files in the list.
3.1 Step Up In Windows 3.1, you would have to change from the File Manager to DOS before performing many of the actions that the Windows 95 Open dialog box allows.
There are several tasks listed below which, by example, demonstrate many of the
actions you can perform using the Open dialog box.
Task 5.3: Changing Folders Using Open
Step 1: Description
If the Open dialog box does not open to the folder you want, you can easily change
to a different folder anywhere on the disk. You also can change to another disk drive
and open a file there just by clicking the mouse.
Step 2: Action
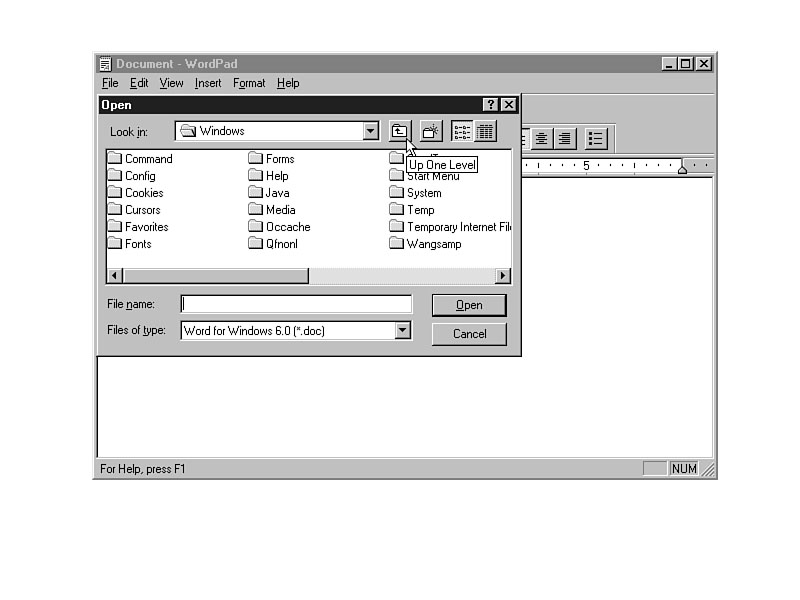
Figure 5.6.
Get ready to back up one directory.
Windows Minute
The Up One Level toolbar button really moves the Open view back to the parent directory
of the directory being viewed. The Up One Level button moves you back up through
folder levels quickly.
TIME SAVER: The Backspace key is the shortcut accelerator key for the Up One Level icon. Instead of pushing the icon you only need to press Backspace.
JUST A MINUTE: If you work on a network, you'll also see networked locations appear in the dropdown listbox. If you work on the Internet, you'll even see Internet location access (such as FTP sites)! Remember that Windows 95 does not limit your desktop access to your own personal computer but seamlessly integrates outside computers.
Step 3: Review
The Open dialog box gives you the ability to find documents located anywhere in your
computer system. When you view the contents of folders within folders, the Up One
Level icon takes you to the parent folder.
TIME SAVER: If you know the exact filename and location of the document you want to open, you can bypass the mouse clicks and type the full pathname in the File name text box prompt and click the OK button (or press Enter) to open that document. Given Windows 95's powerful Open dialog box and considering the extremely long filenames that Windows 95 supports, most users will enjoy the benefit of zeroing-in on the file using the mouse instead of typing complete path and document names such as these:c:\winword\docs\balance.doc a:\Note for James
Task 5.4: Detailing the List of Files
Step 1: Description
If you want to display document information with more detail than by name and location
only, the Open dialog box's Details icon (the fourth icon on the toolbar, indented
in Figure 5.7) changes the view of the documents and files in the Open dialog box.
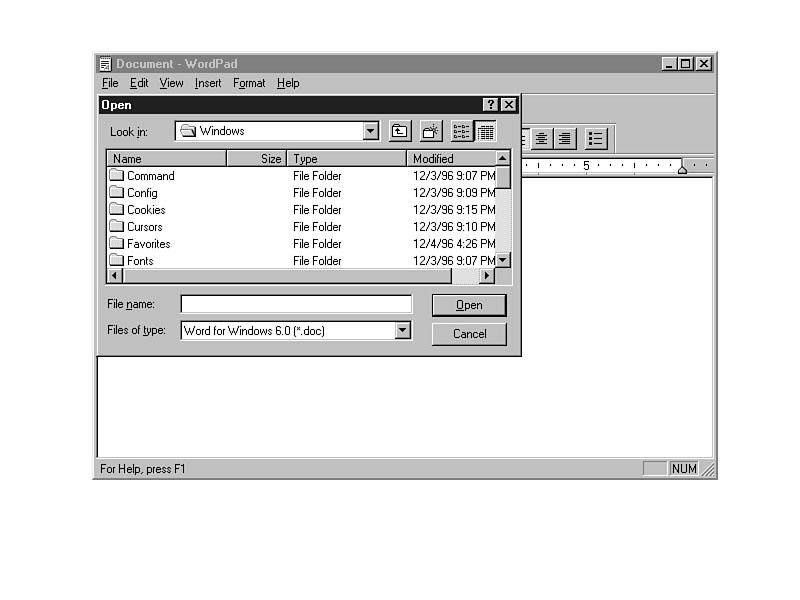
Figure 5.7.
You can look at more document detail by clicking the Details icon.
Step 2: Action
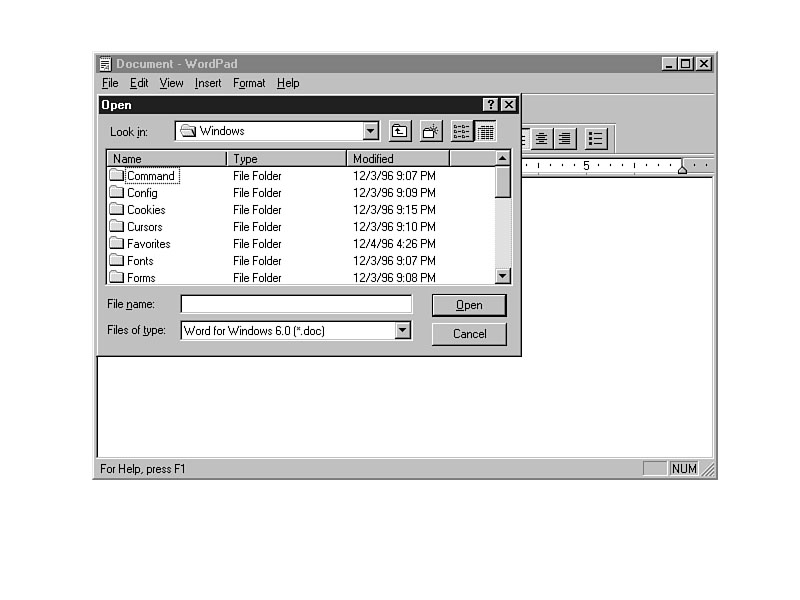
Figure 5.8.
The column sizes in the detailed view are adjustable.
Step 3: Review
There are two different views of the documents in an Open dialog box. You can look
at the list view and see the folders and documents displayed as icons. If you request
a detailed view, Windows 95 displays the folders' and documents' sizes, types, and
last-modified information as well.
Task 5.5: Creating a New Folder
Step 1: Description
If you decide to create a new set of documents that logically go together, such as
your holiday letters and birthday greetings for each year, consider putting those
documents in their own folder. Instead of wading through a huge list, you can find
specific documents more easily by clicking on their folder. This displays only those
documents when you want to work with them. The toolbar's Create New Folder icon creates
new folders for you.
3.1 Step Up Instead of using the File
Manager or DOS to create a new directory, the Create New Folder icon creates a new
directory instantly anytime you view a Windows 95 Open dialog box.
Step 2: Action
Figure 5.9.
Create a new folder with one mouse click.
Step 3: Review
Adding new folders for new document groups is as easy as clicking a toolbar icon
and typing a name for the new folder. Of course if you double-click on a new folder
there will be no contents inside. Once you create the new folder, you can then copy,
move, or save related documents in that folder when you're ready to do so.
Task 5.6: Manage Documents with a Right Mouse-Click
Step 1: Description
After you display the Open dialog box you can point to any folder or document and
click the right mouse button to perform several actions on the document that you
might want to do. Here are the things you can do with documents:
A right click over a folder's name produces a menu that lets you perform these same actions as well as start the Windows 95 Explorer program (described in the next hour) or search the disk for other files and folders.
The following task walks you through many of these right-click actions.
Step 2: Action
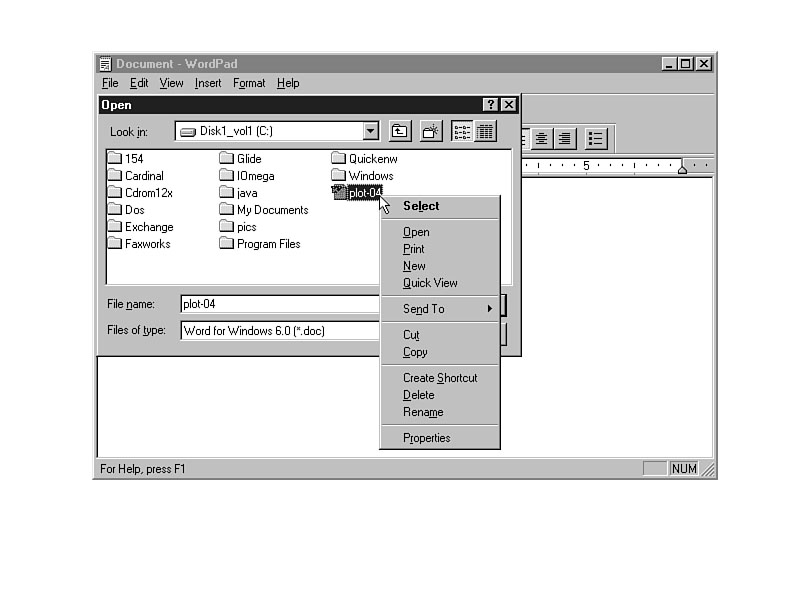
Figure 5.10.
The right mouse displays the document menu.
JUST A MINUTE: You'll learn all about the printing of documents in the Hour 15, "Increase Printing Power."
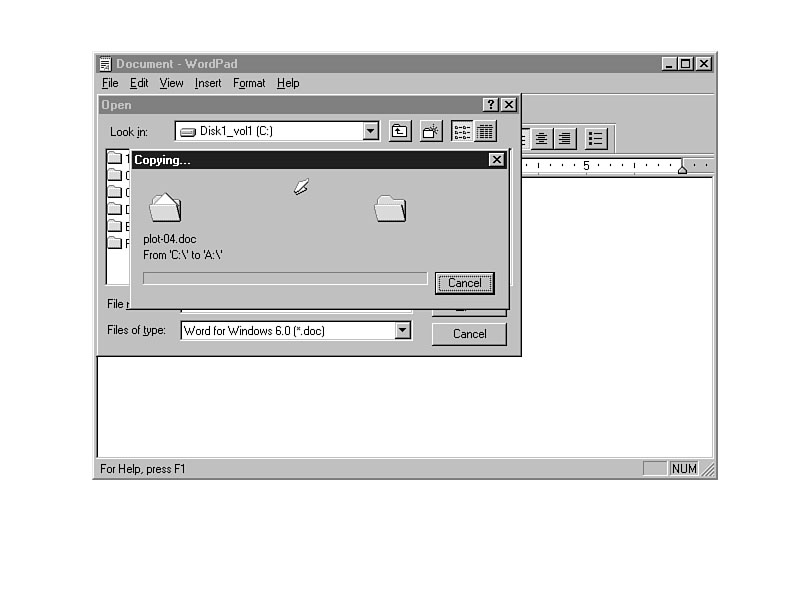
Figure 5.11.
Windows 95 entertains you while copying documents.
JUST A MINUTE: If you attempt to copy a document over another one that already exists with the same name, Windows 95 warns you that you are about to overwrite the existing document.
3.1 Step Up The overwrite warnings in Windows 95 are much more informative than in Windows 3.1. Windows 95 displays the date, time, and file size of each file (the target and the source file of the copy) to help you decide whether or not you want to overwrite the file on the floppy drive.
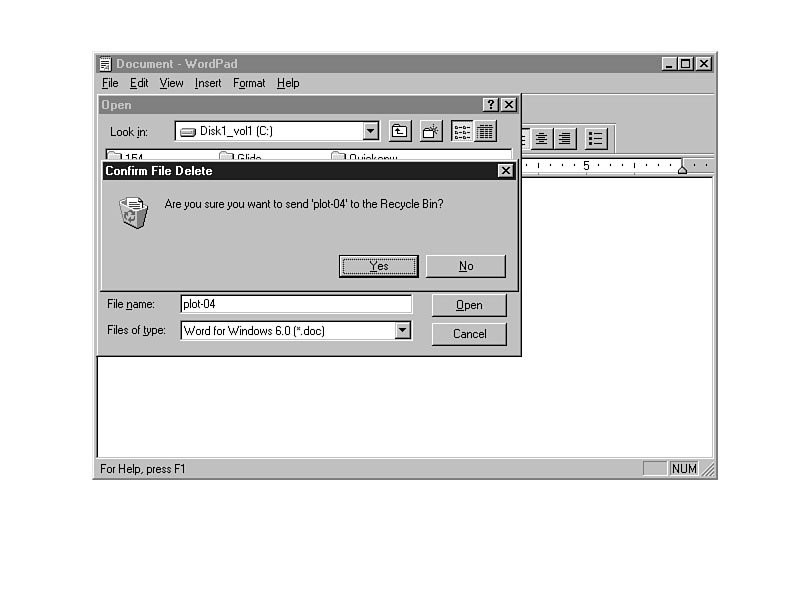
Figure 5.12.
The Recycle Bin holds deleted documents for a while.
TIME SAVER: The File | Save and File | Save As menu commands in Windows 95-compatible programs also display dialog boxes that act just like the Open dialog box. All of the right-mouse click commands described here are also available in those dialog boxes.
CAUTION:: Do not supply an extension when you rename the document file. For example, if you renamed the Readme document (that is really named Readme.txt) to NewName.txt, the document would actually be named NewName.txt.txt! About the only way to rename a document and its extension is through the Windows Explorer program described in the next hour. If you or someone else has set up your Windows 95 system to display filename extensions in file listings (as described in the next hour's chapter), you will be able to rename the full filename including the extension.
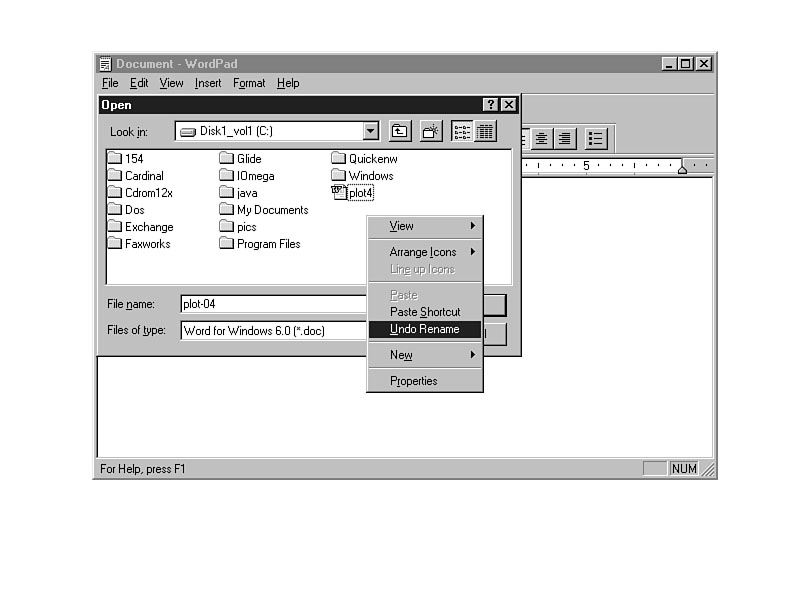
Figure 5.13.
You can undo the renaming of a file.
TIME SAVER: The Undo Rename remembers a long list of past names. For example, if you change a document's name three times in a row, then select Undo Rename three times, Windows 95 reverts the name to its first and original name!
Figure 5.14.
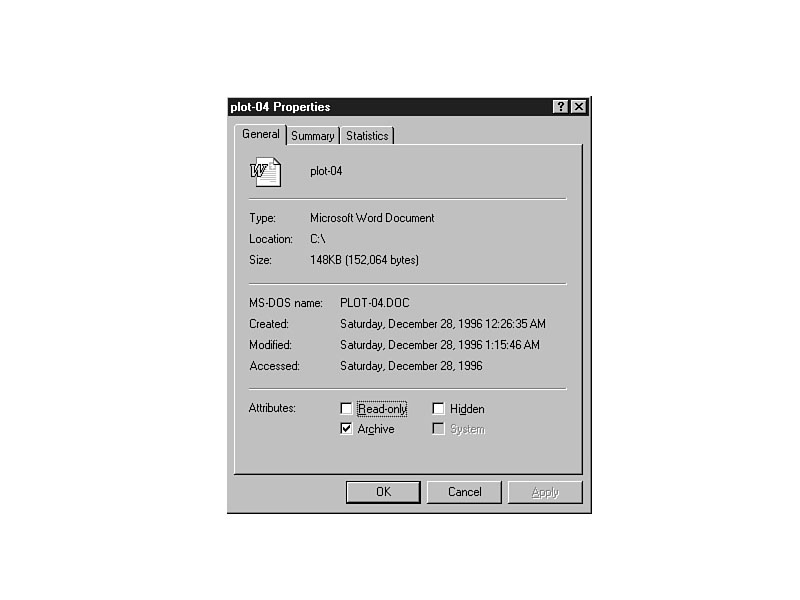
Changing the attributes of a document.
Step 3: Review
This task covered the most important commands in the Open dialog box's right-click
document menu. This menu differs slightly depending on the kind of document you click
over (folder, sound, graphic, program, text, word processor document, and so on),
but the fundamental menu of commands stays the same and works the way this task described.
If you want to make copies of files on the hard disk or move the file to a different
location, you'll want to master the techniques described in the next task.
JUST A MINUTE: You'll learn about the Create Shortcut command in the next hour.
Table 5.1. Document file attributes.
| Attribute | Description |
| Read-only | When checked, you can read the file but not modify or delete it. |
| Archive | When checked, the file has been modified since the most recent backup was made. |
| Hidden | When checked, the file cannot be seen from normal directory listings. |
| System | When checked, the file is a protected class of files most generally used by the operating system. (System files are often hidden as well.) |
JUST A MINUTE: The Clipboard holds one file at a time. If you copy a document to the Clipboard, a subsequent copy will overwrite the first copy.
TIME SAVER: If you want to copy a file to a disk, use the Send To command explained in Task 5.6 because the Send To command is easier to use than copying to a disk.
When you move a file from one location to another, Windows 95 first performs a
cut operation. This means that Windows 95 deletes the file from its current
location and sends the file to the Clipboard (overwriting whatever was on the Clipboard).
When you find the location you want to move the file to, Windows 95 copies the Clipboard's
contents to the new location (such as a different folder or disk drive).
Windows Minute
The Clipboard
In a way, the Clipboard is like a short-term Recycle Bin. The Recycle Bin holds all
deleted files until you are ready to remove them permanently. The Clipboard holds
deleted (or copied) documents and pieces of documents, but only until you send something
else to the Clipboard or until you exit Windows 95 and turn off your computer. In
Hour 12, "Clip and Save," you'll learn how to view the contents of the
Clipboard and how to work with specific text on the Clipboard itself.
Step 2: Action
JUST A MINUTE: The copy, cut, and paste operations all get their names from the paper equivalents of copying, cutting, and pasting scraps of paper.
CAUTION:: Windows 95 keeps the name of the document in place until you paste the document elsewhere. The name is misleading because the name makes you think the document is still in the Windows folder. A ghost outline of an icon appears where the document's icon originally appeared. As long as the name still appears in the Windows folder, you can still open the file and do things with the file, but as soon as you paste the Clipboard contents somewhere else, the file goes away permanently from the Windows folder.
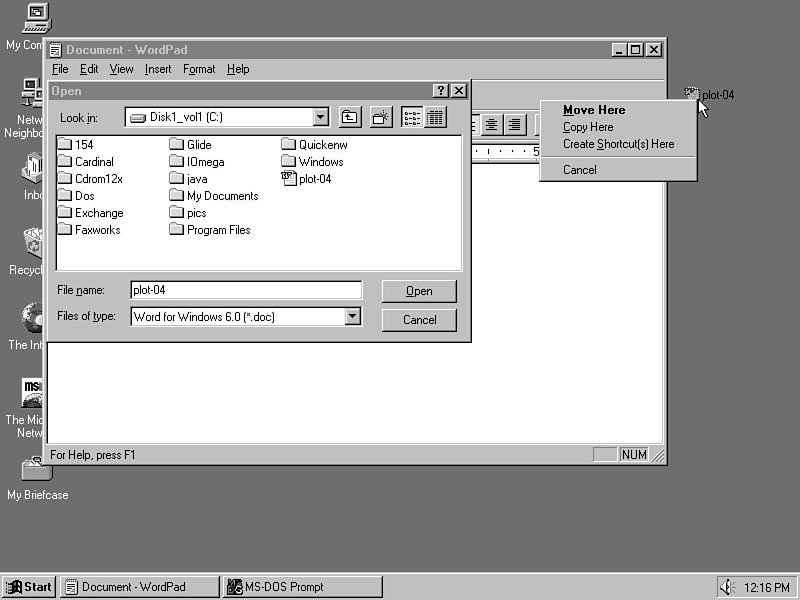
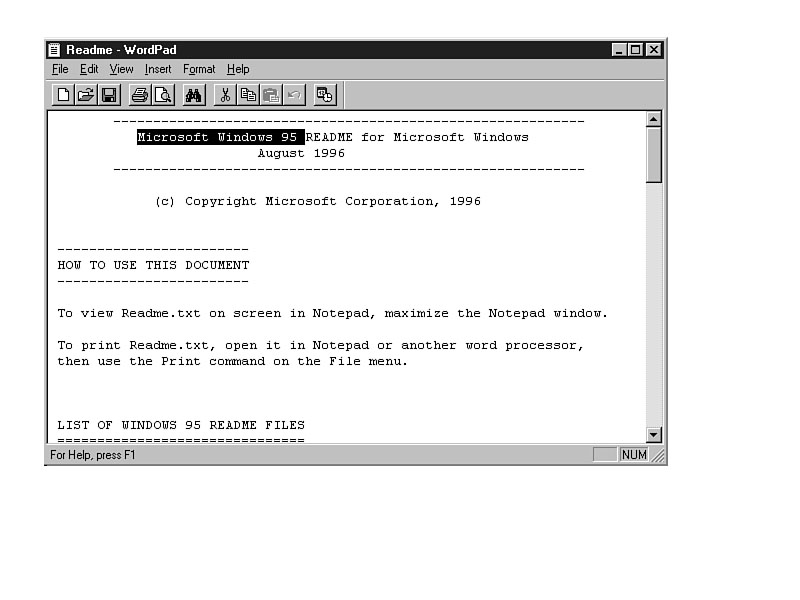
TIME SAVER: Here's a much faster way to move a document to another folder listed in the Open dialog box: Drag the document to the folder! Try it by dragging the Readme document over to the Config folder. An outline of the Readme document travels with the mouse cursor as shown in Figure 5.15. When you point to the Config folder, let up on the mouse button and the Readme document moves from the Windows folder to the Config folder (the name goes away from the Windows folder). Want it back again? Right-click the mouse and select Undo Move. Windows 95 always lets you undo moves no matter how you made the move.
Figure 5.15.
Drag and drop makes moving documents simple.
TIME SAVER: If you want to use the drag-and-drop shortcut method for copying documents, hold down the Ctrl key while dragging the document to the other folder. The key combination is easy if you remember that both copy and CTRL begin with the same letter. As you drag to copy an item, Windows 95 displays a plus sign at the bottom of the icon to indicate that you are copying and not moving. To cancel a copy you've started, drag the item back to its original location before releasing your mouse button or press ESC before releasing your mouse button.
CAUTION:: You cannot drag an item such as a document to just anywhere. Windows 95 changes the mouse cursor to a circle with a slash through it (the international "Do Not" symbol) when you drag the document over any area of the screen that cannot accept that document.
Figure 5.16.
Putting items onto the desktop itself.
3.1 Step Up The Windows 3.1 desktop could
only hold program groups, not individual files or portions of files. The Windows
95 desktop acts somewhat like a secondary and visual Clipboard where you can store
items. The desktop is actually more like a bulletin board where you can pin items
such as documents until you need them at a later time.
JUST A MINUTE: When you delete a desktop document, the document goes to the Recycle Bin. You can retrieve the document later if you wish, or delete the bin, as the next hour explains. Once you've deleted a desktop document, a right mouse click over the wallpaper displays an Undo Delete command. Use it to put the document right back on the wallpaper if you change your mind.
Windows Minute
Placing Documents on the Desktop
The items you place on the desktop, whether by copying or by moving, stay on the
desktop until you remove the item from the desktop. Even after shutting down Windows
95 and turning off your computer, the desktop item will be there when you return.
Although you shouldn't put too many documents out on the desktop, which would cause clutter, you may want to work with a document in several different programs over a period of a few days. By putting the document on the desktop, it is always easily available to any application that's running. Of course, if you run an application in a maximized window, you'll have to shrink the window to some degree to retrieve the document because you have to see the desktop to copy and move the items on it.
TIME SAVER: Instead of moving the Readme document by dragging with the left mouse button, repeat this task by dragging the Readme document to the wallpaper with the right mouse button (reverse this for a left-handed mouse). When you position the document over the wallpaper and release the right mouse button, Windows 95 displays the menu shown in Figure 5.17. The Move Here and Copy Here commands give you the choice of a move or copy, or you can cancel the operation altogether, if you change your mind. (The shortcuts to these procedures are explained in the next hour.)
Figure 5.17.
The choice is yours regarding the document's drag operation.
Step 3: Review
Managing documents often involves moving or sending copies of those documents from
one location to another. Perhaps you want to work with a document in two or more
applications. If so, you can copy that document into each application's folder.
Windows 95 supports a complete set of menu-driven cut, copy, and paste commands
from the right mouse click. With these commands, you can copy or move files from
one place to another. If you can see the target location of the copy or move, such
as another window's folder on the screen or the desktop, use the mouse to copy or
move the document and save time.
Task 5.8: Copy and Move Pieces of Documents
Step 1: Description
In addition to copying or moving documents of all types, you'll often need to copy
or move pieces of documents, such as a paragraph of text or sections of art, from
one document to another. Several programs that you use, such as word processors and
spreadsheets, enable you to copy or move specific pieces of documents. As long as
those programs are written for Windows 95, the techniques for copying and moving
are the same. Therefore, master these techniques now, and you'll already know how
to perform these functions in almost every program you run.
Step 2: Action
Figure 5.18.
Text is now selected.
Windows Minute
How To Select Text
If you've never selected text before, you do so with the mouse. Windows 95 must always
know exactly what text you want to copy or move when working with portions of documents.
To select text, find the upper-left corner of the text that you want to select and
click the left mouse button to begin selecting. Then drag the mouse to the right
and continue dragging the mouse down if the text you wish to highlight will span
more than one line. Select text until all the text you want to cut or copy is highlighted.
When you let up on the mouse button, Windows 95 ends the selection of text. (You
may also select text by holding down the Shift key and pressing one of the arrow
keys.)
TIME SAVER: The shortcut to copying the text to a new location is to drag the selected text to a different location. After the dragging of the text, Windows 95 will put a copy of the text wherever you release the mouse button.
Step 3: Review
This task showed you that you can copy or cut selected portions of a document using
many of the same tools that you used earlier for entire documents. When you copy
a portion of a document to the desktop, that portion is known as a scrap. The scrap's
icon description describes the scrap and displays a few characters from the scrap.
3.1 Step Up In Hour 14, "Activate DOS-Based Applications," you'll learn how to copy, cut, and paste data from or to a DOS program. Windows 3.1 did not support DOS-based copy, cut, and move operations as well as Windows 95 does.
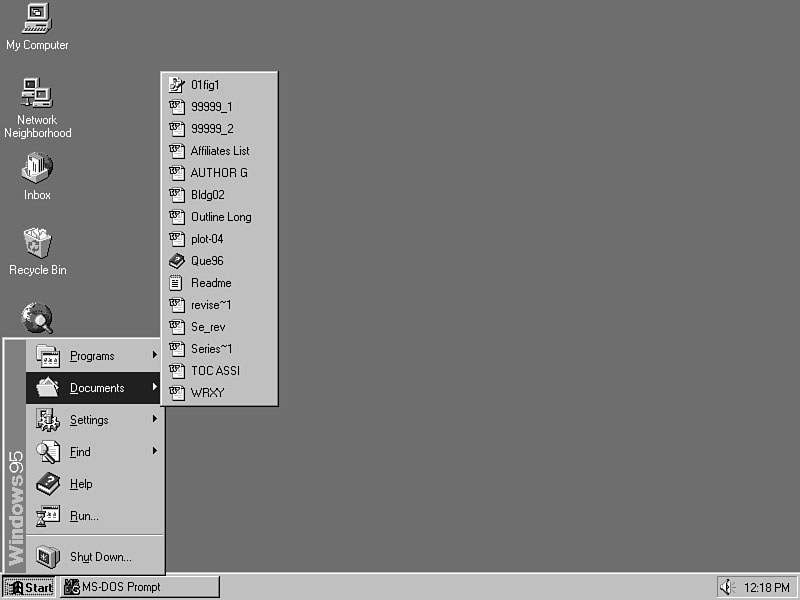
The document concept is so vital to Windows 95 users that Microsoft added a Documents command to the Start menu itself. When studying how people use Windows 95, Microsoft found that people often refer to the same few documents over and over. For example, you might work on a report for several days in a row before you are finished with it. The report might also contain several tables and graphs from other sources such as a spreadsheet program or a drawing program.
When you select the Documents command, Windows 95 displays a menu of several
recent documents such as the menu shown in Figure 5.19. The next task shows how to
access and use the Start menu's Documents command.
Figure 5.19.
Quickly return to a document from the Start menu.
Task 5.9: Opening Documents from the Documents Menu
Step 1: Description
When you select a document from the Start menu's Documents list, Windows 95 analyzes
the document to determine the best method of opening that file. If you select a graphics
file, Windows 95 opens an appropriate graphics program so you can view and edit the
open graphics document (see Hour 11, "Paint a Picture"). If you select
a text file, Windows 95 uses either Notepad or WordPad, depending on the size of
the file. There are several other document file associations that Windows 95 makes
to determine the best way of opening the file you want.
TIME SAVER: When you need to make changes to a document, why not go directly to that document and let Windows 95 figure out the best way of opening the document? That's exactly what you do when you open documents using the Documents command. Instead of locating and running the correct program, and then opening the document to edit it, you can select your document directly, if that document appears on the Documents menu. Then, Windows 95 figures out the best program to run to enable you to look at and edit the document.
Step 2: Action
CAUTION:: Don't get confused! Although this hour earlier used WordPad to open the Readme document, Windows 95 opens the document inside the Notepad editor because Notepad is more efficient, as you'll learn in Hour 10, "Compose Using Writing Tools." If the text document is too large to fit inside Notepad, Windows 95 opens the file in WordPad.
3.1 Step Up These kinds of file associations
are also available in Windows 3.1, but only from the File Manager.
Step 3: Review
The Start menu's Documents command gives you double-click access to your documents.
A click on the menu, and then on the document you want, instantly starts the program
associated with the file's type, and you can go to work on that document.
TIME SAVER: If the Documents menu gets too large, you can empty it. Select Settings from the Start menu and select Taskbar (as you did in the previous hour). Click the tabbed dialog box labeled Start Menu Programs. The bottom half of the dialog box contains a single command button labeled Clear with which you can completely erase all the documents on your Documents menu.
This hour showed you how important the document concept is to Windows 95. Although previous versions of Windows supported a document concept, Windows 95 takes the concept to an extreme by making the focus of all disk file operations a document-related focus. Although you view a list of files when opening or saving data, the icons and menu commands available to you act as if you are working with paper documents that you can copy or move from one place to another. Windows 95 extends the document concept even further to include all kinds of files including programs, graphics, sound, and multimedia files.
When managing the documents inside Windows 95, you've got to master the Windows 3.1 version of the Open dialog box, as well as the Windows 95 version. The Windows 95 Open dialog box supports several additional commands as well as the right click menu that appears when you right click over a folder or document.
When you want extremely quick access to a document that you've been working on recently, select that document from the Documents menu. Windows 95 determines the best program to use to open the file and starts that program for you.
Clipboard An area of Windows 95 that holds documents or parts of documents. The Clipboard can hold any kind of document including text, sound, and graphic images.
copy The process of sending a copy of an item such as a document or part of a document to the Clipboard. From the Clipboard you can place the item elsewhere, in effect making a copy of the item in at least two places on your computer system.
cut The process of removing an item, such as a document or part of a document, from somewhere in your computer system. The removed item goes to the Clipboard. From the Clipboard you can place the item elsewhere, in effect moving the item.
file extension The end part of some filenames including a period followed by one to three characters. By giving some files the same filename extension you can group them together so that, using wildcards, you can work with those files as a collection. All major applications support their own filename extension. For example, WordPad likes to use the Word for Windows standard .DOC filename extension at the end of all documents you open with WordPad. You can select a different filename extension in WordPad if you prefer to work with a different type of document.
formats Different files are stored on the disk differently depending on the nature of the file. The format is the nature of the file that determines if the file is a graphic, text, or program file.
kilobyte Approximately 1,000 characters of storage. See also KB.
KB The abbreviation for kilobyte. 8KB refers to approximately 8,000 characters of storage.
paste The process of sending the contents of the Clipboard to another area of the computer system such as to a specific folder or to the Windows 95 desktop.
Recycle Bin A special location in Windows 95 that temporarily holds all the files that you delete. Until you empty the Recycle Bin, you can recover the deleted files just as you can remove trash from your office trashcan until the can's contents get taken away by the janitor.
RTF Stands for Rich Text Format and refers to a universal file format that many different programs support. The RTF format differs from a straight text file format because RTF files can contain text encoded with special effects such as boldfacing and underlining.
scrap A selected portion from a document that you send to the desktop.
toolbar This area of a window contains a list of icons that instantly execute
push-button commands. Many Windows 95 applications and dialog boxes contain toolbars
that make issuing commands easier for you.
wildcard character When you want to refer to more than one file, you can often
use a * or ? wildcard character. The * substitutes for
zero or more characters in a filename and the ? substitutes for one character.
Therefore, *.txt refers to all files whose names end in the .txt
filename extension, whereas month?.txt refers only to those files that match
the pattern month1.txt, month2.txt, montha.txt, month$.txt,
and so on.
![]()
![]()
![]()