![]()
![]()
![]()
The taskbar and the Start button are closely related. Most Windows 95 users use the Start button to display the Start menu, then execute a program. As you've already seen, when the program begins running, the taskbar displays a button with an icon along with a description that represents that running program.
The taskbar, Start button, and the Start menu are the most important components Microsoft put in Windows 95. Previous versions of Windows offered less intuitive startup procedures for programs. The taskbar is the cornerstone of Windows 95; as a matter of fact, the taskbar is so important, we'll spend this hour discussing nothing but the taskbar. This hour describes the taskbar and its Start menu in detail and explains how to customize the taskbar to make it perform in a manner that best suits your computing style.
The highlights of this hour include:
In Hour 1, you saw the Start menu and used it to shut down your computer properly.
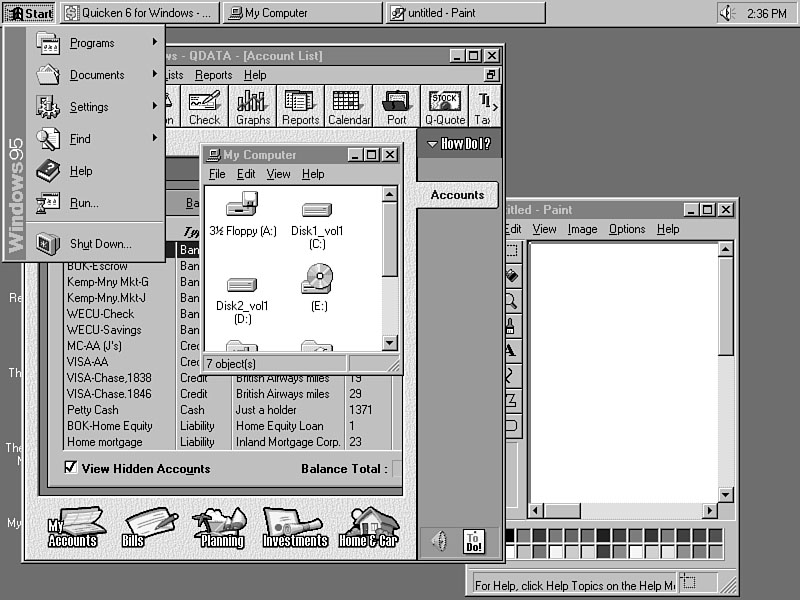
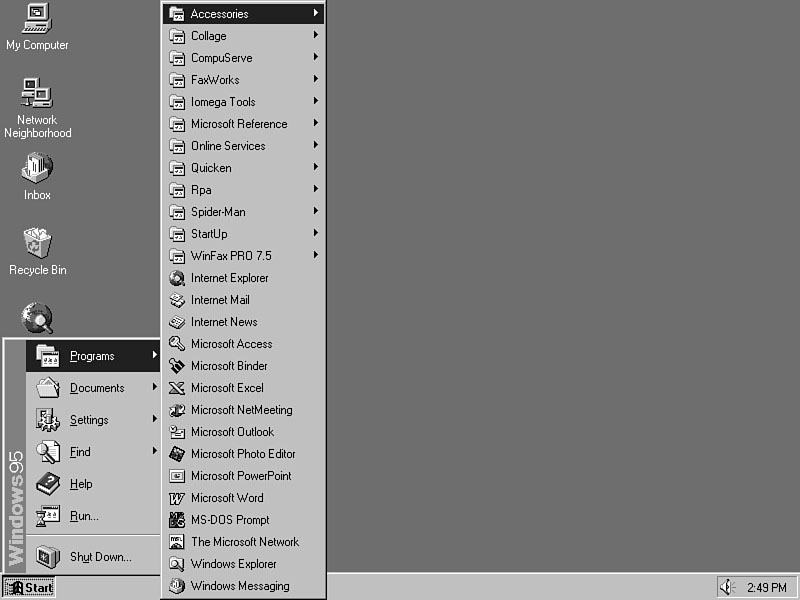
Clicking the taskbar's Start button produces the Start menu shown in Figure 4.1.
The Start menu does all these things and more:
Figure 4.1.
The Start menu gives you access to all other areas of Windows 95.
The next few sections explain how you can customize the taskbar and its associated Start menu, so when you are ready to use the Start menu for these items, the Start menu will act and look the way you expect.
TIME SAVER: If you do not see the Start button, your taskbar may be hidden or you may be working within a full-screen MS-DOS session. Press Ctrl+Esc to display the Start menu if you need to use the Start menu and cannot see it. Many Windows 95 experts forget about the Ctrl+Esc shortcut keystroke. If you were working in a full-screen MS-DOS session when you pressed Ctrl+Esc, Windows 95 switches back to the Windows 95 desktop to display the Start menu, but the MS-DOS session remains active. You can then switch back to the MS-DOS session by clicking the taskbar button or by pressing Alt+Tab when you finish with the Start menu.
The taskbar does not have to stay at the bottom of your screen. Depending on your application, you can move the taskbar to either side of your monitor, or even to the top of your screen. The taskbar placement is easy to change, as you will see in this hour.
JUST A MINUTE: Figure 4.2 shows that a side taskbar does not have the width necessary to display lengthy taskbar descriptions. When you place the taskbar at the bottom or top of the screen, the taskbar is wide and has more room for longer descriptions of programs and windows you currently have open.
Figure 4.2.
You can place the taskbar on any edge of your screen.
If you place the taskbar at the top of the screen, the Start menu falls down from
the Start button, whereas the Start menu pops up from the Start button when you place
the taskbar at the bottom of the screen. Figure 4.3 shows the Start menu coming down
from a taskbar that is placed at the top of your screen.
Figure 4.3.
The Start menu drops down from a taskbar at the top of the screen.
TIME SAVER: When working on a wide spreadsheet or document, you may want as much screen width as you can get. Therefore, you would want the taskbar placed at the bottom or top of your screen when working with such programs. When working with graphics, you usually need more vertical screen space, so you could move the taskbar to either side of the screen when working within a graphics program.
Task 4.1: Move Your Taskbar
Step 1: Description
The taskbar is easy to drag to any of the four edges of your screen. Simply drag
the taskbar to the new location. When dragging the taskbar, you'll have to position
the mouse pointer over a blank spot in the taskbar, such as between two buttons or
to the right of the Start button if no other windows are open.
Step 2: Action
Step 3: Review
The taskbar does not have to stay at the bottom of your screen. If you like, drag
the taskbar to another location. You may want to place the taskbar at one location
for one program and move the taskbar for another program later. You can move the
taskbar any time, even after you've started one or more programs. If you share a
computer with another user, have your Network Administrator set up a user profile
for both of you. When you log on (see Hour 1), your Windows 95 session's taskbar
will appear where you last left it no matter where the other user moved the taskbar
before you logged on.
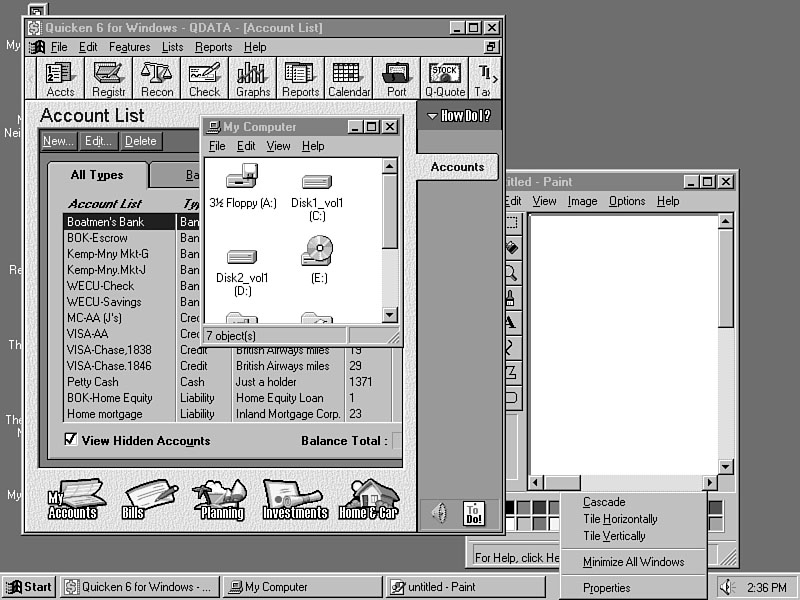
In the previous hour, you learned that a right mouse button click (or the left button click if you've set up your mouse for left-handed operation) often displays a context-sensitive menu of options available to you. The taskbar is one such location where the right mouse button brings up a helpful menu, called the taskbar properties menu. You can use it to change the appearance and performance of the taskbar and the windows controlled by the taskbar. After finding a blank spot on your taskbar, clicking the right mouse button brings up the context-sensitive taskbar properties menu shown in Figure 4.4.
CAUTION: Do not click the right mouse button over one of the taskbar programs unless you want to activate that button's program or window (known as bringing the program into focus). For example, suppose you load these three programs: a word processor, a spreadsheet, and a database. The taskbar will list each program's taskbar button. If you are typing with the word processor and decide that you want to change the taskbar's properties through the right mouse button's taskbar menu, don't click the right mouse button when the mouse pointer points to the database or spreadsheet button. If you do, Windows 95 will give that program's window the focus and will display a menu that controls the size and location of the window--not at all what you had in mind.
Figure 4.4.
A click of the right mouse button on a blank space on the taskbar displays
a context-sensitive menu.
The taskbar properties menu is not necessarily a menu you'll want to display often.
Most users play around with different taskbar and window settings for a while until
they find preferences that suit them best. Thereafter, those users may rarely use
the taskbar properties menu.
3.1 Step Up Whenever you wanted to change the performance of Windows 3.1, you would often have to step through a series of program groups and menus. The right mouse button's context-sensitive help offers tremendous shortcut power when you want to perform common maintenance tasks within Windows 95.
The first three menu options are important when you want to work with more than one open window. These three menu options offer three ways of arranging your open windows so they are more manageable. If you open two or more windows at once, perhaps by running several programs, all those windows can be difficult to manage individually. You could maximize each window and display only one window at a time. There are many reasons, however, to keep more than one window open and displayed at the same time, such as when you want to copy data from one window to another. (Hour 5, "Cruise with Documents and Windows" explains how to copy between windows.)
JUST A MINUTE: Most users feel that a 17-inch monitor (or larger) is necessary to work effectively between two or more open windows on the screen at once.
When you want to see more than one open window at a time, the taskbar properties
menu gives you tools that provide quick management of those windows so you do not
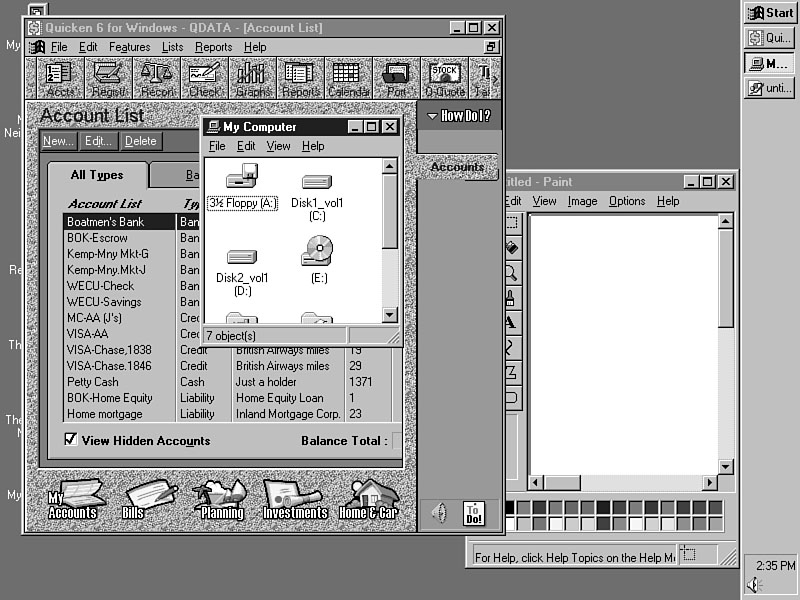
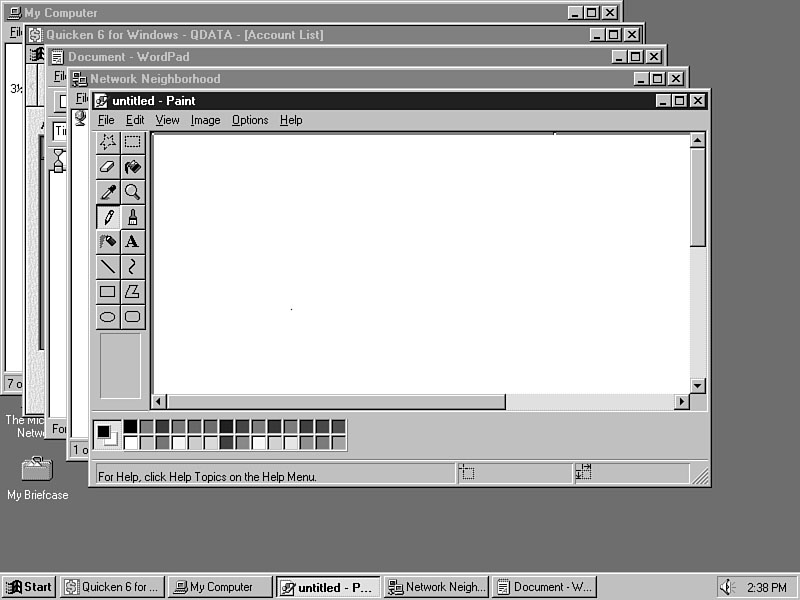
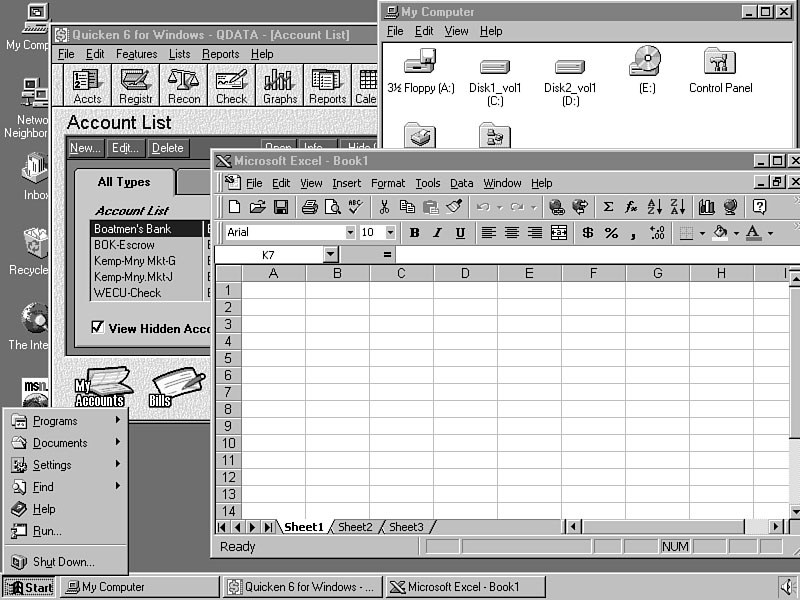
have to size and place each window individually. Figure 4.5 shows how too many windows
open at the same time can be confusing. You'll see in the Task section that follows
how to use the taskbar properties menu to straighten up such a mess.
Figure 4.5.
Too many open windows can quickly cause disorganization.
Task 4.2: Organizing Multiple Windows
Step 1: Description
The taskbar properties menu provides a way to organize several open windows with
the click of a mouse. There are three ways to organize the windows: You can cascade
them, vertically tile them, or horizontally tile them.
Step 2: Action
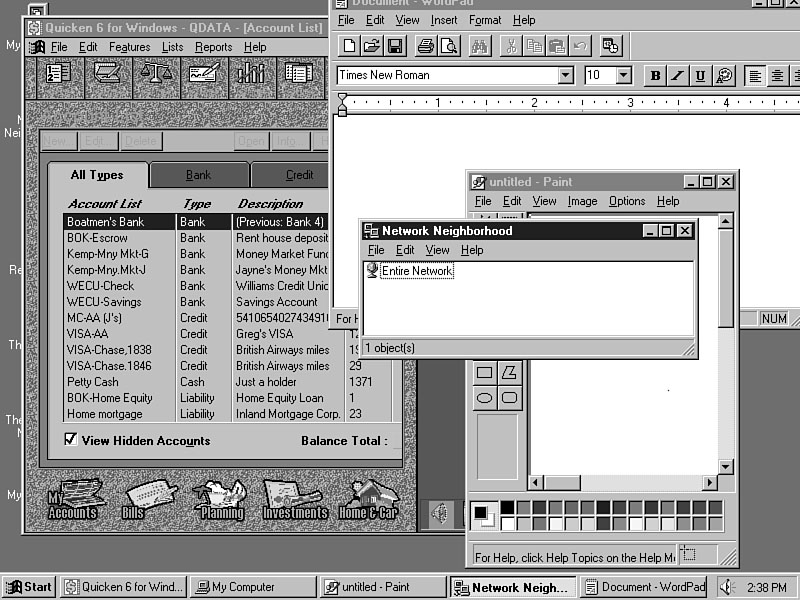
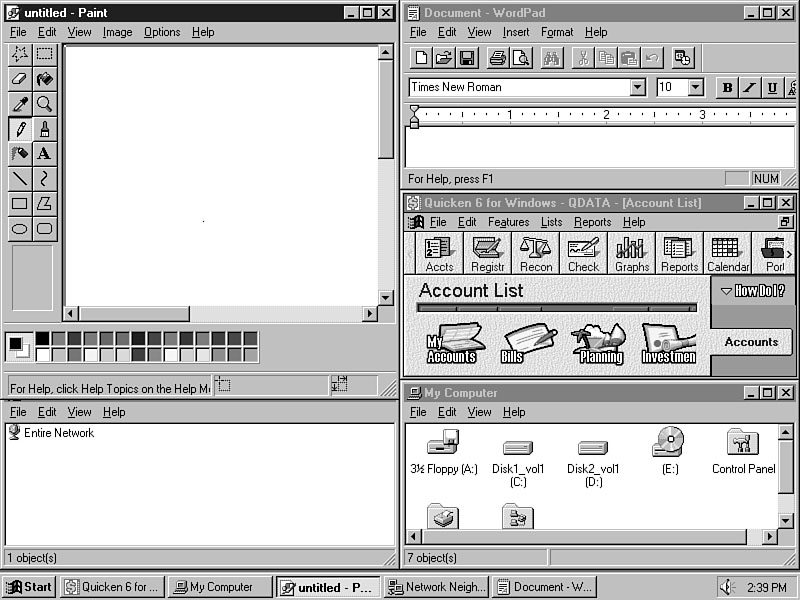
Figure 4.6.
The windows are now more manageable.
Figure 4.7.
The windows are now tiled horizontally.
CAUTION: Your windows may differ in size and placement depending on your monitor size and graphics card settings.
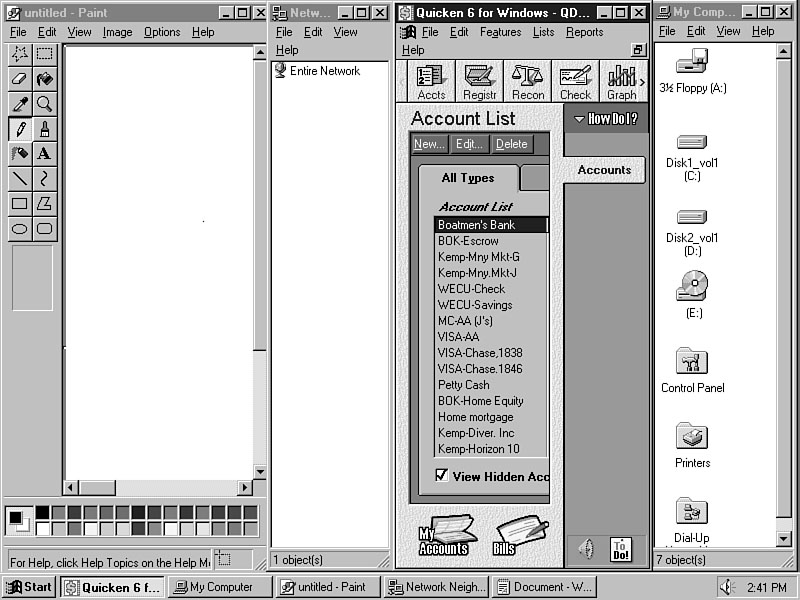
Figure 4.8.
The windows are now tiled vertically.
JUST A MINUTE: No matter how you tile or cascade the windows, each window's minimize, maximize, and restore buttons all work as usual. Therefore, you can maximize a cascaded window at any time by clicking that window's maximize button.
Step 3: Review
You can use the taskbar's properties menu to control the appearance of the open windows
on your screen. The nice thing about using the taskbar to manage open windows is
that you don't have to size and place each window individually. Instead, leave the
hard work to Windows 95 when you want to see a tiled or cascaded series of windows
at one time.
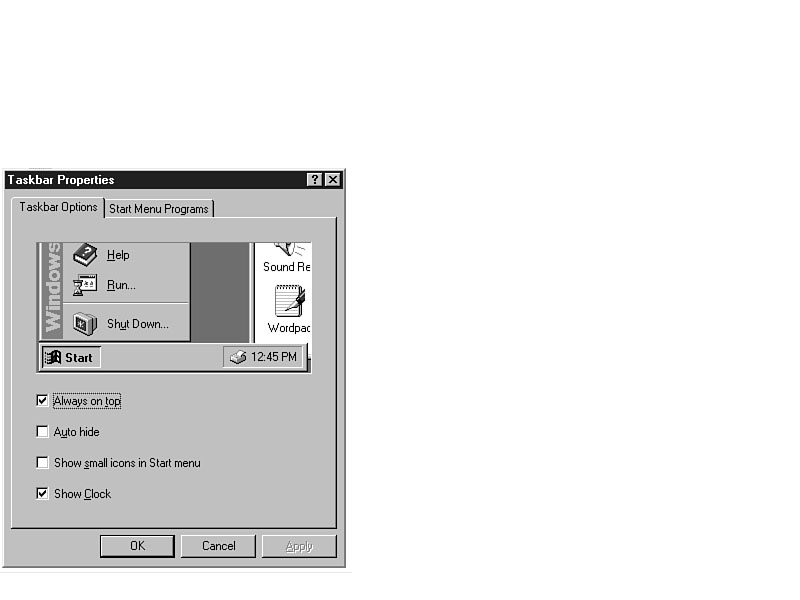
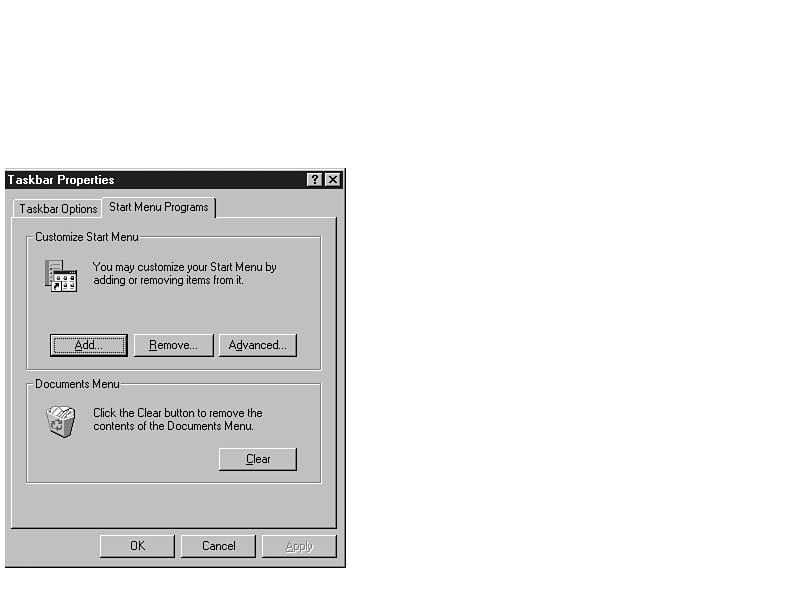
The taskbar properties menu not only controls the appearance and performance of
open windows, the taskbar properties menu also controls the appearance and performance
of the taskbar itself. The Properties menu option displays the Taskbar Properties
tabbed dialog box shown in Figure 4.9. With the Taskbar Properties dialog box, you
can change the way the taskbar appears and performs, and you also can change the
contents of the Start menu.
Figure 4.9.
You can change the taskbar's appearance and performance by using the Taskbar
Properties dialog box.
JUST A MINUTE: In Hour 8, "Manage Your Desktop," you'll learn how to use the Taskbar Properties dialog box to change the contents of the Start menu.
Windows Minute
Using Dialog Boxes
You saw your first tabbed dialog box in the previous hour when you changed the mouse
cursor (Figure 3.7). Tabbed dialog boxes are often called property sheets.
Before you can understand a tabbed dialog box, you should know what a standard
untabbed dialog box is all about.
When Windows 95 needs one or more items of information from you, you may see a special window called a dialog box on your screen. A dialog box captures all kinds of information that Windows 95 needs. Windows 95 might put command buttons, option buttons, checkmarks, text boxes, or other kinds of controls, all together inside a dialog box. You can choose to respond to one or more of those controls depending on the information you want to provide at the time. When you click the dialog box's OK button, Windows 95 closes the dialog box and your dialog box settings go into effect.
JUST A MINUTE: In addition to the OK button, some dialog boxes have an Apply button. Generally, these dialog boxes change a Windows 95 setting such as the font size. If you click Apply, Windows 95 puts your dialog box settings into effect but does not close the dialog box. Therefore, you can see the results of your dialog box settings without getting rid of the dialog box.
When Windows 95 displays a tabbed dialog box, it is offering you more than one
dialog box at the same time. Instead of displaying two or more dialog boxes on the
screen at the same time, the tabs give you a way to select just which dialog box
you want to respond to. You can even respond to one dialog box and then click another
tab and that tab's dialog box then appears so that you can respond to it, too, if
you desire. Windows 95 will often put an OK command button on a dialog box that you
can press when you are finished responding to the dialog box's controls.
Task 4.3: Using the Taskbar Properties Dialog Box
Step 1: Description
The Taskbar Properties dialog box accepts from you information that controls the
way the taskbar appears on the screen. You can allow (or disallow) windows to overlap
the taskbar if those windows are large enough to do so, you can eliminate the clock
from the taskbar, and you can even minimize the taskbar so that it does not appear
until you need it. (Normally the taskbar appears no matter what else you have displayed
on the Windows 95 screen, as you've already seen.)
Step 2: Action
TIME SAVER: If you display the Taskbar Properties dialog box but decide that you don't want to make any changes after all, click the Cancel command button and Windows 95 will remove the Taskbar Properties dialog box and leave the taskbar unchanged.
JUST A MINUTE: You'll learn what that speaker icon is at the right of the taskbar in Hour 20, "Multimedia Is Really Here."
Figure 4.10.
The change in the screen's appearance after shrinking the Start menu's
icons and removing the taskbar clock.
Figure 4.11. The second dialog box appearing from behind the taskbar options.
Step 3: Review
There are several ways to change the taskbar's properties and performances through
the taskbar properties menu. The menu appears when you click the right mouse button.
The menu contains commands to modify the appearance of all of the following:
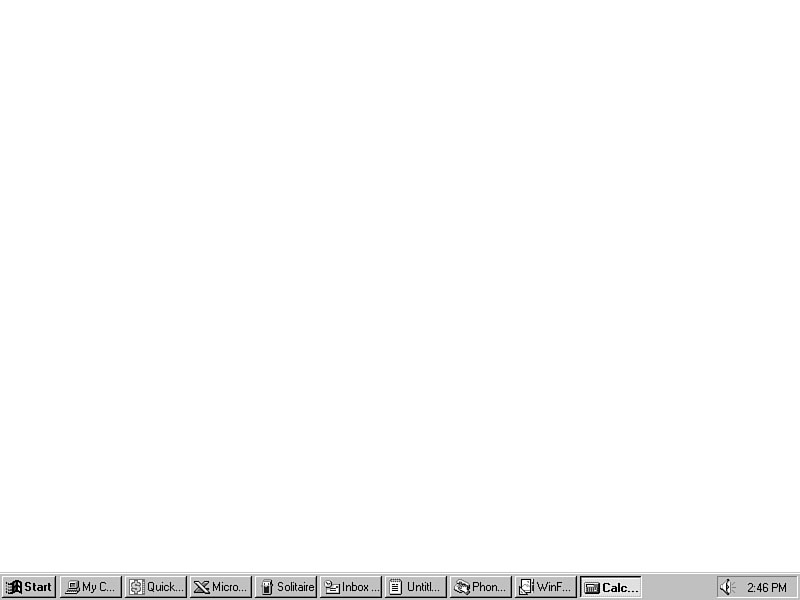
What happens if you open a number of windows by starting several programs? The
single-line taskbar fills up very quickly with buttons and icons and descriptions
that represent those open windows. Figure 4.12 shows such a taskbar. If you're doing
a lot of work, the taskbar gets squeezed for space. However, you can solve that problem
rather easily.
Figure 4.12.
The taskbar needs more room.
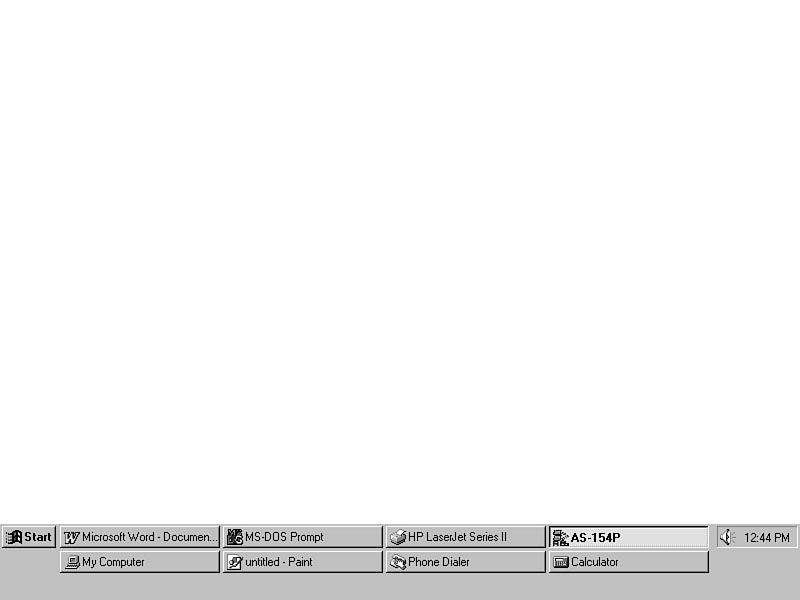
Just as you can resize a window, you also can resize the taskbar. When you enlarge
the taskbar, it can more comfortably hold several buttons for open windows, and the
descriptions on those buttons can be longer. Figure 4.13 shows the same taskbar as
the one shown in Figure 4.12. This time, the taskbar is larger, and you can better
tell by the descriptions on the taskbar buttons what each program is.
Figure 4.13.
The taskbar now has more breathing room.
CAUTION: You can change the height of the taskbar from one to several rows. The taskbar can consume up to half your screen space. Keep in mind, however, that the more space you devote to the taskbar, the less space you'll have for your application windows. The taskbar is there to help you do your real work, so don't make it too large, or you won't have screen space for the rest of your work.
Task 4.4: Resizing the Taskbar
Step 1: Description
If you need to expand (or shrink) the taskbar, you can drag the top of the taskbar
up the screen until it reaches the middle of the Windows 95 desktop. The taskbar
then has more room for more open window buttons and descriptions. Of course, if you've
moved the taskbar to one of the other edges of the screen, you'll drag the inward-most
edge of the taskbar towards the middle of the screen to increase the size of the
taskbar. If you want to shrink the taskbar, you can reverse the dragging until the
taskbar is as small as you want it to be.
Step 2: Action
TIME SAVER: If you drag the top of the taskbar all the way down to the bottom of your screen, the taskbar goes away. By shrinking the taskbar in this way, you shortcut the procedure needed to hide the taskbar. In the previous section, you learned how to hide the taskbar by first displaying the taskbar properties menu and then displaying and selecting from the Taskbar Properties dialog box. It is easier to shrink the taskbar with the mouse than by using the dialog box to hide the taskbar. To bring the taskbar into view, move the mouse to the bottom of the screen until the mouse cursor changes to bidirectional arrow. Drag the arrow up the screen and the taskbar will appear.
Step 3: Review
When you need more room for the taskbar, drag the taskbar's edge until the taskbar
is the size you need. You can expand or shrink the taskbar by dragging the taskbar's
innermost edge with the mouse.
The Start menu offers an extremely simple way for you to start the programs on
your computer. Two or three clicks start virtually any program on your disk drive.
The Programs command on the Start menu launches your programs. To start a
program you only need to display the menu that contains that program and then click
the program's name or icon.
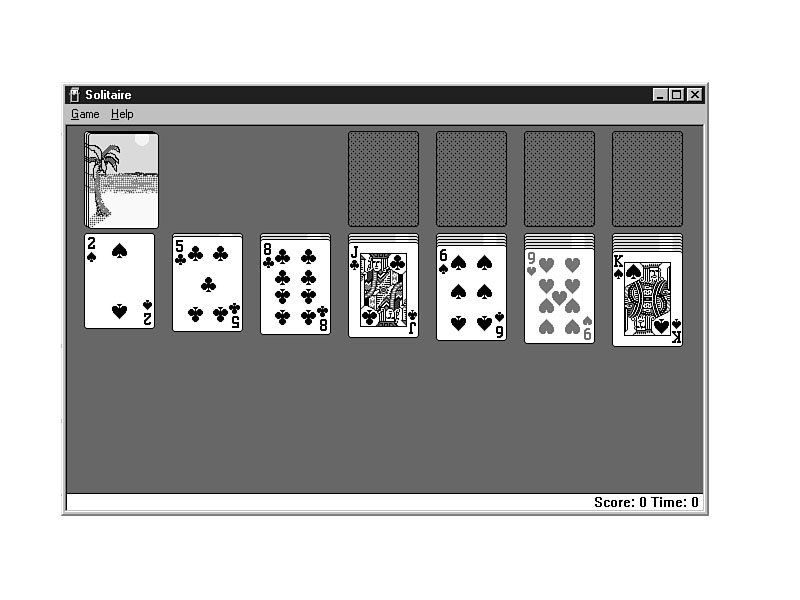
Task 4.5: Starting Solitaire
Step 1: Description
Microsoft gives you a Windows 95-based version of the Solitaire card game. Solitaire
is considered an accessory program. Accessory programs are programs Microsoft
included with Windows 95 which fall under several categories, such as multimedia
programs, text editors, and games such as Solitaire. Between the four major parts
of this book, you'll learn how to control the Solitaire game, as well as other fun
programs that you get with Windows 95. For this hour, you'll learn how to start and
stop Solitaire.
Step 2: Action
Figure 4.14.
You may have a list of several programs on your system.
Figure 4.15.
Get ready to have fun!
JUST A MINUTE: Your Solitaire screen may differ slightly from the one in the figure because your default card deck may be set to have a different picture backing.
Step 3: Review
The Programs command launches any and all programs on your system. Depending
on the way your programs are set up and because many Windows 95 programs are stored
in folders, you may have to display one or more menus to access individual programs
that you want to execute.
3.1 Step Up How did all those programs get on the Start menu? If you upgraded from a previous version of Windows, the Windows 95 installation program automatically updated your programs so they appear on the Start menu.
If you didn't upgrade from a previous Windows version, your Start menu may not have many items. Only those programs that come with Windows 95 will appear. To add other programs on your system, if you have other programs, you'll have to install those programs all over again using Windows 95. (Read the program's Windows installation instructions to see how to install the program.) When you reinstall the program, Windows 95 adds the program to the Start menu.
In the future, Windows 95 will add more and more programs to the Start menu's series of menus as you install programs. Therefore, you don't need to worry about adding programs to the Start menu because Windows 95 does the work for you as you install each program.
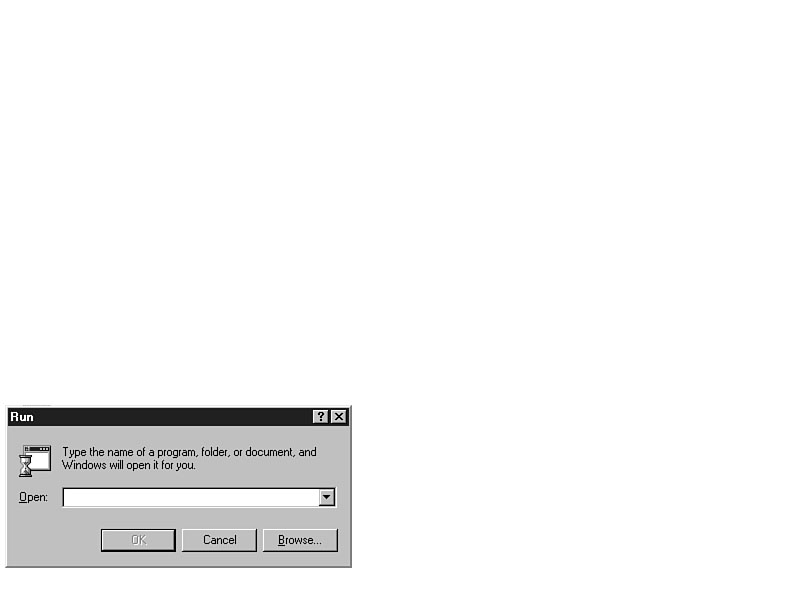
In addition to the Start menu's Programs command, you can use another method to start programs that aren't set up on the Programs' cascade of menus. The Run command on the Start menu providesa way for you to execute specific programs.
CAUTION: Before using the Run command, you must understand the basics of disk drive names (such as C: and D:) and pathnames of files (such as C:\WORD\DEC97). You must also know the exact name of the program you want to run. Most newcomers to Windows 95 stay away from the Run command for good reason: Run requires a fairly comprehensive level of understanding of the underlying program you are trying to start. Many Windows 95 users will work inside Windows 95 for years and never need the Run command because Windows 95 programs install their own icons on the Start menu.
Windows Minute
Reaching Your Files
A pathname is the exact computer system location of a file. The document and
folder concept in Windows 95 makes working with paths much easier than before Windows
95 came along. Most often, you will specify pathnames visually by clicking folder
icons instead of typing long pathnames as you had to do before Windows 95.
The folders in Windows 95 are more technically known as directories as explained in Hour 2, "Tour Windows 95 Now." A directory is just a collection of files and other directories. In file listings, Windows 95 often displays a folder icon with a name to represent a directory that holds other files. Directories also can hold subdirectories so the location of a file, the file's path, may be deep within several nested directories on a disk or CD-ROM drive.
A full pathname begins with a disk drive name followed by a colon (:), followed by a backslash (\). If the file resides in the disk drive's top directory (the root directory), you then type the filename. If, however, the file resides in a directory, you must list the directory after the backslash. If the file resides in several nested directories, you must list each directory in order, from the outermost directory to the innermost directory, and separate each directory name with a backslash. Both of the following are full pathnames to specific files:
c:\autoexec.bat
d:\Sherry\WordProc\Home\Insure\Fire and Casualty
The first filename is autoexec.bat located in the root directory. The second filename is Fire and Casualty located within a series of nested directories.
Windows 95's icon folder concept makes specifying long pathnames almost obsolete. Aren't you glad? Clicking folders to open them is much easier than typing the long streams of characters that often represent pathnames.
3.1 Step Up The Start menu's Run command mirrors the File | Run command in Windows 3.1. Generally, you used the File | Run command to install programs in Windows 3.1. You'll install programs in Windows 95 using one of two methods. Often, if the program is on a CD-ROM, the first time you insert the CD-ROM in the caddy the installation program starts automatically (depending on how the program was written).
Also, an Add/Remove Programs icon in the My Computer window walks you through
the installation of new programs. Just as a novice user would, you may have to read
the software's installation guide to find the best way to install the program. If
the program was specifically written for Windows 95, the Add/Remove Programs icon
located in the My Computer window's Control Panel will walk you through an appropriate
installation procedure.
Task 4.6: Running with Run
Step 1: Description
The Start menu's Run command offers a tedious way to execute any program on
your computer. If you want to run a program that would not properly set up in Windows
95 (perhaps the program is an old DOS-based program), you'll have to execute the
program using the Run command. This task executes the Solitaire program by
using Run.
Step 2: Action
Figure 4.16.
You can run programs directly from the Start menu.
C:\WINDOWS\SOL
Step 3: Review
You may be one of the lucky few who never needs the Run command. Nevertheless
there are many programs on the market that Windows 95 cannot execute in its environment.
Using Run, you can execute any program on your computer as long as you know
the program's pathname and filename.
TIME SAVER: Hour 5's chapter ("Cruise with Documents and Windows") explains how Windows 95 supports a strong document concept. You'll learn that Windows 95 is data-driven more than program driven. Here's a quick preview: If you type a data file (such as a Microsoft Word document) instead of a program name with the Start menu's Run command, Windows 95 automatically starts the program needed to work with that data file and loads the data file for you. Therefore, you worry less about your programs and you can concentrate more on your data. In addition, if you use the Internet, you can type an Internet address (often called a URL) at the Run command's prompt and Windows 95 automatically starts your Internet browser and takes you to the Web site you entered.
This hour concentrated mostly on the taskbar. The taskbar gives you a play-by-play status of the open windows on your system. As you open and close windows, the taskbar updates with new buttons to show what's happening at all times. If you start more than one program, you can switch between those programs as easily as you switch between cable TV shows: Click a button on the taskbar.
There are several adjustments you can make to the taskbar. You can move and resize the taskbar. You can determine whether the taskbar appears or not. You can remove the clock on the taskbar if you want the space. The taskbar includes a context-sensitive menu that lets you modify all these settings and more.
The taskbar works along with the Start menu to start and control the programs running on your system. Use the Programs command on the Start menu to start programs with a total of two or three mouse clicks. Although you can use the Run command to start programs, the Programs command is easier as long as the program is set up properly in Windows 95.
accessory programs Programs that Microsoft included with Windows 95 which fall under several categories such as multimedia programs, text editors, and games such as Solitaire.
cascade The effect of neatly stacking all open windows on the screen so that each window's title bar appears.
dialog box A special window in which you can enter information needed by Windows 95.
tabbed dialog box Two or more cascaded dialog boxes appearing on the screen at the same time.
taskbar properties menu The menu that appears when you click the right mouse button over an empty spot on the taskbar. You can control the performance and appearance of the taskbar and Windows 95 through the taskbar properties menu.
Taskbar Properties tabbed dialog box A tabbed dialog box that appears when you select the Properties command on the taskbar properties menu. The Taskbar Properties tabbed dialog box lets you modify the appearance and performance of the taskbar and the Start menu.
tiling The effect of placing all open windows on the screen so that the body of each window appears next to, above, or below, the other windows.
URL The address of an Internet Web site. URL is an acronym for Uniform Resource Locator.
![]()
![]()
![]()