


- Hour 10 -
Compose Using Writing
Tools
For many people, this hour contains a review of procedures they already know.
The Notepad and WordPad programs that appear on your Accessories menu are simple
editing programs that accept your text as input and create documents. The WordPad
program does not contain all the features of a word processor, such as Microsoft
Word for Windows 6; WordPad does, however, contain many formatting features and can
accept documents created in several word processing programs. WordPad accepts any
document created by Word for Windows 6, as well as documents created in other word
processors that can save the documents in RTF (Rich Text Format as defined
in Hour 4, "Take Windows 95 to Task"), or in the text format.
Before looking at WordPad, this hour explores the Notepad program. Notepad loads
more quickly than WordPad (or virtually any word processor) and takes less memory,
but it has less functionality than WordPad. Notepad handles only text files up to
the size of 64KB (approximately 64,000 bytes of memory). Therefore, Notepad holds
about 60 pages of single-spaced text. Notepad works only with text files, so if you
have to work with text files, you don't have to select from among various document
file types as you have to do with WordPad.
JUST A MINUTE: Notepad and WordPad are actually
text editors and not word processors because they do not contain the powerful formatting
abilities available in word processors.
The highlights of this hour include:
- When to use Notepad and when to use WordPad
- How to edit text within the Notepad environment
- How to edit and format text within the WordPad environment
- Why the Print Preview feature can save you time and paper costs
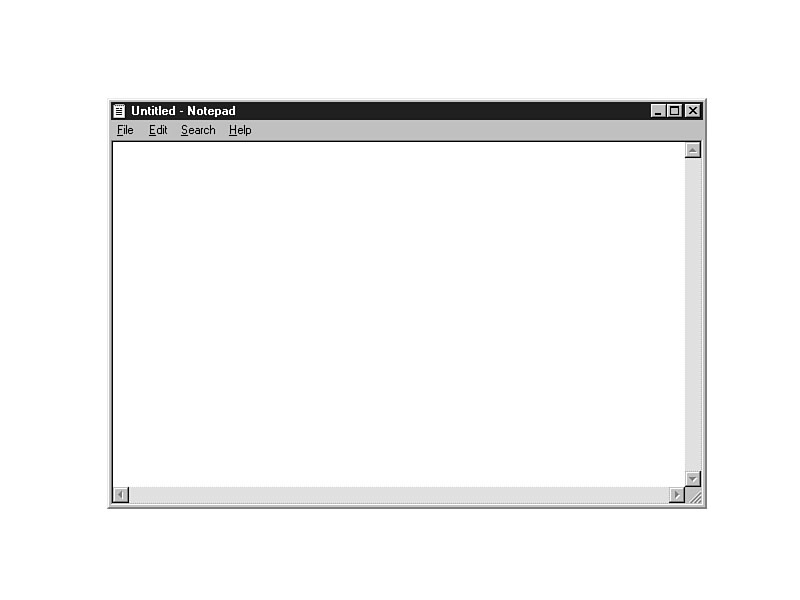
Notice the Notepad
When you start Notepad from the Accessories menu, the Notepad program window opens
as shown in Figure 10.1. You can resize and maximize the window. The Notepad window
contains both horizontal and vertical scroll bars, so Notepad can create documents
that are larger than the window's width and height.
Figure 10.1.
The Notepad program is a simple text editor.
TIME SAVER: If you have not used a word processor
before, or if you have not used a Windows-based word processor before, Notepad and
WordPad provide great introductions to word processors. You can get the basics of
data-entry using Notepad, and then add the formatting capabilities of WordPad before
tackling a comprehensive word processor program such as Word for Windows.
All of the typical text-entry control keys, such as Backspace, the cursor-movement
arrow keys, the Enter key, the Del(ete), the PageUp and PageDown keys, operate normally
on the text you type inside the Notepad window. In addition to the usual keys, the
following keys control the text-entry as well:
Ctrl+Left Arrow Moves the cursor to the beginning of the previous word in the
document.
Ctrl+Right Arrow Moves the cursor to the beginning of the next word in the document.
Home Moves the cursor to the beginning of the current line.
End Moves the cursor to the end of the current line.
Ctrl+Home Moves the cursor to the beginning of the document's first line.
Ctrl+End Moves the cursor to the end of the document's last line.
JUST A MINUTE: These same keys are available
in WordPad also. Therefore, if you learn the keys in Notepad, you'll already know
them when you work with WordPad.
Task 10.1: A First Look at Notepad
Step 1: Description
This task loads a text file from the Windows 95 directory into Notepad. Once you
load the file, you can then practice changing the file and using the keyboard editing
tools.
Step 2: Action
- 1. Select File | Open. You'll see the familiar (familiar
after Hour 5, "Cruise with Documents and Windows") Windows 95 Open dialog
box.
2. Display the contents of the Windows folder (usually located on drive C) by
double-clicking on the Windows folder. By default, Notepad expects to open text document
files with filename extensions of .TXT, so when you see an Open dialog box, the only
documents you see in the list are text documents and folders.
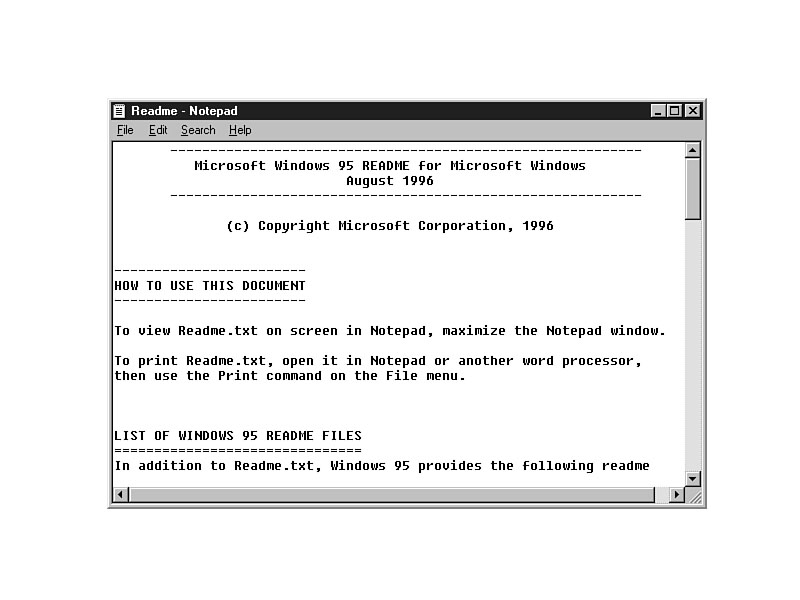
3. Double-click the document named Readme.txt (you may not see the extension,
depending on the settings of your Explorer Options). The TYÏtents of
your Windows 95's Readme.txt document file might differ from the figure's.
JUST A MINUTE: If you want to see filename extensions
or hide them, you must set the appropriate option using the Explorer program's View
| Option command, as described in Hour 6, "Explore the Windows 95 System."
The Explorer setting determines how all Windows 95 Open dialog boxes display filename
extensions.
- When Notepad loads the file, your Notepad window should look similar to the one
in Figure 10.2.
Figure 10.2.
Notepad now has a document loaded in memory.
CAUTION: If you maximized the Notepad window,
resize the window so that the size fills only the center of the screen. The smaller
window gives you more practice scrolling using the scroll bars. Remember, too, that
your version of Windows 95 might differ slightly from this book's version meaning
that the actual contents of your Readme.txt text document might be different from
the one shown here.
- 4. Click the scroll bars and use the cursor-movement keys described earlier
to practice navigating through text documents.
TIME SAVER: You can move the mouse to any position
where you want the text cursor and click the mouse button to move the text cursor
instantly to that location.
- 5. Press Ctrl+End to place the cursor at the very end of the document.
6. Type these words: This is the end of the Readme.txt document.
7. Press Enter to position the cursor at the start of the next line.
8. Press the Up Arrow to move the cursor to the beginning of the line you just
added.
9. Press the Ctrl+Right Arrow key until the text cursor rests just before the
letter t in the third word (the) on the line. Type the word really
and press the spacebar. Notice that Notepad shifts the entire line to the right to
make room for the new word.
CAUTION: Notepad does not support an overtype
mode as do most word processors, including WordPad. Notepad only works in insert
mode which means that each character you type, when that character precedes others
on the line, shifts all other characters to the right to make room for the new character.
Overtype mode, when available in other programs such as WordPad, means that new characters
always overwrite existing characters on a line.
- 10. Press Backspace twice. As you press Backspace, Notepad backs up the
cursor, erases as it backs up, and shifts the remaining characters to the left to
close up the space caused by the deleted characters.
11. Press Ctrl+Z. Ctrl+Z is the shortcut key for Edit | Undo. The
Undo command reverses the most recent edit. Notice that your two deleted characters
return.
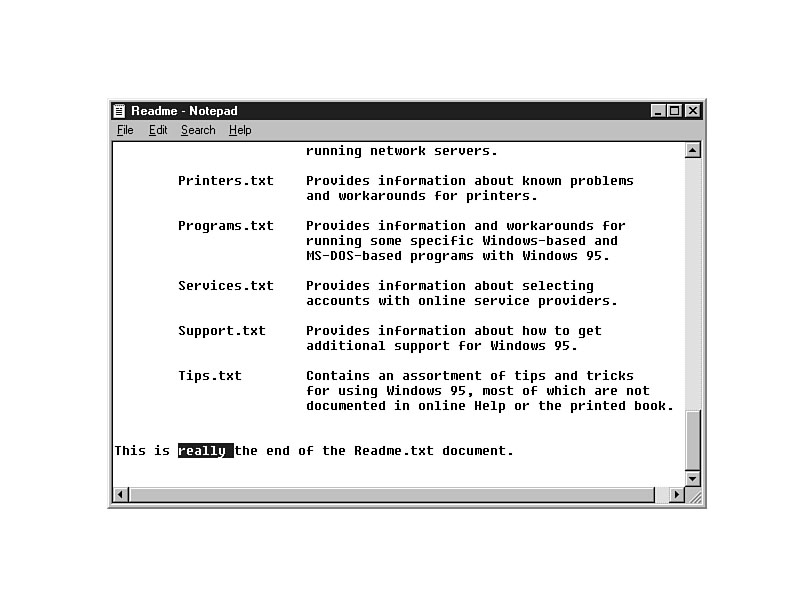
12. When you want to delete an entire word, or a group of words, you might be
better off selecting the text first with the mouse. Drag the mouse cursor over the
beginning of the selected text and release the mouse after highlighting the selected
text.
Select the entire word really, plus the space at the end of the word, as
shown in Figure 10.3.
Figure 10.3.
Select words with the mouse or keyboard.
TIME SAVER: You can select text by holding down
the Shift key and pressing the arrow keys. Holding down a Shift key while pressing
both Ctrl and a left or right arrow key selects an entire word at a time. Holding
down the Shift key plus an up or down arrow highlights the previous or subsequent
lines.
- 13. After you select text (you can select multiple paragraphs at the same
time if you need to work with that much text at once), you can copy the text to the
Clipboard, cut the text from the document and send that cut text to the Clipboard,
or delete the text without using the Clipboard. All of these commands are available
from the Edit menu.
Press Del to delete the selected text.
TIME SAVER: You can select the entire text document
at once by choosing the Edit | Select All command.
- 14. Add to the end of the line. Press the End key to move the cursor to
the end of the line. Press the Spacebar and type this text: Now is the time to
finish.
If you've worked with word processors, you may have expected the text to wrap
when the cursor got to the end of the window. Notepad does not automatically wrap
text to the next line at the edge of the window. There is a way to force the text
to wrap at the edge of the window. Select the Edit | Word Wrap command
and watch your screen. Notepad reformats the entire file so that no line is hidden
by the right edge of the screen. Notepad removes the horizontal scroll bar when the
Word Wrap is turned on because there is no text to the right to require scrolling.
15. Without Word Wrap turned on, the Notepad program wraps text to the next line
only when you press Enter. Turn off Word Wrap (by selecting Edit | Word
Wrap once again) to put the Readme.txt file back to its original margins. The line
you typed at the end of the file, as well as many of the other lines in the file,
will now span past the right edge of the screen.
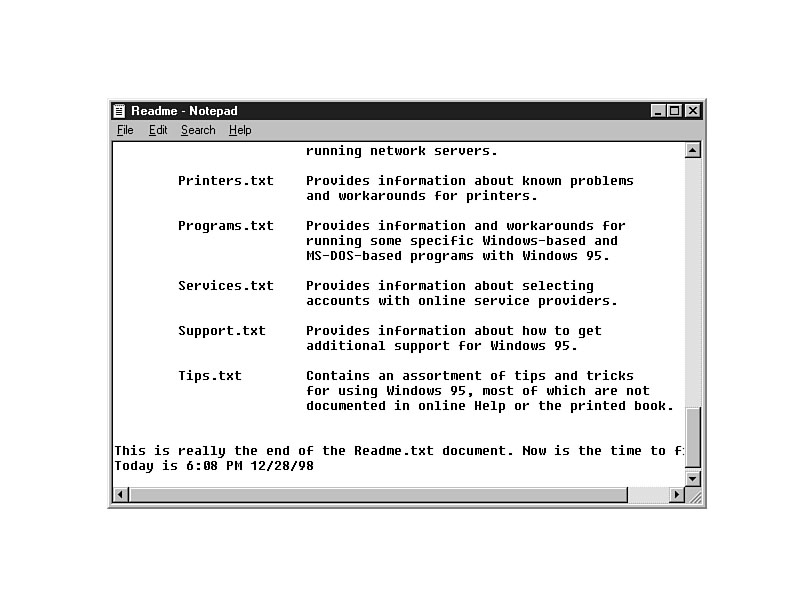
16. Press Ctrl+End to move the cursor to the end of the document file.
17. Type this: Today is, and then press the Spacebar to put a space
after is.
18. Press F5. F5 is the shortcut key for the Edit | Time/Date command.
Notepad places the time and date at the cursor's position as shown in Figure 10.4.
Figure 10.4.
Notepad can insert the time and date at the cursor's position.
If you want only the time or the date, you can insert the full time and date and
delete the unwanted portion.
TIME SAVER: Here is a strange feature of Notepad:
If you ever type the word .LOG (notice the initial period) at the top of
a Notepad text document and then save the document, every subsequent time that you
open the document, Notepad appends the current time and date to the end of the file.
You can use this feature to keep a log file using Notepad.
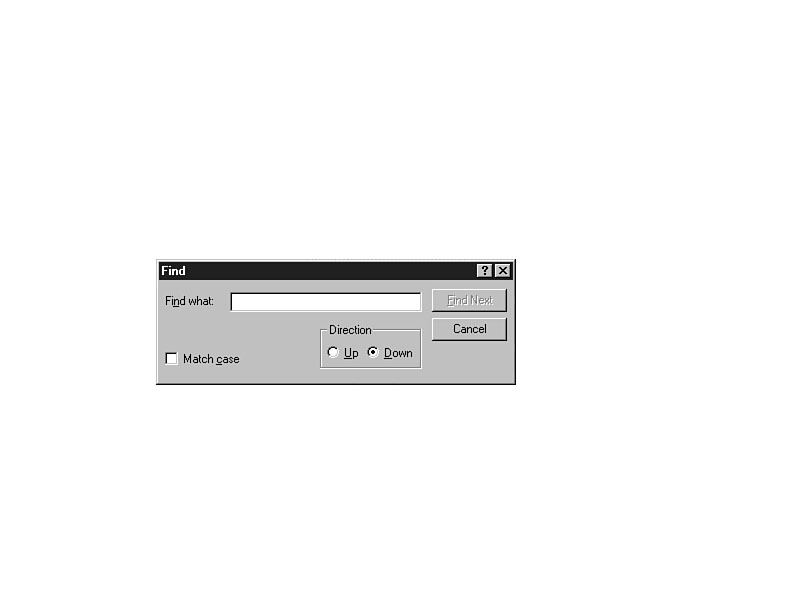
- 19. Display the Search menu. Select Find. Notepad displays
the Find dialog box shown in Figure 10.5. You can look for specific text. If you
want Notepad to search for the text you enter and match only the text that exactly
matches the uppercase and lowercase characters of your search text, click the Match
case option. If you want Notepad to search up from the cursor's current position
(something you would want if, as is now the case, the cursor appears at the end of
the file) select Up and Notepad searches from the current cursor position
to the start of the file. By default, Notepad searches down in the file and stops
the search at the end of the document.
Figure 10.5.
Notepad can search for specific text within the document.
Type Windows and click the Up option to locate the previous occurrence
of the word. Press Find Next to start the search. When Notepad finds matching
text, it displays the Find dialog box once again and you can continue searching.
20. If you want to save the document text you created, select File | Save.
Don't save the Readme.txt file, however, because you made changes to the document
that shouldn't appear in the file. Select File | Exit to exit the program.
When Windows 95 informs you that you may want to save the changes you made to the
file, Click the No command button.
Step 3: Review
Notepad offers a simple text editing tool for text files. Although Notepad provides
only fundamental editing features, you can quickly load Notepad and work with text
files whether or not you want those files created with Word Wrap.
TIME SAVER: If you are a programmer, you can
use Notepad as a quick editor for programs. Turn off the Word Wrap feature so that
Notepad does not automatically wrap at a window's edge. Notepad always opens and
saves document files in the standard text format, just as most language compilers
require.
WordPad Works Well with Words
The WordPad program is more than a text editor, but slightly less than a word
processor. WordPad offers a large assortment of editing and formatting tools that
go beyond the power of Notepad. Whereas Notepad edited, loaded, and saved only text
documents, WordPad edits, loads, and saves documents in all the following formats:
- Word for Windows
- Windows Write (the word processor available in Windows 3.1)
- Text documents
- RTF documents
- Text documents--MS-DOS format
As a result, when you open an RTF or Write or Word for Windows 6 document that
contains formatting, such as underlining and boldfaced characters, WordPad retains
those special formatting features in the document. (Notepad does not have this capability.)
WordPad supports all the standard editing keys described for Notepad in the previous
sections. In addition, WordPad contains a toolbar that you can display to help you
access common commands more easily. WordPad also supports the uses of a Ruler and
format bar that help you work with WordPad's advanced editing features.
3.1 Step Up The WordPad editor is a
full 32-bit application. That means Microsoft programmers wrote WordPad to take advantage
of all of the internal and external features of Windows 95.
Task 10.2: Working with WordPad
Step 1: Description
The WordPad program contains features for the novice as well as for advanced power-users.
If you have no other word processor on your system, you can use WordPad to produce
virtually any kind of document that you need. This task leads you through the basic
steps for using WordPad and its features.
Step 2: Action
- 1. Start the WordPad program from the Accessories menu. You'll see the
WordPad screen shown in Figure 10.6.
Figure 10.6.
WordPad offers many word processing features.
JUST A MINUTE: Your WordPad screen may not look
exactly like the one in Figure 10.6. Use the View menu to checkmark each of
the first four commands: Toolbar, Format Bar, Ruler, and Status
Bar, so that you display each of these four optional tools.
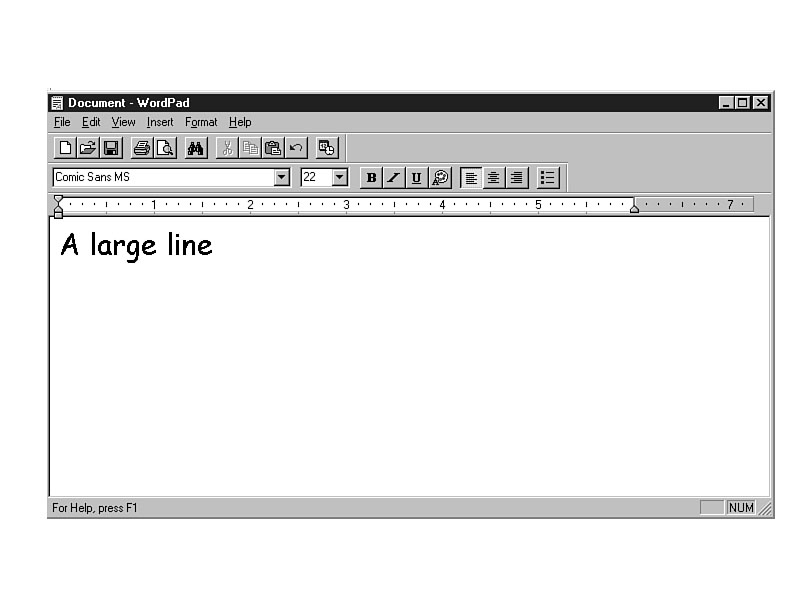
- 2. For this task you'll practice entering and formatting text. Type the
following text: A large line.
3. Select all three words by highlighting them with the mouse or keyboard.
4. Click the first format bar button with the letter B. The text stays selected
but something changes; the text becomes boldfaced. You can press an arrow key to
get rid of the highlight and see the boldfaced text.
5. Select the three words once again. Click the second format bar button with
the letter I. WordPad italicizes the text. Now click the third format bar
button with the letter U. WordPad instantly underlines the selected text.
Keep the text highlighted for the next step.
6. By default WordPad selects a font (a typestyle) named Times New
Roman. You can see the font name directly below the format bar. The font's size,
in points (a point is 1/72 inch), appears to the right of the font name (the
default font size is 10 points).
You can change both the font and the font size by clicking the dropdown lists in
which each appears. When you select text, then select a font name, WordPad changes
the font of the selected text to the new font name style. After selecting the text,
display the font name list by clicking the dropdown listbox's arrow and select a
font name. If you have the Comic Sans MS, use that font to correspond to the
next figure in this book. If you do not have that font name, select another font
name that sounds interesting.
Open the point size dropdown listbox and select 22 (you can type this number directly
into the listbox if you want to). As soon as you do, you can see the results of your
boldfaced, underlined, italicized, large-sized text displayed using the font name
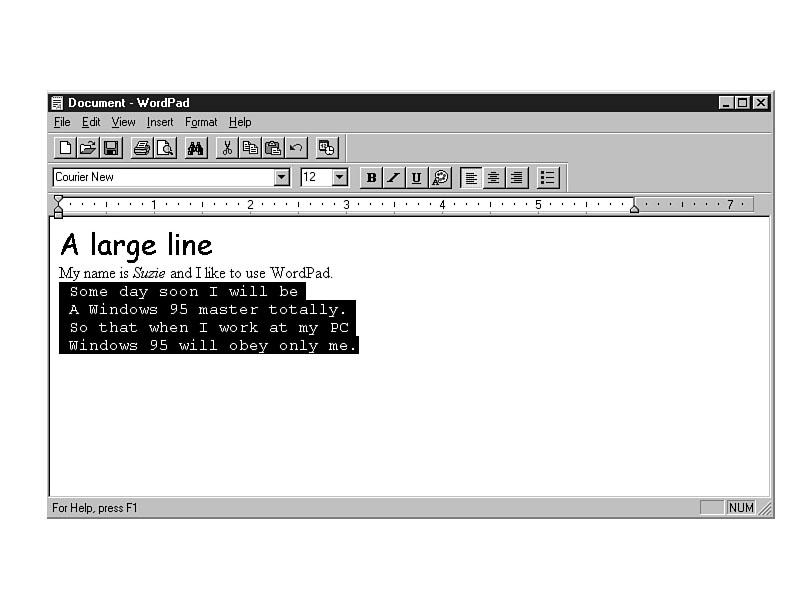
you selected. Press the left or right arrow key to remove the selection. Figure 10.7
shows what your WordPad window should look like.
Figure 10.7.
The text is formatted to your exact specifications.
WordPad applied all of the previous formatting on the three words because you selected
those words before you changed the formatting. If you select only a single word,
WordPad formats only that selected word and leaves all the other words alone.
CAUTION: Don't overdo the formatting of text!
If you make text too fancy, it becomes cluttered, and your words will lose their
meaning amidst all the italics, underlines, and font styles. Don't mix more than
two or three font styles on the same page. Use italics, boldfacing, and underlining
only for emphasis when needed for certain words and titles.
- 7. Press Enter. Click the B, I, and U format bar buttons
and return the font name to Times New Roman. Lower the font size to 10. Type
the following: My name is and press the spacebar. If you do not like the
font size, click the down arrow to the right of the font name list and select a different
size.
8. Suppose you want to italicize your name. If you now click the format bar for
italics, all subsequent text that you type will be italicized. Click the italics
format bar button now and type your first name. The name will be italicized, but
the other text is not italicized.
9. Click the italics format bar button once again and continue typing on the
same line. Type this: and I like to use WordPad.
10. As you can see, you don't have to select text to apply special formatting
to text. Before you type text that you want to format, select the proper format command
and then type the text. WordPad then formats the text, using the format styles you've
selected, as you type that text. When you want to revert to the previous unformatted
style (such as when you no longer want italics) change the style and keep typing.
Windows Minute
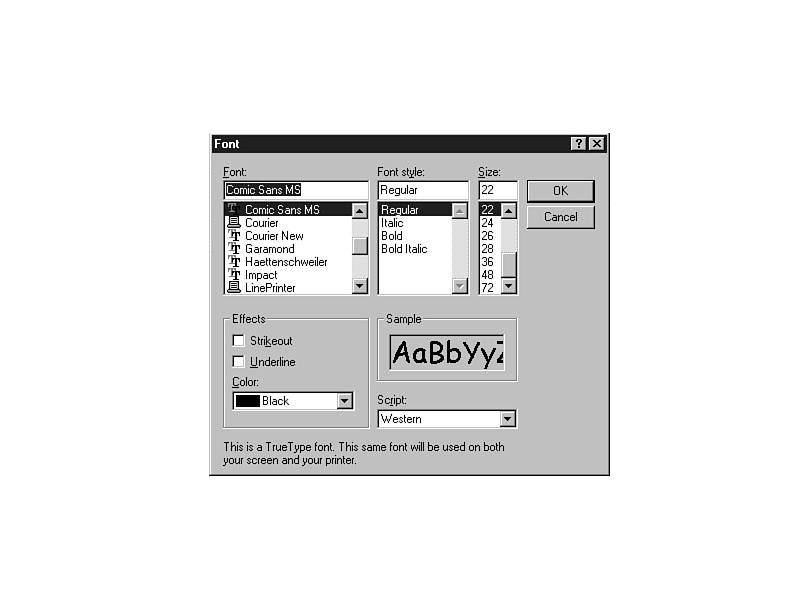
Font Controls
Ctrl+B, Ctrl+I, and Ctrl+U are the shortcut keys for clicking the B, I,
and U format bar buttons. You can also change the formatting of text characters
by selecting Format | Font. WordPad displays a Font dialog box, shown
in Figure 10.8, on which you can apply several formatting styles.
As you change the style, the Font dialog box's Sample area shows you a sample
of text formatted to the specifications you provide. When you close the Font dialog
box, WordPad formats subsequent text according to the Font dialog box settings.
Figure 10.8.
The Font dialog box provides all formatting specifications in a single
place.
11. The Ruler indicates where your text will appear on the printed page when
you print the document. (This book's printer discussion is saved for Hour 15, "Increase
Printing Power.") The screen's text measurements will differ from the printed
document's measurements because of differences in screen sizes and video resolution
(the amount of clarity your video adapter and screen can provide). Each number on
the Ruler represents an inch (or a centimeter if your computer is set up for a metric
setting).
As you type you can watch the Ruler to see where the text will appear once you print
the document. If you select the Format | Paragraph command, WordPad
displays the Paragraph dialog box in which you can set left and right indentations
for individual paragraphs (either highlighted paragraphs or the paragraph that contains
the cursor when you select the Format | Paragraph command).
Display the Paragraph dialog box now, but leave the values at their default settings.
Once you've read through the dialog box press Esc to close the dialog box.
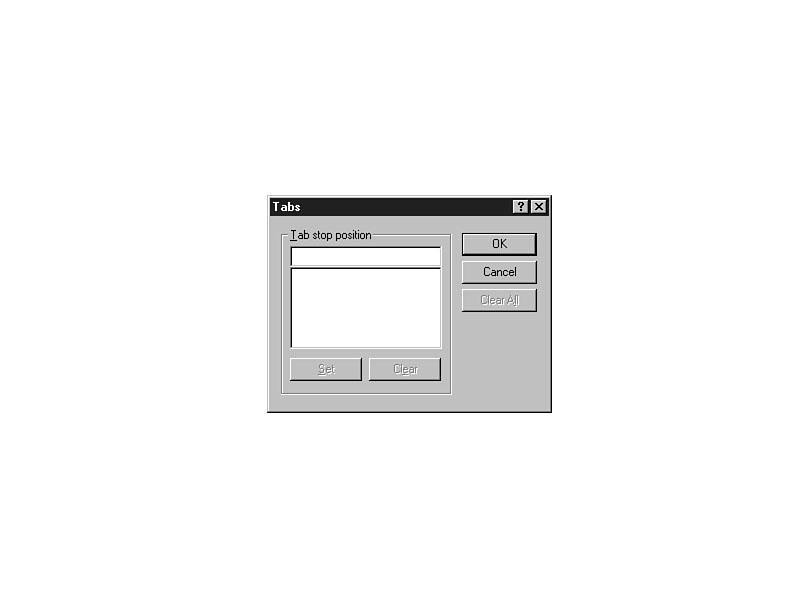
12. If you want to set tab stops, do so by first selecting the Format
| Tabs command, and then displaying the Tabs dialog box shown in Figure 10.9.
Figure 10.9.
You can add one or more tab stops to a document's Ruler bar.
If you know the exact Ruler measurement of the tab stop you want to create, type
that number at the top of the Tabs dialog box and click the Set command button. The
Tabs dialog box holds a list of tab stops as you add them. You can clear a tab stop
by highlighting the tab stop value and clicking Clear. When you've set the tab stops,
click the OK command button to return to the document.
TIME SAVER: You can place tab stops quickly by
double-clicking over the Ruler at the exact location of the tab stop you want.
- 13. Maximize the size of your WordPad window. Type the following poem;
press Enter at the end of each line:
Some day soon I will be
A Windows 95 master totally.
So that when I work at my PC
Windows 95 will obey only me.
- 14. Select the entire paragraph so the paragraph is completely highlighted.
15. Click the Center format bar button (the third button from the right that
displays the message Center, when you hold the mouse pointer over the button for
two seconds). WordPad automatically centers your paragraph on the page. The Ruler
determines the centering measurements.
16. Click the Align Right format bar button (the second format bar button from
the right). WordPad aligns the poem against the right margin. These formatting buttons
adjust the alignment of your WordPad paragraphs. By default, WordPad aligns all of
your paragraphs against the left margin.
TIME SAVER: The center alignment format bar button
is useful for centering titles at the top of documents.
- The Format | Paragraph dialog box contains a dropdown listbox that
offers these three alignment choices in case you don't have the format bar displayed,
but you still want to align text. Change the alignment back to the left edge of the
screen.
JUST A MINUTE: A paragraph is actually any line
or group of lines that end with an Enter keypress.
- 17. Click the Color format bar button (see Figure 10.10) to display the
color-selection listbox shown in Figure 10.10.
Figure 10.10.
Apply color to selected text with the Color format bar button.
If you select a color, WordPad sets all selected text to that color. If there is
no selected text, then all subsequent text that you type from the text cursor's current
position will be that color, until you change the color once again.
18. Move the cursor to the end of the poem you just typed. Press Enter twice
to add a blank line after the poem.
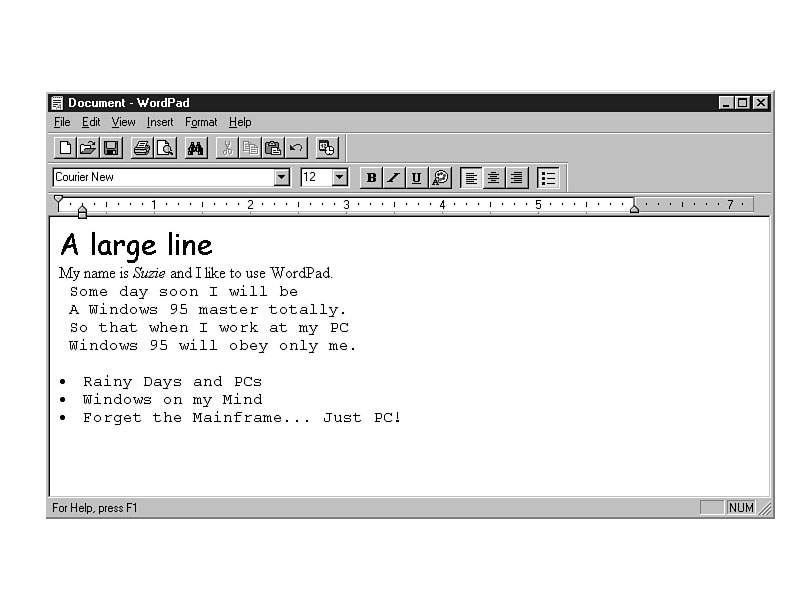
19. Click the far-right format bar button. This is the Bullets format bar button.
When you want to create a list of bulleted items, you can first click the Bullets
button to get WordPad's help with the bullets. (The format bar button offers a shortcut
for the Format | Bullet Style menu command.)
Type three song titles, pressing Enter at the end of each line. When you press Enter,
WordPad produces another bullet to the left of the new line. After the third song
title, click the Bullets format bar button once again to end the list of bulleted
items. Your screen should look something like the screen in Figure 10.11.
Figure 10.11.
WordPad makes adding a bulleted list of items easy.
TIME SAVER: To revert a bulleted list back to
regular lines of text, select the list and then click the Bullets format bar button.
- 20. All of the usual Clipboard editing features, such as Copy, Cut, and
Paste, work inside WordPad. Also the Edit menu contains Find and Replace commands
that let you locate and even globally replace text.
Suppose that you write a 10-page letter to a Joe MacDonald and then you find out
that Joe spells his last name McDonald. You could edit the document by hand
deleting the a inside every MacDonald. An easier method would be to
select the Edit | Replace command to display the Replace dialog box
(display this dialog box now). You could type MacDonald at the Find
what prompt and McDonald at the Replace with prompt. You could then
have WordPad replace each individual occurrence of the name, one at a time, by clicking
the Find Next button or you can click Replace All to request that WordPad
make all the replacements for you. For now, press Esc to close the Replace dialog
box.
21. WordPad supports an Edit | Undo command (Ctrl+Z is the shortcut).
You can undo your most recent edit or format command. Many of the menu bar commands
are contained on the toolbar buttons as well. Take a moment to run your mouse cursor
over each toolbar button for a couple of seconds to see what each button represents.
(The toolbar is the row of buttons above the font name dropdown listbox, as opposed
to the format bar at the right of the font name dropdown listbox. See Figure 10.6.)
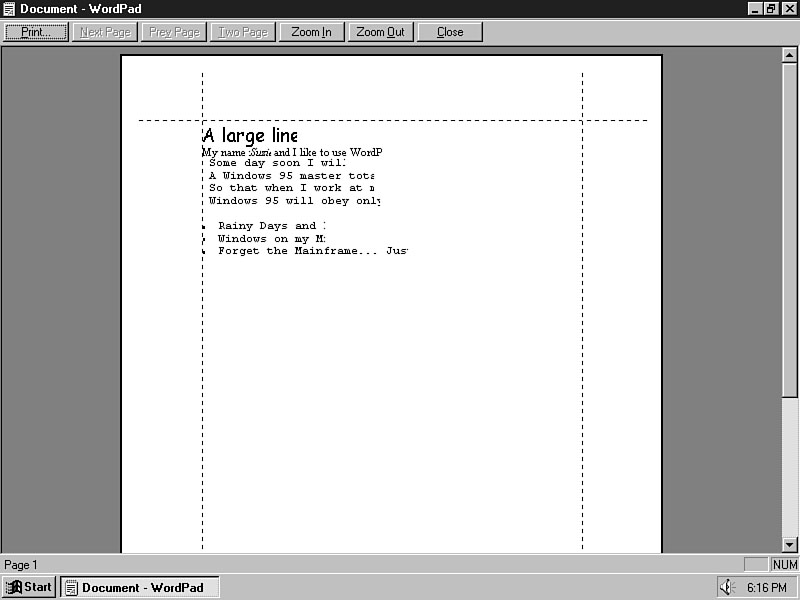
22. Perhaps one of the most helpful features of WordPad is the Print Preview
feature. Select File | Print Preview to see a full-page thumbnail
sketch of how your entire document's page will look when you print the document.
If your document is more than one page, press PageDown to see a preview of the subsequent
pages. Figure 10.12 shows a sample Print Preview of the document you're now creating.
Figure 10.12.
The Print Preview feature illustrates how your printed document will look.
The Print Preview command buttons all work with the preview (printing the document
or changing the way the preview appears on the screen). If you want to zero-in on
certain parts of the Print Preview, you can move the cursor over that area of the
preview. WordPad changes the cursor's shape to a magnifying glass, and when you press
Enter, WordPad expands the size of the preview so that you can read the text.
When you are done viewing the preview, press Esc or click the Close command button
to return to the normal WordPad editing window. Since one entire document page will
not fit inside the screen's WordPad window, the Print Preview gives you an idea of
how the printed document will eventually look.
23. Select File | Exit to leave WordPad for now. Don't save the
document you created in this hour.
Step 3: Review
You've now used just about all of WordPad's major features. The commands and tips
you now know will get you through the creation of almost any document you want to
create using WordPad. Once you type the document and format the document the way
you want it, use the Print Preview command before printing the document to get a
idea of how the printed output will look. If there is a formatting problem in your
document, you can catch the problem during the preview instead of printing output
that you'll have to correct and reprint.
TIME SAVER: As with most Windows 95 programs,
you can start multiple instances of WordPad. For example, you could start three copies
of WordPad and run all three inside their own windows at the same time. Also, the
taskbar will contain buttons for all three. With three open windows, you can easily
move and copy text between the documents you are editing.
Summary
This hour discussed the two editors of Windows 95: Notepad and WordPad. Notepad
creates and edits small text files. Using Notepad you can perform simple editing
tasks on documents that have no special formatting in them.
If you want more formatting power, the WordPad program acts almost as powerfully
as many word processors on the market. You can format text, display a Print Preview,
and control the text placement on a Ruler line. The WordPad program also edits documents
created with Word for Windows 6 or other word processor programs.
Even if you don't have a word processor yet, these two programs will get you through
many hours of tedious editing.
Workshop
Term Review
32-bit application A program written to take advantage of the Windows 95
interface and to integrate easily with other Windows 95 application programs.
font A specific typestyle. Fonts have names that distinguish them from
one another. Some fonts are fancy and others are plain. Choose a font style that
best serves the idea your words need to convey.
home position The upper-left position of a document or of a window.
insert mode Newly typed text shifts the existing text to the right.
overtype mode Newly typed text overwrites existing text.
point A measurement of 1/72 of an inch (72 points equals one inch). Most
computer on-screen and printed text measures from 9 to 12 points in size.
Print Preview A full-screen representation of how your document will look
when you print the document.
resolution A measurement that specifies how close together individual screen
dots can be. The higher the resolution, the closer together the dots that form characters
and graphic images, and the better the picture will be.
text editor A program that creates document files but offers only primitive
formatting and printing functionality.
thumbnail sketch A small representation that shows the overall layout without
showing a lot of detail.
wrap When an editor or word processor automatically moves the cursor to the
start of the next line when the cursor gets to the edge of a window or Ruler margin.
Q&A
- Q I have a Windows word processor, so why would I need to use Notepad or WordPad?
A Neither Notepad nor WordPad can match your word processor in skills. Both
Notepad and WordPad do, however, take less memory and therefore load faster. Although
memory limits are not a constant problem as they were in Windows 3.1, you'll still
want to maximize the use of memory and use as little as you need at any one time.
If you want to create or edit simple text document files, your word processor is
certainly overkill. In addition, your word processor's automatic word wrap (which
is often difficult to turn off in major word processors) will format your text file
in a way you probably don't want the file formatted. When you turn off the word wrap
in Notepad, using a simple menu command, you won't have to worry about word wrap.
Q I like to create text documents for my programming work and word processed documents
for my correspondence. My word processor is great for the correspondence. I can see
a programming need for Notepad, but not for my use of WordPad. Am I missing something
here?
A You'll probably want to stay with your word processor for your correspondence.
Keep in mind, however, that unless your word processor was designed for the Windows
95 environment, its Open dialog boxes (including the related dialog boxes such as
the Save and Save As dialog boxes) probably do not support long filenames or the
special right-click features of the Windows 95-style Open dialog boxes.
If you need to manage documents much while editing them, you may want to use WordPad
for the job once in a while because of the power that WordPad's Open dialog box provides.
Remember, too, that WordPad can read and write Word 6 for Windows document files,
as well as document files you store in the RTF format. Therefore, you can use your
word processor to create files, and then use WordPad when you want to make minor
changes to the files without taking the time or memory to load a full-featured word
processor.
Q Can WordPad do anything my own word processor cannot do?
A That question cannot be answered here. The answer depends on your word processor's
capabilities and whether or not your word processor was written for the Windows 95
environment.
WordPad lets you create multiple instances of itself, which means that you can load
more than one WordPad program at the same time and edit different documents in each.
Also, the WordPad program supports all the major Windows 95 interface tools, such
as the Open dialog boxes (as explained in the previous answer).
Once you become proficient at Windows 95, WordPad supports the use of OLE. OLE stands
for object linking and embedding, meaning that one application, such as WordPad,
can interface to any other Windows 95 application. If you want to, you can embed
a WordPad document in the middle of a spreadsheet for textual explanation of your
data. When you are working on the spreadsheet, you can click on its copy of the WordPad
document. WordPad then automatically starts, and you can edit that document using
the WordPad menu and commands, without removing the WordPad document from the spreadsheet
or recopying it. You'll get a chance to try OLE in the next hour. Your word processor
may not be able to open and edit Word 6 for Windows documents. If not, you can use
WordPad, if someone gives you a Word 6 for Windows document that you need to edit
or print.
Q I don't have a color printer so will I need to use the Color format bar button
in WordPad?
A Even if you don't have a color printer, your monitor is probably color.
You can apply color to parts of a document that you want to call your own attention
to later when editing that document. For example, if you leave some parts of a business
report's annual report unfinished, you can color the paragraph that contains the
unfinished material in yellow, so you'll later be able to find those locations easily
and finish the report.
The Internet provides another reason you may create color documents even if you have
no color printer. If you create Web pages from within WordPad, the color will appear
on the Web page. By the way, WordPad certainly may not be the best place to create
final Web pages, but you can use WordPad to generate initial Web pages that
you then finish with more comprehensive Web page tools such as Microsoft's Front
Page.
Q Why can't I read all the text on the Print Preview?
A The Print Preview feature was not designed to let you read text necessarily.
The Print Preview feature simply draws a representation of your document when you
print the document on the printer. Instead of printing the document and discovering
there is a margin or formatting error, you can often find the errors on the Print
Preview screen, so you can correct the problem before printing the document.