![]()
![]()
![]()
Windows 95 works well but, like a well-made automobile, you must tune it once in a while to optimize its operation and keep Windows 95 running at top speed. (Who wants a sluggish operating system?) When your operating system slows down, your entire computer system slows down because the operating system controls everything else that happens.
Periodically, you can run tune-up programs that Microsoft provides with Windows 95 to keep your system running smoothly. Most of a system's slowdown is due to the disk drive's mechanical design. The disk, being a mechanical device, can experience problems. The disk's magnetic surface wears down, and files can get lost as a result. Windows 95 can periodically scan your disk looking for trouble spots.
Over time, you create and delete many files. Although the deleted file space is released for other files, your computer's disk drive can become filled with many small holes so that subsequent files stored on the disk must fill those holes resulting in a slowdown (these holes create a fragmented disk). Windows 95 can close up these gaps and make larger and contiguous chunks of free disk space available so your files go to and from the disk quickly.
CAUTION: Disk defragmentation is not the same thing as Drive Space which is explained in Hour 19, "Back Up and Squeeze Disk Space."
Not only can your disk cause problems, but memory can produce resource leaks. System Monitor and System Resource Meter are the two memory-analysis programs that can help you detect memory problems and recover lost memory.
The highlights of this hour include:
Windows 95 supplies a program named ScanDisk that checks your disk drive for problems and potential problems so that you can avoid future troubles. ScanDisk contains two levels of disk drive inspection: A standard scan and a thorough scan. The standard scan checks your disk files for errors. The thorough scan checks the files and performs a disk surface test to verify the integrity and safety of disk storage.
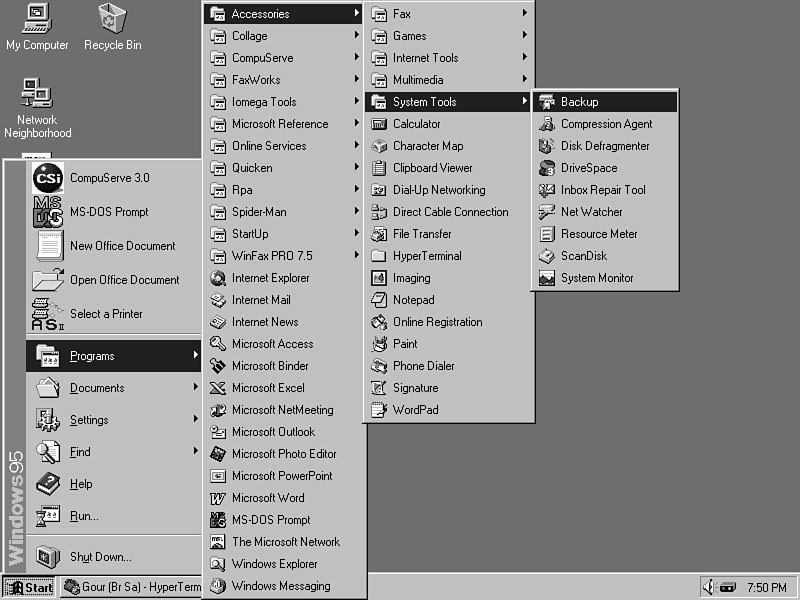
JUST A MINUTE: ScanDisk is just one of the applications inside the folder labeled System Tools that you can install when setting up Windows 95 or when adding programs to Windows 95. Depending on your Windows 95 installation, your System Tools menu might contain one or more of the icons shown in Figure 17.1.
Figure 17.1. The System Tools menu contains several helpful utility applications.
TIME SAVER: Run ScanDisk regularly (perhaps once or twice a week). As with all Windows 95 programs, you can multitask ScanDisk while running another program.
Task 17.1: Check a Disk with ScanDisk
Step 1: Description
This task explains how to use the ScanDisk application. ScanDisk is simple to use
and often takes only a few seconds to load and run.
Step 2: Action
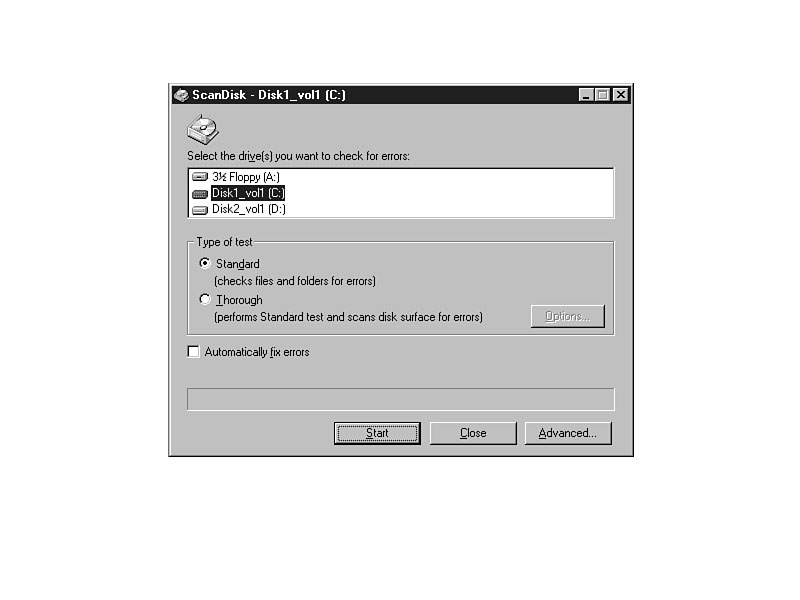
Figure 17.2.
The opening ScanDisk window for analyzing your disk drives.
JUST A MINUTE: ScanDisk checks only disk drives, not CD-ROM drives.
CAUTION: If ScanDisk finds a problem and you've checked the option labeled Automatically fix errors, ScanDisk attempts to fix any problems it finds using default repair tools. (You can change the way ScanDisk repairs the disk by pushing the Advanced command button described toward the end of this task.)
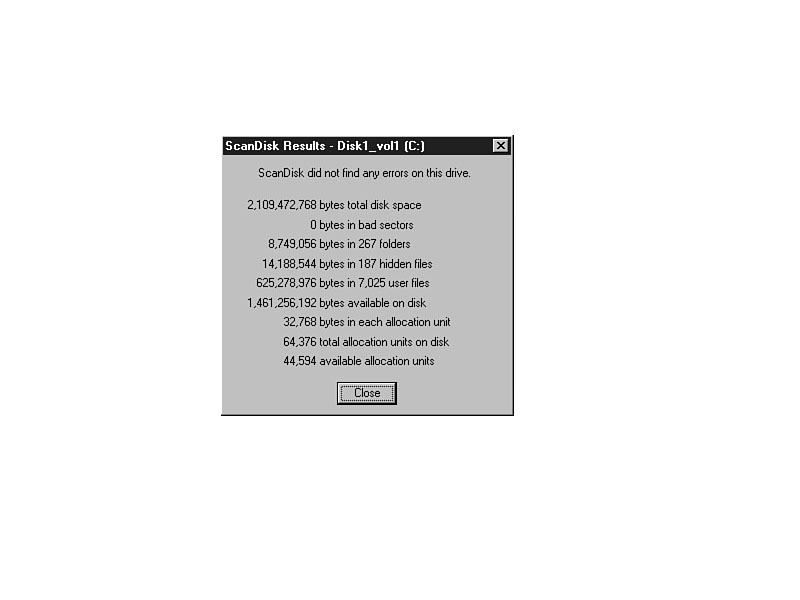
Figure 17.3.
ScanDisk reports its results to you upon completion of the disk scan.
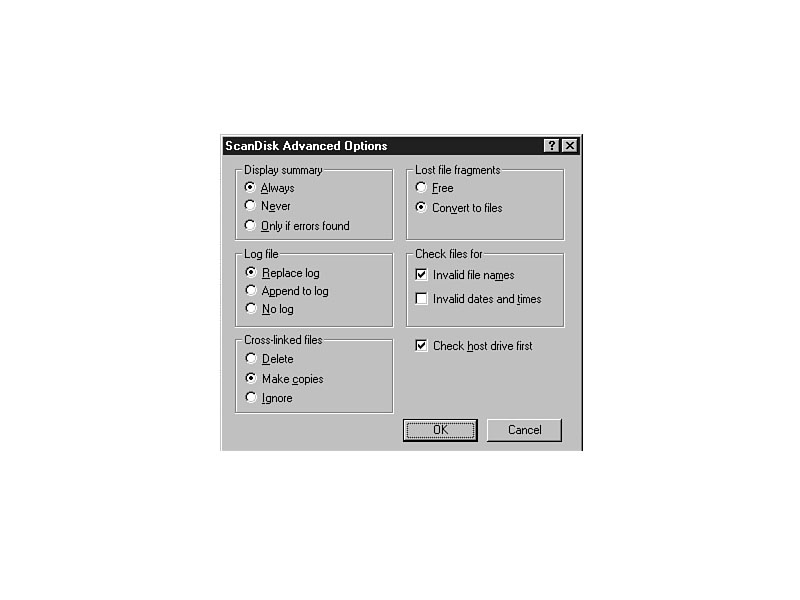
Figure 17.4.
The advanced ScanDisk options that you control.
Step 3: Review
The ScanDisk program is a dual-leveled disk checking program that searches for disk
errors and, optionally, attempts to fix the errors. Run ScanDisk once or twice weekly
to make sure your disk is as free from defects as possible.
If you want more control over the ScanDisk process, you can click the Options button to control these options:
The Disk Defragmenter is a utility program, available on the System Tools
menu, that fills in the gaps on your disks. As you add and delete files, the deleted
space leaves free holes around the disk. Over time, your disk response time will
slow down as you add or delete document files to and from the disk drive.
Windows Minute
Pick Up the Pieces
Windows 95 can store large files on a fragmented disk as long as there is enough
total free fragmented space to hold the file. Windows 95 stores the files in linked
chunks across the disk drive, filling in fragments and linking them together.
The reason that disk access slows down on a fragmented disk drive is that Windows 95 must jump to each file fragment when retrieving a file. If you run the Disk Defragmenter program often enough (once or twice a month for the average user ought to be enough), Windows 95 keeps the fragments to a minimum and, thus, increases the disk access speed.
TIME SAVER: Some people forget that the Disk Defragmenter helps speed floppy disk drives as well as hard disk drives. As a matter of fact, if you run Disk Defragmenter on floppy disks that you use regularly, you can increase the speed of those floppy disks greatly.
CAUTION: Although the Disk Fragmentation program works well and accurately in most cases, do yourself a favor and back up your system before starting the defragmenting process. Hour 19 explains how to use the Windows 95 Backup program to back up your files.
Task 17.2: Correcting Disk Fragmentation
Step 1: Description
This task explains how to defragment a disk drive. The task assumes that you'll begin
by defragmenting a diskette. If you defragment diskettes, you'll be able to run the
Disk Defragmenter program several times (on different diskettes) if you want to.
Step 2: Action
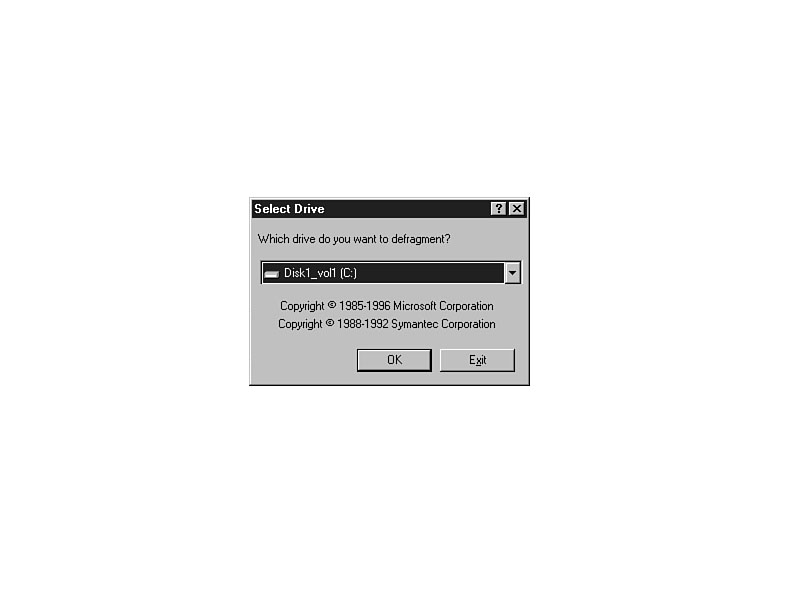
Figure 17.5.
The opening Disk Defragmenter window for analyzing your disk drives.
Step 3: Review
The Disk Defragmenter is easy to run regularly because you can run Disk Defragmenter
and run other programs at the same time. Disk Defragmenter rearranges information
and blank spots on your disk drive, and puts all the data in contiguous disk space
and all the empty holes into one large contiguous block. Once defragmented, your
disk access will speed up.
Windows 95 contains two programs, System Monitor and the Resource Meter, that monitor your system resources. These applications are extremely advanced for most Windows 95 users because most users don't have to run them and analyze their results.
Windows 95 manages the system and memory much better than Windows 3.1 did, and you'll rarely run out of memory or resources when you work inside Windows 95. System Monitor tracks these three items:
System Monitor graphically displays one or more of these items and continuously updates the graph to show how your system is being used. You can start the System Monitor and go about your regular Windows 95 work. If the system begins to slow and you want an idea as to which parts of the system are getting the most use, click on the System Monitor on the toolbar to have an idea of your machine's current workload.
3.1 Step Up The 3.1 Program Manager's Help | About box displayed a subset of free system resources. The Windows 95 System Monitor program provides a much more complete and accurate analysis of your computer's memory.
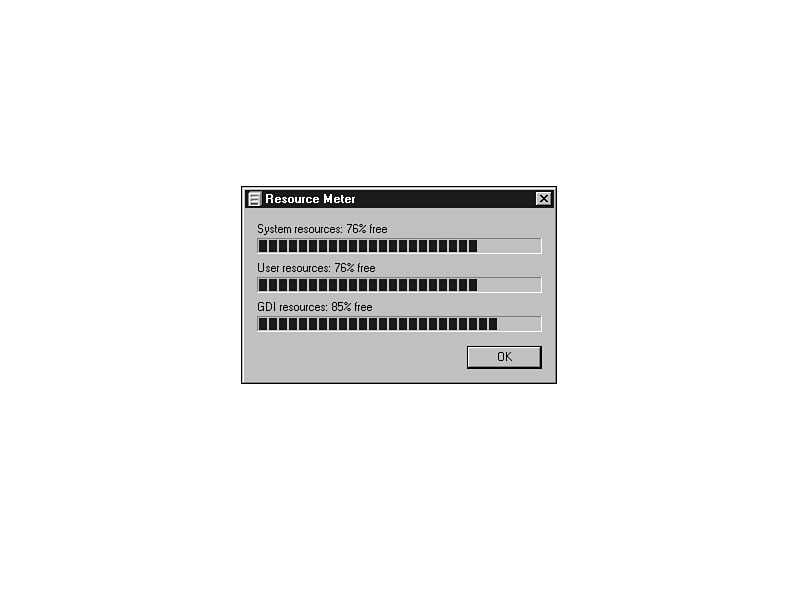
When you run the Resource Meter, its program puts a Resource Meter icon next to the clock. You can click the icon to obtain statistics on these items:
Task 17.3 demonstrates a simple use of the System Monitor and Resource Meter.
Task 17.3: Checking Resources
Step 1: Description
This task explains how to start System Monitor and Resource Meter. You can use the
programs' output to check the efficiency of your computer system.
Step 2: Action
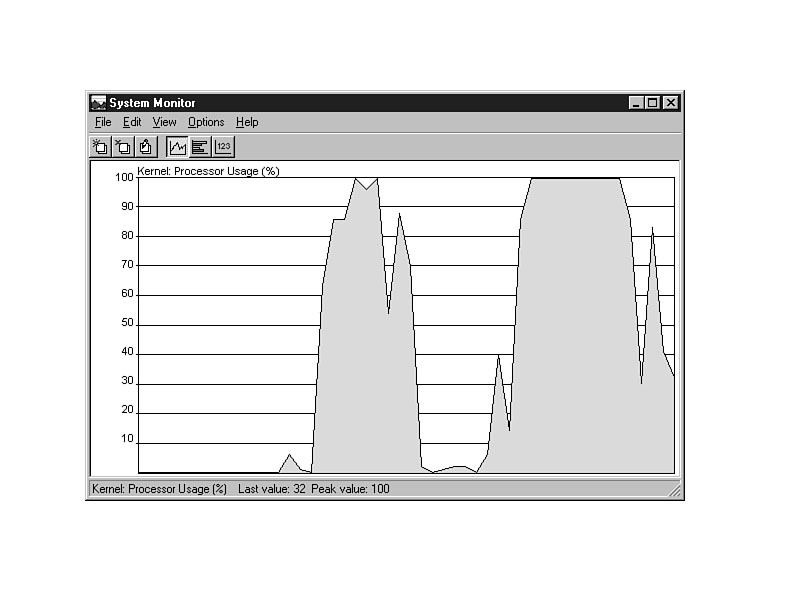
Figure 17.6.
The System Monitor screen updates regularly to show your resources.
JUST A MINUTE:: To show the System Monitor running at extremes, the System Monitor in Figure 17.6 was produced on a fairly slow 486
33-megahertz computer, which had quite a drain on its resources. You can see the high and low extreme peaks in the graph as programs were used, paused, and closed.
TIME SAVER: Click over any of the small graphs. System Monitor describes what the graph means in the status bar at the bottom of the System Monitor window.
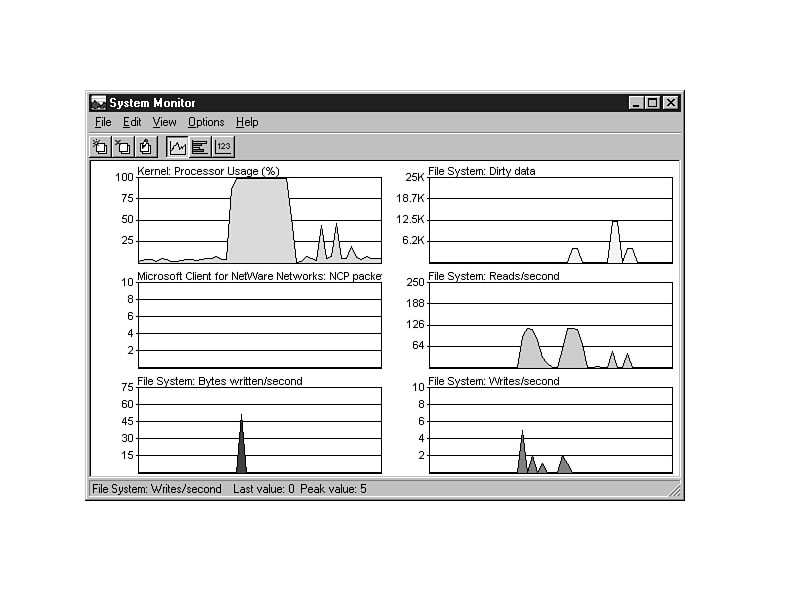
Figure 17.7.
The System Monitor can display statistics for several items.
Figure 17.8.
The Resource Meter window available from the taskbar.
3.1 Step Up If you can find a computer
running Windows 3.1, start three or four Windows 3.1 programs and select the Windows
3.1's Help | About dialog box to look at your resources. This number
is an average of your total resources, not the three different types shown by Resource
Meter. Now start the same three or four programs under Windows 95 and check resources
using Resource Meter. You'll be shocked by how much more memory is available under
Windows 95.
Step 3: Review
The System Monitor shows one or more graphs, depending on your options, that display
usage patterns. The Resource Meter displays a graph of three resource utilizations
as you work within Windows 95. If you run graphics- and processor-intensive programs,
you can run System Monitor and Resource Meter to see how much of a load you are placing
on Windows 95 and the hardware.
This hour described several system tools you can run to manage and monitor your disk, memory, and other system resources. The ScanDisk program detects errors on the disk drive and attempts to fix as many problems as it is capable of fixing.
The Disk Defragmenter program rearranges your disk files so that all the file space resides in one large block and all the free space is together. This speeds disk drive access and eliminates fragmentation. Run both ScanDisk and Disk Defragmenter every week or two to keep your disk drives as healthy as possible.
The System Monitor and Resource Meter programs work passively to display statistics about your memory, disk, and system usage. Windows 95 handles resources better than previous versions of Windows, but these tools give you two additional ways to monitor the usage.
Disk Defragmenter A Windows 95 program that collects and removes blank disk space left from deleted files.
FAT An abbreviation for file allocation table. Controls the placement of files on your disk.
file system The collection of disk access routines and memory.
GDI Stands for Graphics Device Interface and consists of your graphics resources.
kernel The CPU's processor routines.
Memory Manager Controls the various segments of memory that Windows 95 tracks.
standard scan The quickest ScanDisk version that checks your disk files for errors.
System Monitor A Windows 95 program that graphically illustrates your computer's resources as you use the computer.
system resources The amount of CPU, memory, and disk space utilization consumed by Windows 95 and the applications you are running.
thorough scan The slower, but more thorough, scan that checks the files and performs a disk surface test to verify the integrity and safety of disk storage.
![]()
![]()
![]()