


- Hour 18 -
Aid via the Accessibility
Options
This hour describes all the Windows 95 tools that provide help for users with
special needs. Previous operating environments did not support these kinds of user
options. Windows 95's accessibility options change the behavior of the keyboard,
screen, and speakers so that they operate differently from their default behaviors.
Microsoft set out to design Windows 95 so that everybody could take advantage
of the new operating environment. In addition to helping those people who need extra
assistance, the accessibility options can also help users who do not normally need
special help with their hardware and software. For example, if you have temporarily
disconnected your speakers from your computer, you may want to turn on the visual
feedback options so that sounds that normally activate the speaker appear on the
screen as flashing icons instead.
The highlights of this chapter include:
- Which accessibility options might benefit you
- How to change the keyboard's response so that combination keystrokes are easier
to type
- Why visual clues can replace audible signals and alarms
- Where to set the screen's display so that you read enlarged letters, icons, title
bars, and high-contrasting screen colors
- How to make the keyboard respond as if you were moving and clicking the mouse
The Accessibility Options
The Accessibility Options tabbed dialog box contains settings for the accessibility
options that you may want to set up for your Windows 95 environment. All of the accessibility
options are available from this dialog box. You can set any or all of the accessibility
options from the Accessibility Options tabbed dialog box.
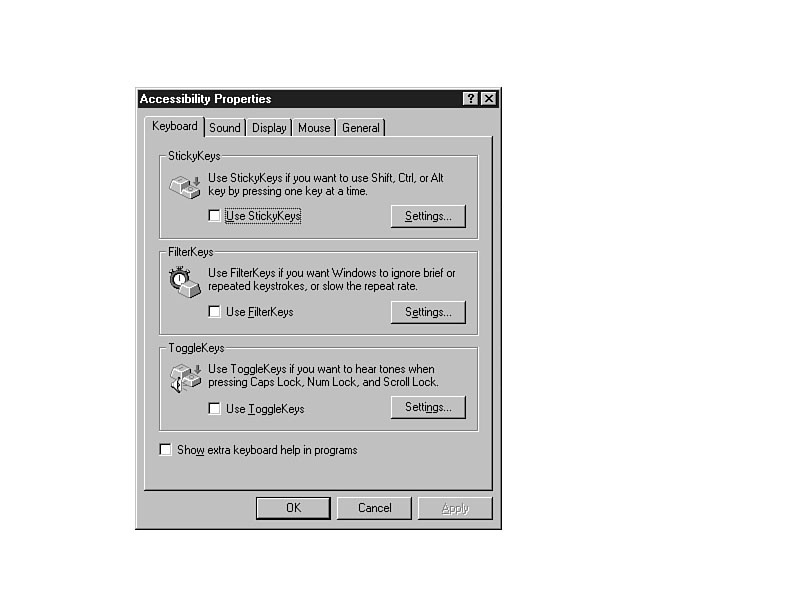
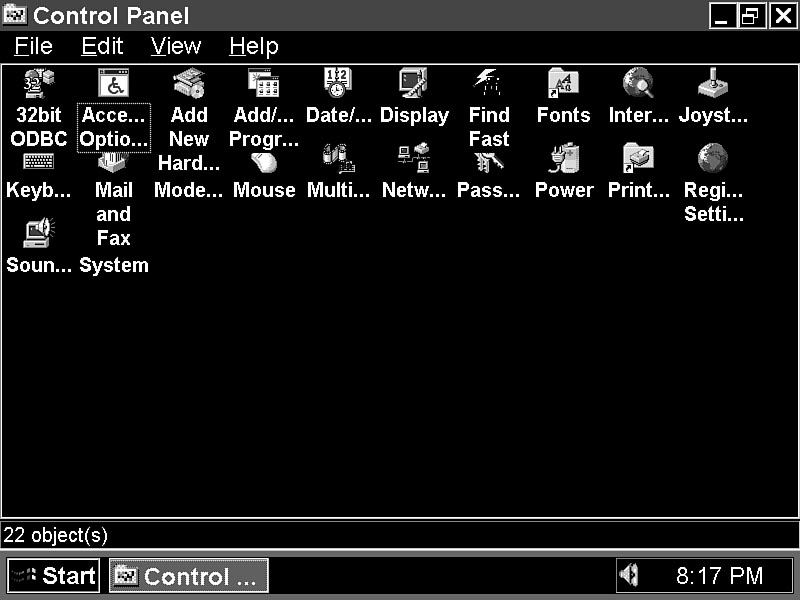
When you double-click the Accessibility Options icon from the Control Panel you
will see the Accessibility Properties tabbed dialog box shown in Figure 18.1.
Figure 18.1.
Set one or more accessibility options from this tabbed dialog box.
This hour approaches things a little differently from the others. Table 18.1 contains
a list of every accessibility option available in Windows 95. The rest of the chapter
describes, using the task approach, how to access and use each of these accessibility
options.
Table 18.1. The accessibility options.
| Option |
Description |
| Accessibility TimeOut |
When the computer sits idle for a preset period of time the accessibility options
revert to their default state. |
| Accessibility status |
A graphical display of icons that describe which accessibility indicator options
are turned on at any given time. |
| BounceKeys |
Keeps users from accidentally producing double keystrokes if they accidentally bounce
keys several times in succession. |
| Customizable |
You can change the mouse pointer to make the mouse cursor mouse pointer easier to
see. (Hour 3, "Understanding the My Computer Window," explained how to
change the mouse cursor.) |
| FilterKeys |
The group of keystroke aids that include RepeatKeys and BounceKeys. |
| High-contrast |
By changing the Windows 95 color scheme to a different color color scheme set, you
can make the screen's color contrast more obvious and discernible for people with
impaired vision. (Hour 8, "Manage Your Desktop," explained how to change
the Windows 95 color schemes.) |
| High-contrast mode |
In addition to offering adjustable high-contrast color schemes, Windows 95 can also
ensure that applications adjust themselves to display the highest possible contrast
so that visually impaired users will be able to distinguish between background and
foreground screen elements. |
| MouseKeys |
Lets you simulate mouse movements and clicks using the keyboard. |
| RepeatKeys |
Users can turn on or off the repetition of keys so that holding down a key does not
necessarily repeat that keystroke. |
| Scaleable user |
Each of the system fonts, scroll bars, title bars, and menu interface elements options
can be set to a larger size. |
| SerialKeys |
Lets the user use a nonkeyboard input device. |
| ShowSounds |
Provides visual feedback on the screen when applications produce sounds. |
| SlowKeys |
Windows 95 can disregard keystrokes that are not held down for a preset time period.
This aids users who often accidentally press keys. |
| SoundSentry |
Sends a visual clue when Windows 95 beeps the speaker (in the case of warning and
error message dialog boxes). |
| StickyKeys |
Lets the user press the modifier keys (the Shift, Ctrl, or Alt keys) individually
instead of having to press them using combined keystrokes. Therefore, the user can
press Alt, let up on Alt, and then press C instead of combining the two for
Alt+C. |
| ToggleKeys |
Sounds a noise on the speaker when the user presses the CapsLock, NumLock, or ScrollLock
keys to make them active. |
Task 18.1: Controlling the StickyKey Actions
Step 1: Description
Users who need help with the keyboard can set the keyboard options to take advantage
of the StickyKeys, FilterKeys, and ToggleKeys options. Once you request the keyboard
help, you then can use the modified keyboard to set the other options. This task
explains how to set up and use the StickyKeys feature.
Step 2: Action
- 1. Display the Accessibility Properties tabbed dialog box by opening the
Control Panel and double-clicking the Accessibility Options icon.
2. Make sure the tab marked Keyboard is selected.
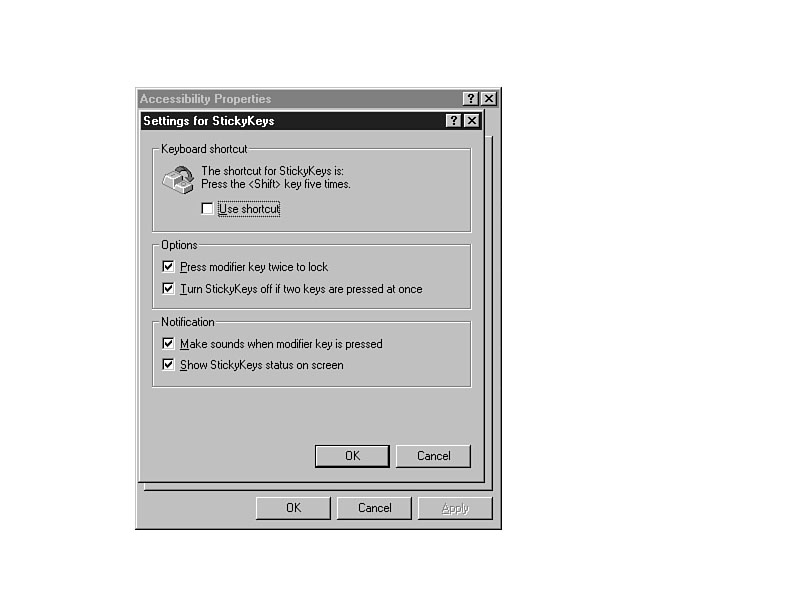
3. Click the Settings command button inside the StickyKeys section at
the top of the dialog box. You'll see the dialog box shown in Figure 18.2.
4. Click the top option to turn on the shortcut key for StickyKeys. Once you
set this option, you'll be able to turn on and off the StickyKeys by pressing the
Shift key five times.
TIME SAVER: If you share your computer with other
users, both you and others can quickly turn on and off the StickyKeys feature by
pressing the Shift key five times without having to return to the Control Panel again.
Figure 18.2. The setting
available for StickyKeys.
5. If you check Press modifier key twice to lock, Windows 95 will activate
the modifier keys if you press any of them twice in a row. For example, instead of
having to press the Ctrl key and then P while still holding Ctrl, you will be able
to press Ctrl twice to lock the Ctrl key in place, and then press P by itself to
simulate the Ctrl+P keystroke. This keystroke locking feature lets users who can
type only one keystroke at a time issue combination keystrokes. (Some users must
type by pressing the keys with a pencil.)
After turning on StickyKeys, you need to decide how you want the StickyKeys feature
turned off. As just mentioned, you can toggle the StickyKeys on and off using a multi-Shift
keypress, but there's an even better way. If you check Turn StickyKeys off
if two keys are pressed at once, the StickyKeys feature stays active as long as you
press the modifier keys individually without combining them and their matching keys.
In other words, the StickyKeys feature stays on as long as you keep pressing the
modifier keys by themselves. If you (or someone else who comes along) press Ctrl+P
(or any other modifier keystroke combination) at the same time using a single keypress,
Windows 95 turns off the StickyKeys feature.
There are two final options: Make sounds when modifier key is pressed and
Show StickyKeys status on screen. These options determine whether or not Windows
95 sounds a beep on the speaker when you press a modifier key and whether or not
Windows 95 displays a StickyKeys icon next to the taskbar clock when StickyKeys is
active. These signals aid users who want audible or visual StickyKeys feedback. The
taskbar icon changes when you press a modifier key.
For this task, check every option on the Settings screen so you can practice
using the StickyKeys feature. Click the OK button to return to the Accessibility
Options tabbed dialog box. Don't check the Use StickyKeys option now, but
click the OK button. If you check the Use StickyKeys option, Windows 95 would
immediately turn on StickyKeys, but you're going to turn on the feature differently
in the next step.
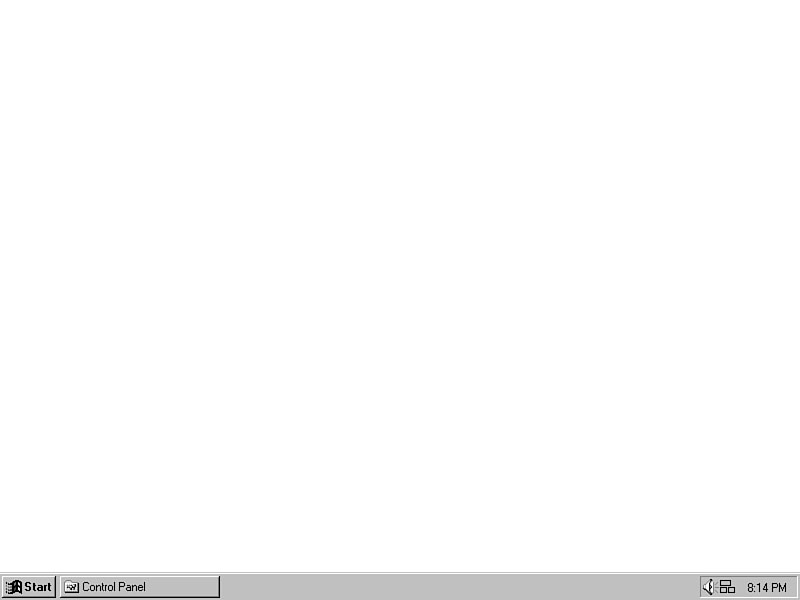
6. Press the Shift key five times. When you do, you'll see a dialog box that
reminds you of the StickyKeys feature. Click OK to finish activating StickyKeys.
Not only will you then hear an audible sound that indicates StickyKeys is active,
but you'll also see an indicator on the taskbar as shown in Figure 18.3.
Figure 18.3. Windows
95 has activated the StickyKeys feature.
TIME SAVER: If you right-click the taskbar's
icon, Windows 95 displays a popup menu from which you can adjust the StickyKeys settings.
If you select Show Status Window, Windows 95 displays a popup dialog box on
the screen that displays the accessibility options icons using a larger icon size
than what appears on the taskbar.
- 7. Start WordPad by clicking the WordPad icon on the Programs |
Accessories menu.
8. Press the Shift key (either the left or right Shift) and release the key.
You'll hear an audible signal. You've now locked the Shift key for the next keystroke.
Press the A key. An uppercase A appears at the cursor's location. You have not locked
the Shift key, however. Press the A key again and you'll see a lowercase a appear.
Press Shift once again, release Shift, and press B to see the uppercase B appear.
Press B once again to see a lowercase b appear.
You can keep pressing any modifier key, Alt, Ctrl, or Shift, to lock that modifier
key before pressing the next key.
9. Now press Shift+A using a normal, single, combination keystroke. Not only
will an uppercase A appear but you'll also turn off the StickyKeys feature.
Remember that you earlier checked the option labeled Turn StickyKeys off if
two keys are pressed at once. Therefore, when you press a normal combination keystroke
using one of the modifier keys, Windows 95 turns off StickyKeys.
Two users can now share the StickyKeys feature. One can turn on StickyKeys by pressing
Shift five times. A second user who does not need StickyKeys does not have to worry
about turning off the feature; as soon as the second user presses a combined modifier
keystroke as usual, Windows 95 automatically turns off StickyKeys.
CAUTION: If you find yourself needing to use
StickyKeys only occasionally, don't check Turn StickyKeys off if two keys
are pressed at once. Force yourself to turn on and off StickyKeys consciously by
pressing Shift five times. If you don't, you'll find yourself inadvertently turning
off StickyKeys the first time you combine a modifier key with another key.
Step 3: Review
StickyKeys determines how you want Windows 95 to recognize modifier keys. For users
who can only type one keystroke at a time, the StickyKeys feature lets them press
and release Alt, Ctrl, or Shift before their counterpart keystrokes. Therefore,
these users will be able to press Shift, release the Shift, and then press
the letter that needs to be capitalized.
Task 18.2: Controlling FilterKey and ToggleKey Actions
Step 1: Description
Inadvertent errors can occur when users hold keys down too long or press keys using
a bouncing motion that often doubles or triples keystrokes. Windows 95 supports the
use of FilterKeys to control some of the extra keystrokes that result from certain
unintended actions. This task explains how to set up and control FilterKeys.
Step 2: Action
- 1. Display the Accessibility Properties tabbed dialog box by opening the
Control Panel and double-clicking the Accessibility Options icon.
2. Make sure the tab marked Keyboard is selected.
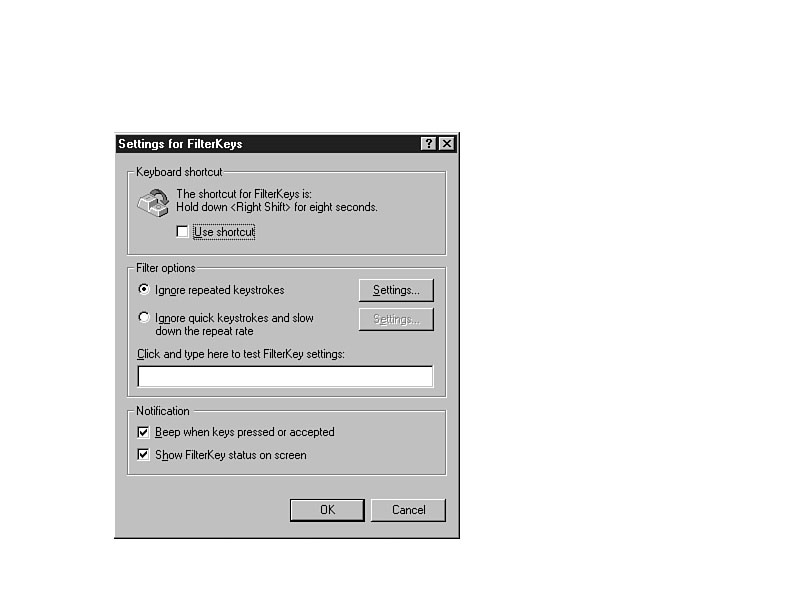
3. Click the Settings command button inside the FilterKeys section of
the dialog box. You'll see the dialog box shown in Figure 18.4.
4. Check Use Shortcut so that you'll be able to turn on and off the FilterKeys
aid by pressing and holding down the right Shift key for eight seconds.
Figure 18.4.
The settings available for FilterKeys.
5. The Ignore repeated keystrokes option requests that Windows 95 ignore
bounced keys that sometimes result in two or three repeated letters appearing on
a line, such as in theese wooordss. This option controls the Windows 95 BounceKey
feature. Certainly, you don't want Windows 95 to prevent you from typing double letters,
because many words, such as book and puppy, require double letter combinations.
Windows 95 initially sets a fairly long pause rate between letters. Therefore, you
might want to decrease the time between double keystrokes that Windows 95 recognizes
as an error. You can press the Settings command button to change the delay
between accidental double keystrokes.
6. The option labeled "Ignore quick keystrokes and slow down the
repeat rate" controls the RepeatKeys and SlowKeys features. There may be some
users who accidentally press keystrokes from time to time. By checking this option,
you can keep Windows 95 from receiving these accidental keystrokes as actual keystrokes;
if a key is accidentally held down too long, you'll minimize the repeated keystrokes
that would occur.
JUST A MINUTE: The two options described in Steps
5 and 6 are mutually exclusive; meaning that you can set either one option or the
other. Therefore, you can activate either the BounceKeys feature or you can activate
the RepeatKeys and SlowKeys features.
7. If you check Beep when keys are pressed or selected, Windows 95 beeps
whenever it recognizes a valid keystroke. If you select Show FilterKey status
on screen, Windows 95 displays a stopwatch icon on the taskbar, such as the one shown
in Figure 18.5, when the FilterKey option is active. Click OK to close the window.
Figure 18.5.
Windows 95 has activated the FilterKeys feature.
TIME SAVER: If you right-click the taskbar's
icon, Windows 95 displays a popup menu from which you can adjust the FilterKeys settings.
- 8. If you select the ToggleKeys feature, Windows 95 sounds a high
beep when you activate the CapsLock, NumLock, or ScrollLock keys and sounds a low
beep when you press these keys once again to turn them off. Select the ToggleKeys
feature now from the Accessibility Options dialog box. Press CapsLock once to turn
on the CapsLock key and you'll hear a high beep. Press CapsLock again to hear the
low beep meaning that the second CapsLock keypress deactivated CapsLock.
9. Some Windows 95 programs contain their own accessibility options keyboard
features and display on-screen help related to their special keys. If you want to
see this help in such programs, check Show extra keyboard help in programs.
Windows 95 will inform all Windows 95 programs you run that you've selected this
option, and those programs will respond with appropriate help when available.
Step 3: Review
The keyboard accessibility options change the behavior and functionality of keystrokes.
The three modifier keys receive the most attention because they often require a double
keypress that some users are not able to perform. The other keyboard accessibility
options control accidental keystrokes to keep Windows 95 from recognizing bad keystrokes
as valid.
Task 18.3: Controlling the Sound Accessibility Options
Step 1: Description
The Accessibility Options icon's Sound dialog box controls the features of the SoundSentry
and ShowSounds accessibility options. These options provide visual feedback that
some users require to let them know that certain audible sounds occurred. For instance,
if a user cannot always hear the usual warning sounds an application makes when the
wrong key is pressed, the user can request that Windows 95 display a visual clue
that a sound was made.
Step 2: Action
- 1. Display the Accessibility Properties tabbed dialog box by opening the
Control Panel and double-clicking the Accessibility Options icon.
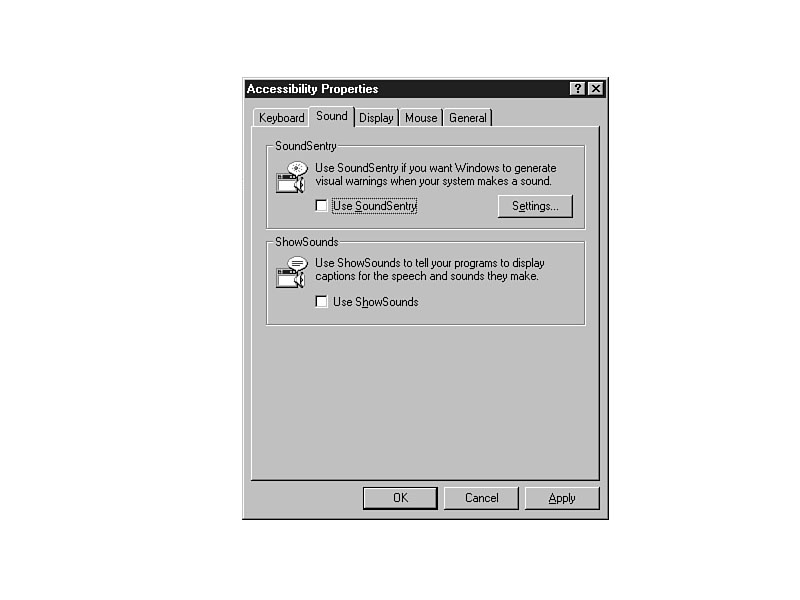
2. Select the tab marked Sound. You'll see the dialog box shown in Figure 18.6.
Figure 18.6.
The Sound accessibility options dialog box provides visual sound clues.
Once you activate the SoundSentry feature, Windows 95 will flash a title bar or another
part of the screen when an application makes a sound.
TIME SAVER: You can control which visual clue
Windows 95 uses for sounds by clicking the Settings command button to display
the SoundSentry dialog box.
- 3. If you click the ShowSounds checkbox, Windows 95 turns on the
ShowSounds option supported by some Windows 95 programs.
TIME SAVER: The SoundSentry and ShowSounds features
can help you if you are hearing impaired, work in a quiet environment where sounds
may disrupt others, or work in a noisy environment where you cannot always hear your
computer's sounds.
- Many applications produce sounds, such as music and speech, that some users cannot
hear. By turning on the ShowSounds option, you request that Windows 95 produce visual
clues whenever an application sounds from the speaker.
If you want to turn on the ShowSounds feature now you can. Click OK to close the
dialog box and, if you have some kind of playback device such as a sound card, double-click
the Sounds icon inside the Control Panel. Select a sound and click the playback button
to hear an audible sound, as well as see a visual representation of that sound.
Step 3: Review
Use the ShowSounds and SoundSentry options when you need visual clues for the sounds
that applications produce. This task explained how to turn on and control these features.
Task 18.4: Controlling the Display
Step 1: Description
This task explains how to change the display to increase the contrast Windows 95
uses so that people with vision impairments can see the screen more easily. Windows
95 can change the contrast and letter size, using the high-contrast mode.
Step 2: Action
- 1. Display the Accessiblity Properties tabbed dialog box by opening the
Control Panel and double-clicking the Accessibility Options icon.
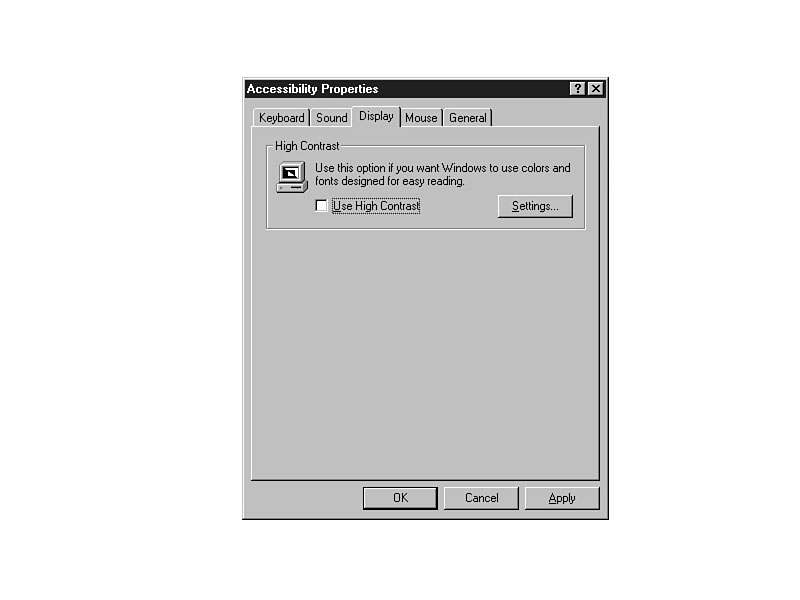
2. Select the tab marked Display. You'll see the dialog box shown in Figure 18.7.
Figure 18.7.
The Display accessibility option dialog box provides high-contrast viewing
of the screen.
3. Click the Use High Contrast option to turn on the high-contrast feature.
Windows 95 displays all dialog boxes, menus, and screen colors using a readable and
legible display. Although you can click the Settings button to change the
high-contrast settings, the default settings often suffice nicely. Windows 95 also
turns on the scaleable user interface elements to make icons, title bars, and text
easier to read.
JUST A MINUTE: The shortcut key for the high-contrast
feature is Left Alt+Left Shift+PrtScr. You can turn the high-contrast feature on
or off by pressing Left Alt+Left Shift+PrtScr.
CAUTION: When you use the high-contrast option,
Windows 95 increases the size of icons, menus, and screen elements. Although these
elements are easier to read by the descriptions beneath icons and on title bars,
the terms are often abbreviated because of their large size.
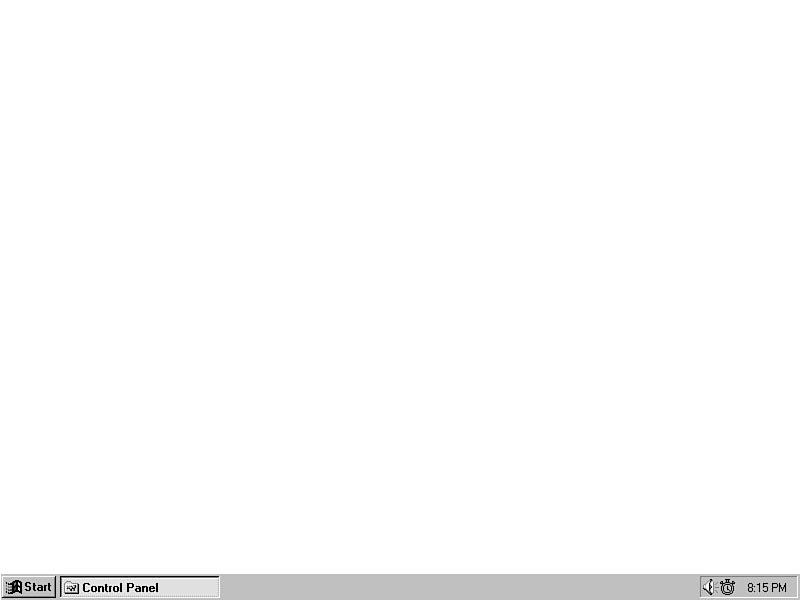
- 4. Click the OK command button. Windows 95 instantly changes the display
to a high-contrast screen such as the one shown in Figure 18.8. The high-contrast
mode stays on for subsequent startups of Windows 95.
Figure 18.8.
Windows 95 made this screen more readable using the high-contrast mode.
Step 3: Review
If you need extra help reading the screen, you can turn on the accessibility options
high-contrast option to increase the size of title bars, menus, and other screen
elements, as well as to change the color contrast to distinguish between screen elements
more easily.
Task 18.5: Controlling the MouseKeys Feature
Step 1: Description
The MouseKeys feature lets you simulate mouse movements and mouse clicks using the
numeric keypad on your keyboard. If you have trouble using the mouse or if you sometimes
work with a laptop that has no mouse, you may want to turn on the MouseKeys feature.
TIME SAVER: If your mouse quits working, you
can still use Windows 95 effectively by turning on the MouseKeys feature and using
the keyboard to simulate mouse movements.
Step 2: Action
- 1. Display the Accessibility Properties tabbed dialog box by opening the
Control Panel and double-clicking the Accessibility Options icon.
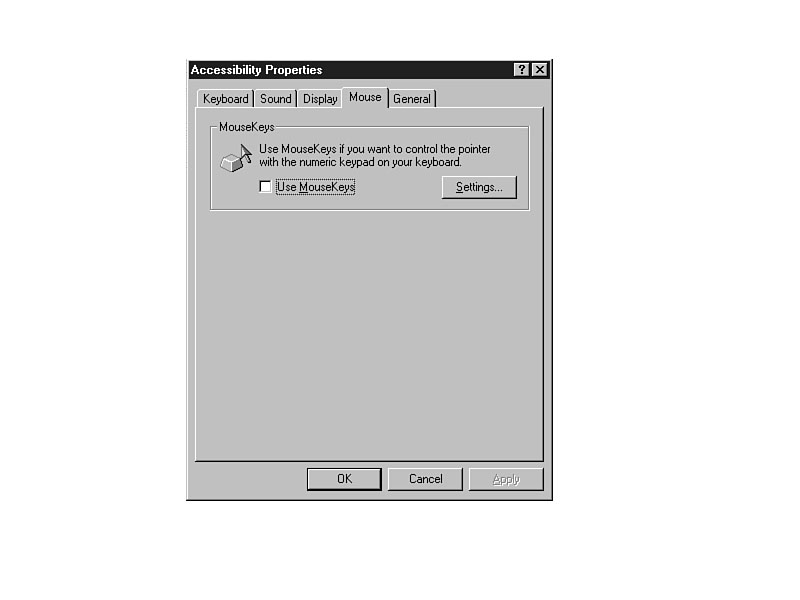
2. Select the tab marked Mouse. You'll see the dialog box shown in Figure 18.9.
Figure 18.9.
The Mouse accessibility option dialog box lets you simulate the mouse with
keyboard action.
3. If you want to use the keyboard to simulate mouse movements and mouse clicks,
click the MouseKeys checkbox, and then click the OK command button. If, before clicking
OK, you want to see the setting values for the MouseKeys option, click the Settings
button. The MouseKeys settings, shown in Figure 18.10, control the way the keyboard
intercepts the mouse actions.
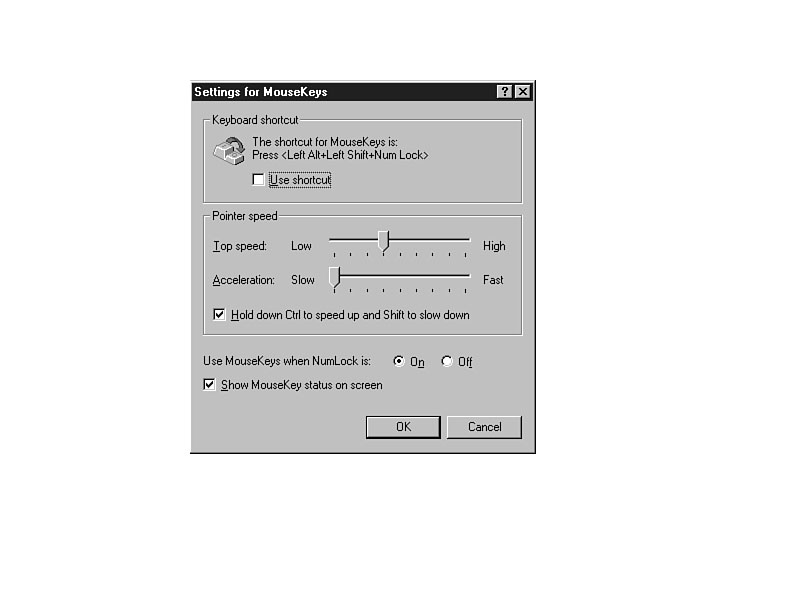
Figure 18.10.
You can change the MouseKeys settings.
Click the Use shortcut option to allow for the turning on and off of the MouseKeys
feature from the keyboard shortcut (Left Alt+Left Shift+NumLock).
The pointer speed and acceleration options control the keyboard response rate when
using the keyboard to simulate mouse movements. You'll probably not need to adjust
these default settings. The first option, Hold down Ctrl to speed up and Shift
to slow down, lets you make very large mouse movements by holding Ctrl when using
a mouse cursor key and very small mouse movements (for precision) when holding down
the Shift key along with a mouse cursor key. Keep this option checked so you can
control the mouse speed when you need to.
4. Check On to use the MouseKeys when the NumLock is on, if you want to
use NumLock to control both the numeric keypad and the MouseKeys feature at the same
time. When on, you'll be able to switch between using the numeric keypad for normal
keyboard cursor navigation and using the numeric keypad for MouseKeys operation at
the same time. If you set this option to Off, you'll be able to switch between
using the numeric keypad for number data-entry and using the numeric keypad for MouseKeys
operation at the same time.
Set the option to On if you normally use the numeric keypad for cursor movement
and Off if you normally use the numeric keypad for the data-entry of numbers.
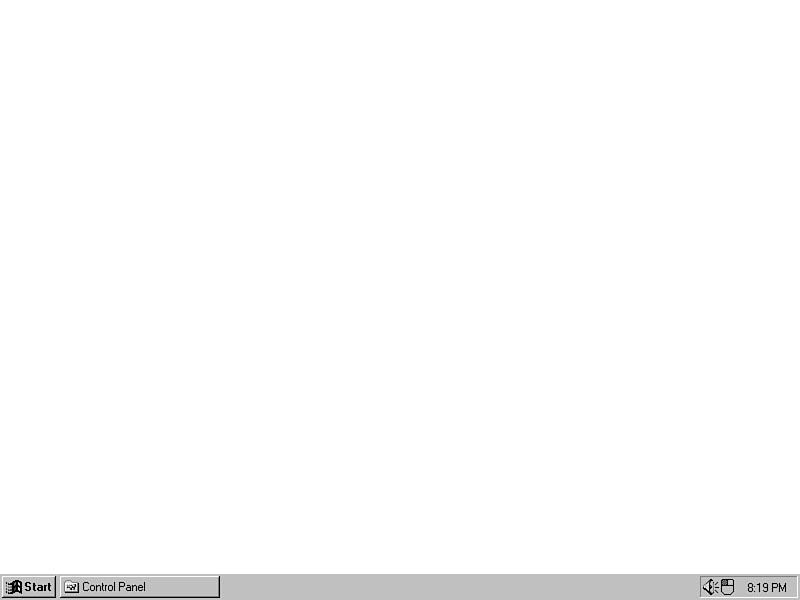
5. If you want visual feedback from a taskbar icon that MouseKeys is active,
as shown in Figure 18.11, be sure to click the Show MouseKey status on-screen
option.
Figure 18.11.
Windows 95 has activated the MouseKeys feature.
6. Click the OK command button to close the Settings dialog box, and then
click OK again to close the accessibility options dialog box.
7. Press NumLock and then press cursor-movement keys on the numeric keypad to
move the mouse cursor. The keypad's number 5 simulates a single mouse click and the
plus sign simulates a double-click of the mouse. All other keys on the keypad move
the mouse cursor in various directions.
Step 3: Review
The MouseKeys setting converts your numeric keypad to a mouse-controlling keypad
when you press the NumLock key. If you have difficulty using the mouse, or if you
don't have a working mouse attached to your computer, you can simulate all mouse
movements by setting the various MouseKeys options.
Task 18.6: Controlling the Remaining Accessibility Options Features
Step 1: Description
The tab marked General on the Accessibility Options tabbed dialog box controls the
remaining accessibility options. You can control the amount of time the accessibility
options remain active and the notification of various accessibility options, and
you can determine how Windows 95 recognizes a SerialKeys device that you may have
attached.
Step 2: Action
- 1. Display the Accessibility Properties tabbed dialog box by opening the
Control Panel and double-clicking the Accessibility Options icon.
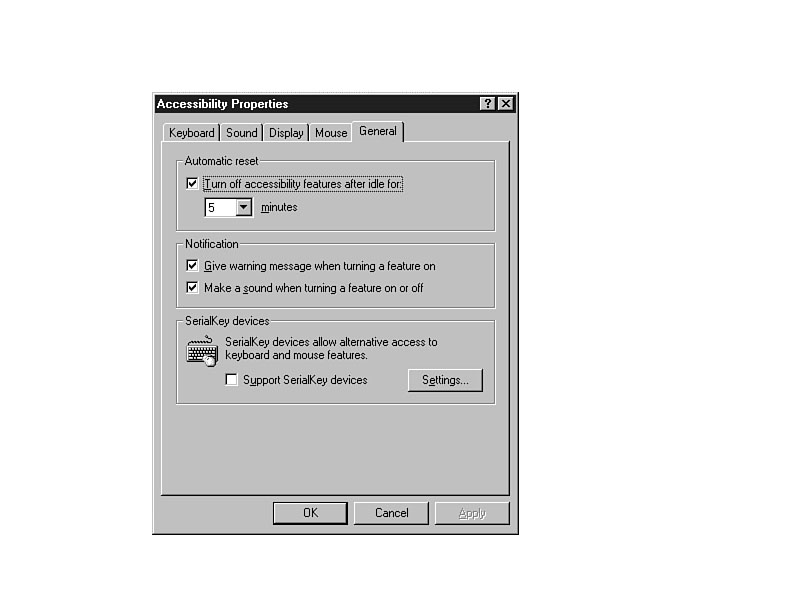
2. Select the tab marked General. You'll see the dialog box shown in Figure 18.12.
3. The minutes value determines how long Windows 95 waits before turning
off the accessibility options. If you check the option labeled Turn off accessibility
features after idle, and then enter a minutes value, Windows 95 turns off
all accessibility options after the computer has been idle for the specified number
of minutes.
Once set, a user can use the computer's accessibility options and then walk away
from the computer to let someone else use the machine. After the specified number
of minutes, Windows 95 turns off the accessibility options so that the next person
to use the computer (after the time limit passes) will use the computer with no accessibility
options in effect.
Either click off the check mark from this option, or change the minutes value
to suit your working environment.
Figure 18.12.
The General accessibility option dialog box provides remaining accessibility
optioin controls.
JUST A MINUTE: If you know you will be alternating
use of the accessibility options regularly, be sure to check all the shortcut options
on each option so that when you return after the idle period, you don't have to go
through each menu to turn the accessibility options back on.
- 4. The Notification section determines whether or not Windows 95 should
issue the warning dialog box telling you that an accessibility option is turned on
when you press the shortcut key for that option. If you want audible feedback when
an accessibility option starts, be sure to check the second Notification option.
5. If you use an alternative input device that attaches to a serial port, check
the Support SerialKey devices option and click the Settings command
button to inform Windows 95 which serial port the device is attached to and the baud
rate of the device. The alternative input device should contain instructions for
the appropriate values.
Step 3: Review
The General section of the accessibility options determines the final settings for
the accessibility options. You can control how long the computer is idle before Windows
95 turns off any accessibility options. Also, Windows 95 can notify you of any accessibility
options when you click the proper notification options. Finally, you can tell Windows
95 which alternative input devices you use through the SerialKeys options.
Summary
This hour explained how you can control the accessibility options inside Windows
95. Microsoft designed Windows 95 to be accessible to virtually anyone who needs
to use a com-puter, even if that person requires extra help with the keyboard, video
display, or mouse.
The primary keyboard accessibility options control the operation of the modifier
keys (Alt, Ctrl, and Shift). If you have trouble combining a modifier key with another
key, you can request that Windows 95 trap these keystrokes and lock them down when
you press them. Other keyboard accessibility options control the repeat rate and
help eliminate extra keyboard bounce.
All the accessibility options contain audible and visual clues that tell you when
you set or reset these options. The high-contrast display options help improve the
screen's visibility. In addition, you can set up the keyboard to control all mouse
movements in case you're missing a mouse or cannot use a mouse.
Workshop
Term Review
Accessibility TimeOut Turns off the accessibility options after a preset
period of time.
BounceKeys Keeps users from producing double-keystrokes if they accidentally
bounce keys several times in succession.
FilterKeys The group of keystroke aids that includes RepeatKeys and BounceKeys.
high-contrast display A video option that makes your screen more readable
by increasing the size of icons, menus, and text, as well as changing screen colors
so that the items on the display are as readable as possible.
Modifier keys The Alt, Ctrl, and Shift keys.
MouseKeys Lets you simulate mouse movements and clicks using the keyboard's
numeric keypad.
mutually exclusive Two or more Windows 95 controls, such as option buttons,
are mutually exclusive if you can set only one option at a time.
RepeatKeys Users can turn on or off the repetition of keys, so that holding
down a key does not necessarily repeat that keystroke.
Scaleable user interface elements The text, title bars, and icons enlarge
to make them easier to see.
SerialKeys Lets the user use a nonkeyboard input device.
SlowKeys Windows 95 can disregard keystrokes that are not held down for
a preset time period. This aids users who often accidentally press keys.
ShowSounds Provides visual feedback on the screen when applications produce
sounds.
SoundSentry Sends a visual clue when Windows 95 beeps the speaker (in the
case of warning or error message dialog boxes).
StickyKeys Lets the user press the Shift, Alt, or Ctrl keys individually
instead of having to press them with their combined keystrokes.
ToggleKeys Sounds a high noise on the speaker if the CapsLock, NumLock, or
ScrollLock keys are activated and a low noise when these keys are deactivated.
Q&A
- Q How can users who have trouble using the default keyboard interface access
the accessibility options?
A All someone has to do is get help the first time by having another user
display the Control Panel's Accessibility Options tabbed dialog box. Click the option
labeled Use StickyKeys. From that point forward users can activate StickyKeys
by pressing either Shift key five times in a row.
Q How can I remember to turn off StickyKeys when my coworker is finished using the
StickyKeys feature?
A Make sure the Accessibility Options StickyKeys Settings dialog box
has a check next to the option labeled Turn StickyKeys off if two keys are
pressed at once. As soon as you press a modifier key in conjunction with any other
key, Windows 95 turns off StickyKeys.
Q Can I use the accessibility options if I don't have special physical needs that
require accessibility option settings?
A There are times when the accessibility options can benefit all people no
matter what their physical needs are. For example, the SoundSentry and ShowSounds
features are useful for those who work in noisy environments and cannot always hear
the computer's speaker. If you forget your mouse when on the road with a laptop,
you can turn on the MouseKeys option to simulate mouse movements and clicks with
the keyboard.